Imaginez entrer dans un espace où les murs eux-mêmes semblent briller, où l'architecture est mise en évidence, et une ambiance captivante remplit l'air. C’est la puissance des laveuses murales à LED! Ces lumières incroyables ne sont pas seulement une question de luminosité; Il s'agit de transformer des espaces, de créer des humeurs et d'ajouter une touche de magie, que ce soit un salon confortable, une grande façade de bâtiment ou un paysage de jardin luxuriant. Ce guide est votre ressource à guichet unique pour tout ce que vous devez savoir sur les rondelles murales LED - des bases aux techniques avancées. Nous allons tout couvrir, afin que vous puissiez choisir, installer et utiliser ces lumières polyvalentes pour donner vie à votre vision.
I. Introduction
Avez-vous déjà remarqué comment certains bâtiments ou chambres se sentent différents? Souvent, c'est l'éclairage qui fait toute la différence. Les rondelles murales LED sont un type spécial de lumière conçue pour «laver» un mur avec une lueur lisse, voire. Il ne s'agit pas seulement de rendre une pièce plus lumineuse; Il s'agit de changer son apparence et son sens. Pensez-y comme la peinture avec de la lumière!
Ce guide est pour tous ceux qui veulent utiliser l'éclairage pour rendre leurs espaces plus beaux, fonctionnels et sécurisés. Que vous soyez un propriétaire, un architecte d'intérieur, un architecte, quelqu'un qui aime travailler dans sa cour ou un propriétaire d'entreprise, ce guide vous donnera les connaissances dont vous avez besoin.
Nous allons commencer par les principes fondamentaux, puis passer à choisir les bonnes lumières, les installer correctement et même faire preuve de créativité avec différentes idées de conception. Nous examinerons également comment garder vos lumières bien fonctionner pour les années à venir. À la fin de ce guide, vous serez bien équipé pour utiliser des rondelles murales LED pour améliorer tout environnement.
Ii Comprendre l'éclairage de la laveuse murale LED: les bases
A. Qu'est-ce que le lavage des parois?
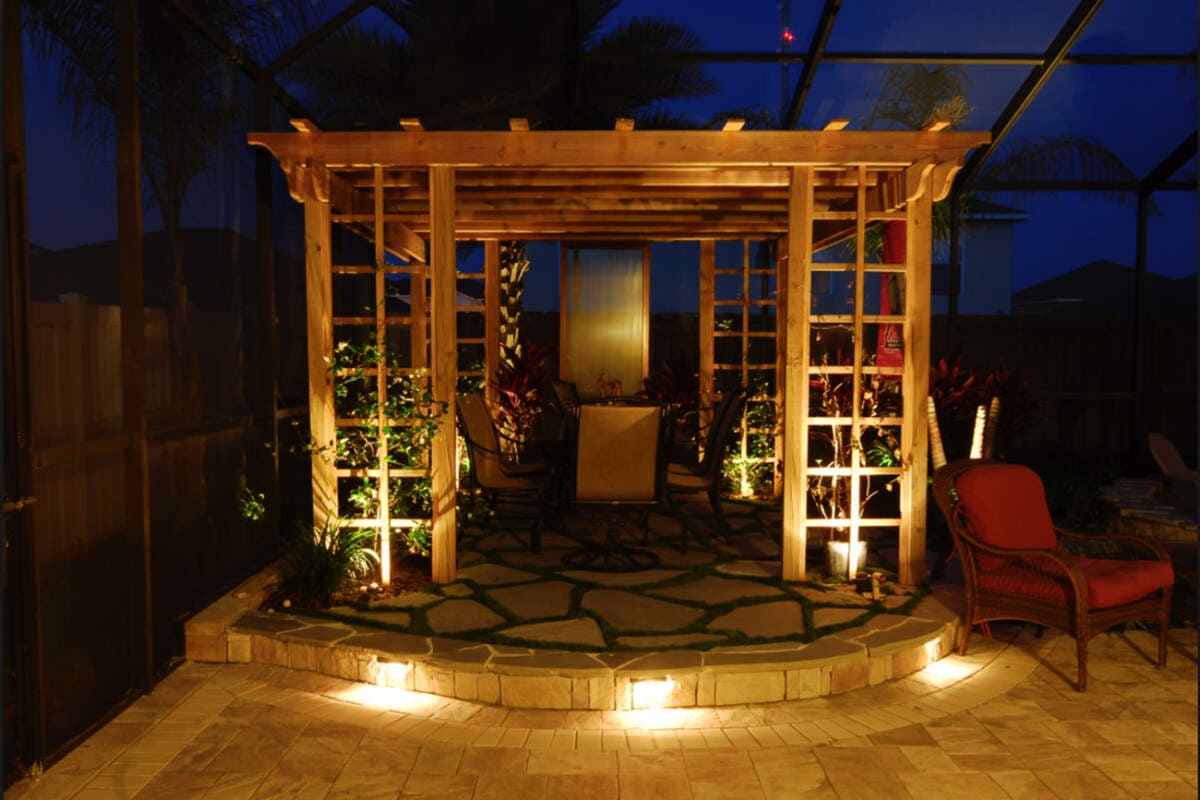
Le lavage des paroi est une technique d'éclairage où vous allumez une surface verticale, comme un mur, uniformément de haut en bas. C’est comme donner au mur un «bain» de lumière. Le but n'est pas seulement de rendre le mur plus lumineux; C'est pour le rendre fluide et même. Cela cache des imperfections mineures et rend l'espace plus ouvert et accueillant.
Pensez-y comme ceci: les lumières régulières créent souvent des taches lumineuses et des ombres. Le lavage mural, en revanche, répand la lumière afin que vous n'obteniez pas ces contrastes difficiles. C’est un effet plus doux et plus subtil.
Comment ça marche? Tout dépend du placement des lumières et du type de luminaire que vous utilisez. Nous allons entrer dans les détails plus tard, mais l'idée de base est de positionner les lumières à une certaine distance du mur et d'utiliser un luminaire qui étale largement la lumière.
Il est important de ne pas confondre le lavage mural avec simplement pointant une lumière vive sur un mur. Cela créera probablement un hotspot, qui est l'opposé de ce que nous voulons!
B. Lavage des parois vs pâturage mural: une distinction cruciale
Bien que le lavage des paroi crée un look lisse et uniforme, le pâturage mural est une question de texture et de drame. Ces deux techniques sont liées, mais elles créent des effets très différents.
Le pâturage mural défini:
Le pâturage mural, c'est comme briller une lumière le long du mur au lieu d'y directement. Cela crée de fortes ombres qui mettent en évidence toute texture à la surface - pensez à la brique, à la pierre ou même au papier peint texturé. C'est un excellent moyen d'ajouter un intérêt visuel et de faire d'un mur un point focal.
Décomposons les différences dans une table:
| Fonctionnalité | Lavage de paroi | Pâturage mural |
|---|---|---|
| Distance entre le mur | Plus (généralement 2,5 à 3 pieds ou plus) | Plus proche (généralement moins de 2 pieds) |
| Angle de faisceau | Plus large | Plus étroit |
| Effet | Éclairage lisse, voire; minimise les imperfections | Met en évidence la texture; Crée des ombres |
| Surface idéale | Murs lisses et plats | Murs texturés (brique, pierre, etc.) |
| But | Pour rendre la pièce plus grande et plus lumineuse, mettant en évidence toute la surface. | Pour mettre en évidence la texture et détaillé, créez une variété visuelle. |
Quand choisir le lavage de mur:
- Vous avez un mur plat et plat que vous voulez donner un aspect plus brillant et plus spacieux.
- Vous souhaitez minimiser les imperfections sur le mur.
- Vous voulez créer un fond doux et uniforme pour les illustrations ou d'autres tentures murales.
- Vous allumez un couloir ou une autre zone où vous avez besoin d'une bonne visibilité.
Quand choisir le pâturage mural:
- Vous avez un mur texturé (brique, pierre, papier peint texturé) que vous voulez accentuer.
- Vous voulez créer un effet dramatique et accrocheur.
- Vous souhaitez ajouter un intérêt visuel à une pièce.
- Vous allumez une cheminée, un mur d'accent ou un mur de caractéristiques.
Pouvez-vous les combiner?
Absolument! En fait, la combinaison du lavage des paroi et du pâturage des parois est un excellent moyen de créer un design d'éclairage en couches et sophistiqué. Par exemple, vous pouvez utiliser le lavage mural pour les murs principaux d'une pièce et un pâturage mural pour mettre en évidence une cheminée en pierre ou un mur d'accent.
C. L'anatomie d'une laveuse murale LED
Pour vraiment comprendre comment ces lumières fonctionnent, jetons un coup d'œil à l'intérieur. Voici les principales parties d'une laveuse murale LED typique:
1. Chips LED:
Ce sont eux-mêmes les minuscules sources lumineuses. Ils sont ce qui rend les lumières LED si économes en énergie et durables. Il existe différents types de puces LED, comme SMD (appareil monté surface) et COB (puce à bord). Les puces SMD sont communes et polyvalentes, tandis que les pubs de COB sont souvent utilisés pour une lumière plus lumineuse et plus ciblée.
Options de couleur:
- Couleur unique: Juste une couleur, comme le blanc ou le blanc chaud.
- RVB: LED rouge, vert et bleu qui peuvent se mélanger pour créer des millions de couleurs.
- RGBW: LED rouge, vert, bleu et blanc. La LED blanche ajoute de la luminosité et permet des nuances plus pastel.
- Blanc accordable: Vous permet d'ajuster la température de couleur de la lumière blanche, du chaud au refroidisseur.
CRI (Index de rendu des couleurs): Ceci est une mesure de la précision de la précision de la lumière montre les vraies couleurs des objets. Un CRI plus élevé (80 ou plus) est meilleur, surtout pour des choses comme les œuvres d'art ou les affichages de détail.
2. Optique:
Ce sont les objectifs ou les réflecteurs qui façonnent la lumière provenant des puces LED. Ils contrôlent l'angle du faisceau, qui est la large ou la étroite que la lumière se propage.
Angle de faisceau:
- Angle de faisceau étroit: Crée un faisceau focalisé de lumière, bon pour le pâturage mural ou mettant en évidence des objets spécifiques.
- Angle de faisceau large: Crée un large lavage de lumière, bon pour le lavage des murs.
Différents types d'optiques peuvent créer différents effets, comme un faisceau net et défini ou une lueur douce et diffuse.
3. Logement:
Il s'agit du boîtier extérieur du luminaire. Il protège les composants internes et donne à la lumière sa forme. Les matériaux courants comprennent l'aluminium (bon pour la dissipation thermique), l'acier inoxydable (durable et résistant aux intempéries) et le plastique (souvent utilisé pour les luminaires intérieurs).
4. Équipement de chaleur:
Les LED, bien que efficaces, produisent toujours de la chaleur. Le dissipateur de chaleur est une partie cruciale qui éloigne la chaleur des copeaux LED, les gardant au frais et prolongeant leur durée de vie. Il est généralement en aluminium et a des nageoires ou des crêtes pour augmenter sa surface.
5. Alimentation conducteur / électricité:
Ceci est le «cerveau» de la laveuse murale LED. Il convertit la puissance électrique entrante (comme de votre sortie murale) dans la tension et le courant corrects pour les LED. Certains pilotes sont intégrés dans le luminaire (interne), tandis que d'autres sont séparés (externes).
tension:
- Basse tension (12V ou 24V): Plus sûr et souvent plus facile à installer, en particulier à l'extérieur. Nécessite un transformateur.
- Tension de ligne (120 V ou 240 V): Tension des ménages standard. Ne nécessite pas de transformateur, mais l'installation peut être plus complexe.
Compatibilité de l'amorçage: Tous les conducteurs ne sont pas dimmables. Si vous souhaitez diminuer vos lumières, assurez-vous que le conducteur est compatible avec le type de gradateur que vous souhaitez utiliser.
6. Système de contrôle:
C'est ainsi que vous contrôlez les lumières. Il peut être aussi simple qu'un interrupteur marche / arrêt, ou il peut être plus complexe, comme un gradateur, une télécommande ou même une application pour smartphone.
Options du système de contrôle
- Interrupteurs de marche / arrêt simples La façon la plus élémentaire de contrôler vos lumières.
- Gisements Vous permettez d'ajuster la luminosité de vos lumières, de créer différentes humeurs et d'économiser de l'énergie.
- Télécommande Offrez un contrôle sans fil pratique sur vos lumières.
- Contrôleurs DMX Utilisé pour des configurations d'éclairage plus complexes, en particulier dans les paramètres commerciaux ou de divertissement. Permettez un contrôle précis sur les luminaires individuels et la création d'effets d'éclairage dynamique.
- Intégration Wi-Fi / Smart Home Contrôlez vos lumières de votre smartphone ou de votre tablette, ou même avec votre voix à l'aide d'un assistant à domicile intelligent.
7. matériel de montage:
C'est ainsi que le luminaire est fixé au mur, au plafond ou au sol. Il existe différents types de supports pour différentes situations de montage.
Options matérielles de montage
- Montage de surface Le luminaire est attaché directement à la surface.
- Montage encastré Le luminaire est placé dans un trou ou une cavité dans la surface, créant un aspect affleurant.
- Supports réglables Vous permettre de modifier l'angle de la lumière après l'installation.
Iii. Les avantages des laveuses murales LED
A. Avantages esthétiques
Les rondelles murales LED ne sont pas seulement pratiques; Ce sont des maîtres de l'esthétique, capables de transformations remarquables.
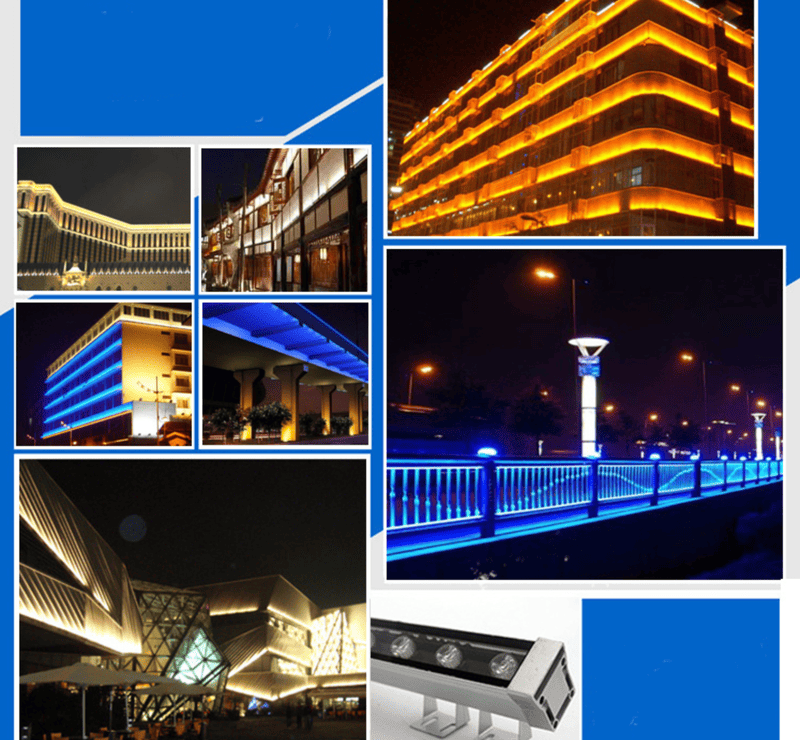
- Amélioration de l'architecture: Ils possèdent la capacité remarquable d'accentuer les textures, les formes et les détails complexes des éléments architecturaux. En jetant la lumière stratégique, ils créent un drame visuel captivant, ce qui rend les bâtiments plus impressionnants et accueillants.
- Définir l'ambiance: Ces lumières polyvalentes sont essentielles pour façonner l'ambiance d'une pièce. Que vous souhaitiez une atmosphère chaude et ajustée ou une ambiance élégante et contemporaine, les rondelles murales LED, en particulier par des ajustements de la température de la couleur, vous permettent d'adapter l'éclairage pour évoquer des émotions spécifiques.
- Attention à l'attention: Les rondelles murales excellent à la mise au point. Ils servent d'outil subtil mais puissant pour mettre en évidence des œuvres d'art, des affichages de vente au détail, une signalisation ou des points focaux que vous souhaitez souligner, garantissant que ces éléments attirent l'attention.
- Création d'intérêt visuel: Même les surfaces apparemment banales gagnent de la profondeur et de la dimension avec le lavage des parois. Le jeu de la lumière et de l'ombre ajoute une touche artistique, transformant les murs plats en expériences visuelles engageantes.
B. Avantages fonctionnels
Au-delà de leur attrait esthétique, les rondelles de mur LED contribuent de manière significative à la fonctionnalité et à la sécurité de divers environnements.
- Amélioration de la visibilité: En éclairant uniformément les espaces, ils améliorent la sécurité et la facilité de navigation. Les ombres et les zones faiblement éclairées sont minimisées, réduisant le risque d'accidents et créant un environnement plus sûr.
- Éclairage de sécurité: Dans les environnements extérieurs, les rondelles murales dissuadent les intrus potentiels en augmentant la visibilité autour des bâtiments. Les extérieurs bien éclairés améliorent la sécurité et créent un sentiment de sécurité.
- Éclairage de tâche: Dans des scénarios spécifiques, ils peuvent fournir un éclairage ciblé pour des activités particulières. Par exemple, ils peuvent être utilisés pour éclairer les espaces de travail, les zones de lecture ou tout endroit où un éclairage concentré est requis.
C. Efficacité énergétique et durabilité
La technologie LED est célébrée pour son éco-convivialité et les rondelles murales illustrent ces avantages.
- Comparaison avec l'éclairage traditionnel: Par rapport aux technologies d'éclairage plus anciennes comme les lumières à incandescence, halogènes ou fluorescentes, les LED sont considérablement plus économes en énergie. Cette efficacité se traduit par des factures d'électricité plus faibles et une empreinte carbone réduite.
- Longue durée de vie: La durée de vie prolongée des rondelles de mur LED signifie des remplacements moins fréquents. Cela permet non seulement d'économiser de l'argent mais réduit également les déchets, contribuant à une approche plus durable.
- Émission de chaleur faible: Les LED émettent une chaleur minimale, qui offre deux avantages. Il réduit la charge sur les systèmes de climatisation, conduisant à d'autres économies d'énergie, et les rend plus sûres pour une utilisation à proximité des matériaux sensibles à la chaleur.
- Matériaux respectueux de l'environnement: Contrairement à certaines options d'éclairage traditionnelles, les LED ne contiennent pas de matières dangereuses comme le mercure, ce qui en fait un choix plus responsable de l'environnement.
D. polyvalence et adaptabilité
La polyvalence des laveuses murales LED est l'un de leurs attributs les plus convaincants.
- Utilisation intérieure et extérieure: Avec des notes IP appropriées (protection d'entrée), ils peuvent être utilisés en toute sécurité dans les environnements intérieurs et extérieurs. Cette adaptabilité les rend adaptés à diverses applications.
- Large gamme d'applications: Leur polyvalence s'étend à de nombreux contextes, notamment des maisons résidentielles, des bâtiments commerciaux, des lieux d'accueil, des espaces de vente au détail et même un éclairage d'événements.
- Options de personnalisation: Avec divers choix de couleur, d'angle de faisceau, de méthodes de contrôle et de styles de montage, les rondelles murales LED peuvent être adaptées pour répondre aux exigences uniques de tout projet.
Iv. Choisir la laveuse murale à LED droite pour votre projet
A. Évaluer vos besoins
Avant de plonger dans les détails techniques, réfléchissons à votre projet spécifique. Se poser ces questions vous aidera à réduire vos choix et à trouver la laveuse murale à LED parfaite:
Répondre à ces questions, c'est comme créer un plan pour votre projet d'éclairage. Il vous guidera vers la laveuse murale LED parfaite.
- Quel est le but de l'éclairage?
«Essayez-vous de créer un accent dramatique, de fournir une lumière ambiante générale, d'améliorer la sécurité et de mettre en évidence un domaine de tâche spécifique? Différentes fins nécessitent des approches d'éclairage différentes.»
- Quelle est la taille et la forme de la zone à éclairer?
"Prenez un ruban à mesurer! Connaître les dimensions du mur ou de la surface que vous voulez allumer est crucial. Cela vous aidera à déterminer le nombre de luminaires dont vous avez besoin et leur luminosité."
- Quelle est la texture et la couleur de la surface?
«Un mur lisse et de couleur claire reflétera la lumière différemment d'un mur rugueux de couleur foncée. La texture et la couleur influencent le choix entre le lavage du mur et le pâturage par mur.»
- Quelle est l'humeur ou l'atmosphère souhaitée?
"Voulez-vous une sensation chaude et confortable? Un look cool et moderne? Une ambiance vibrante et énergique? La température de couleur de la lumière joue ici un grand rôle."
- Quel est votre budget?
«Les rondelles murales LED sont disponibles dans un large éventail de prix. La fixation d'un budget vous aidera à réduire vos options.»
- Quelle est l'infrastructure électrique existante?
«Avez-vous un câblage existant? Quelle tension est disponible? Avez-vous besoin d'ajouter de nouveaux systèmes de câblage ou de contrôle? Ce sont des considérations pratiques importantes.»
- Y a-t-il des codes ou des réglementations du bâtiment à considérer?
«Certaines zones ont des règles sur l'éclairage extérieur, l'efficacité énergétique ou la pollution lumineuse. Assurez-vous que votre projet est conforme aux réglementations locales.»
- Quelle est l'importance de l'efficacité énergétique?
«Si les économies d'énergie sont une priorité, recherchez des luminaires avec des lumens élevés par watt et une longue durée de vie.»
- Avez-vous besoin de capacités de gradation ou de changement de couleur?
"Si vous souhaitez pouvoir ajuster la luminosité ou modifier la couleur des lumières, vous devrez choisir des luminaires et des systèmes de contrôle qui offrent ces fonctionnalités."
- Les lumières seront-elles exposées aux éléments?
«Si les lumières sont à l'extérieur, vous devez choisir les luminaires avec une cote IP appropriée pour les protéger de la poussière et de l'eau.»
- Quelle est la facilité d'installation?
"Si vous n'avez aucune expérience à ce sujet, vous devez envisager d'embaucher un professeur."
B. Spécifications clés à considérer
Maintenant que vous avez pensé à vos besoins, passons aux spécifications techniques des rondelles murales LED. La compréhension de ces spécifications vous aidera à prendre une décision éclairée:
1. Lumidité (lumens):
Les lumens mesurent la quantité de lumière qu'un luminaire produit. Plus de lumens = lumière plus lumineuse. Mais de combien de lumens avez-vous besoin?
Comment calculer les lumens requis:
- Mesurez la zone: Trouvez la superficie (ou les mètres carrés) du mur ou de la surface que vous souhaitez éclairer.
- Considérez le but: pour l'éclairage ambiant général, vous pourriez avoir besoin de 1 à 2 lumens par pied carré. Pour l'éclairage d'accent, vous pourriez avoir besoin de 5 à 10 lumens par pied carré ou même plus.
- Multipliez: Multipliez la zone par les lumens souhaités par pied carré. Cela vous donne une estimation approximative du total des lumens dont vous avez besoin.
Exemple: Un mur de 100 pieds carrés pour l'éclairage d'accent peut nécessiter 500-1000 lumens.
Note importante Ce n'est qu'un point de départ. D'autres facteurs, comme la couleur du mur et l'effet souhaité, peuvent influencer la luminosité requise.
2. Température de couleur (Kelvins):
La température de couleur décrit l'apparence couleur de la lumière blanche. Il est mesuré en Kelvins (K).
Options de température de couleur
- Blanc chaud (2700k-3000K): a une lueur jaunâtre, comme les ampoules à incandescence traditionnelles. Crée une atmosphère confortable et accueillante. Bon pour les salons, les chambres, les restaurants.
- Blanc neutre (3500k-4000K): une lumière blanche plus neutre. Bon pour les cuisines, les salles de bains, les bureaux.
- Blanc frais (5000k-6500K): a une teinte bleue. Crée une atmosphère brillante et énergique. Bon pour l'éclairage de travail, l'éclairage de sécurité, les espaces commerciaux.
Le choix de la bonne température de couleur dépend de l'ambiance que vous souhaitez créer et de la fonction de l'espace.
3. Index de rendu des couleurs (CRI):
Nous avons abordé cela plus tôt. Le CRI mesure comment la lumière montre avec précision les vraies couleurs des objets. Un CRI plus élevé (80 ou plus) est généralement meilleur, en particulier pour les applications où la précision des couleurs est importante (œuvres d'art, affichages de détail, etc.).
4. Angle de faisceau:
L'angle du faisceau détermine la largeur ou la étroite de la propagation de la lumière. Ceci est crucial pour réaliser l'effet souhaité (lavage des paroi ou pâturage mural).
- Angle de faisceau étroit (10-45 degrés): crée un faisceau de lumière focalisé. Bon pour mettre en évidence des fonctionnalités spécifiques ou pour le pâturage mural.
- Angle de faisceau moyen (45-90 degrés): un angle de faisceau plus général.
- Angle de faisceau large (90-120 degrés ou plus): crée un large lavage de lumière. Bon pour le lavage de mur grandes.
Il est essentiel de faire correspondre l'angle du faisceau à la taille et à la forme de la zone que vous souhaitez éclairer. Vous ne voulez pas une poutre trop étroite ou trop large.
5. Note IP:
Ceci est essentiel pour les installations en plein air. La cote IP (Protection Ingress) vous indique à quel point le luminaire est protégé contre la poussière et l'eau.
Répartition de la notation IP
- Premier chiffre: protection contre les objets solides (poussière, saleté, etc.). Varie de 0 (pas de protection) à 6 (étanche).
- Deuxième chiffre: Protection contre les liquides (eau). Varie de 0 (pas de protection) à 8 (protection contre l'immersion dans l'eau).
Notes IP communes pour une utilisation en plein air:
- IP65: Étanche à la poussière et protégé contre les jets d'eau. Bon pour la plupart des applications en plein air.
- IP67: Étanche et protégé contre l'immersion temporaire dans l'eau.
- IP68: Étanche et protégé contre l'immersion continue dans l'eau.
Choisissez toujours un luminaire avec une note IP qui convient à l'environnement où il sera installé.
6. Tension:
Nous en avons discuté brièvement plus tôt. Les deux principales options sont:
- Basse tension (12V ou 24V): plus sûr, plus facile à installer, souvent utilisé pour l'éclairage du paysage. Nécessite un transformateur pour démissionner de la tension de l'alimentation électrique de votre ménage.
- Tension de ligne (120 V ou 240 V): tension domestique standard. Ne nécessite pas de transformateur, mais l'installation peut être plus complexe et doit être effectuée par un électricien qualifié.
Le choix dépend de votre projet, de votre niveau de confort avec des travaux électriques et des codes électriques locaux.
7. Wattage:
La puissance mesure la consommation d'énergie du luminaire. Adoute inférieure = consommation d'énergie moins. Avec les LED, vous pouvez obtenir beaucoup de lumière (lumens) pour une puissance relativement faible.
8. Durée de vie:
Les LED sont connues pour leur longue durée de vie, souvent évaluées pendant 25 000 heures ou plus. Cela signifie que vous n'aurez pas à les remplacer presque aussi souvent que les ampoules traditionnelles.
9. Options de contrôle:
Réfléchissez à la manière dont vous souhaitez contrôler vos lumières. Les options vont des simples interrupteurs marche/arrêt à l’intégration avancée de la maison intelligente.
- DMX : Un protocole de contrôle de qualité professionnelle pour les configurations d'éclairage complexes.
- Wi-Fi : Contrôlez vos lumières depuis votre smartphone ou votre tablette.
- Télécommande: Un moyen pratique de contrôler les lumières sans fil.
- Gradateurs : Ajustez la luminosité de vos lumières.
10. Garantie :
Recherchez un luminaire avec une bonne garantie. Cela montre que le fabricant soutient son produit. Une garantie plus longue est généralement préférable.
C. Choisir le bon type de luminaire
Il existe plusieurs types de lèche-mur LED, chacun avec ses propres avantages et inconvénients :
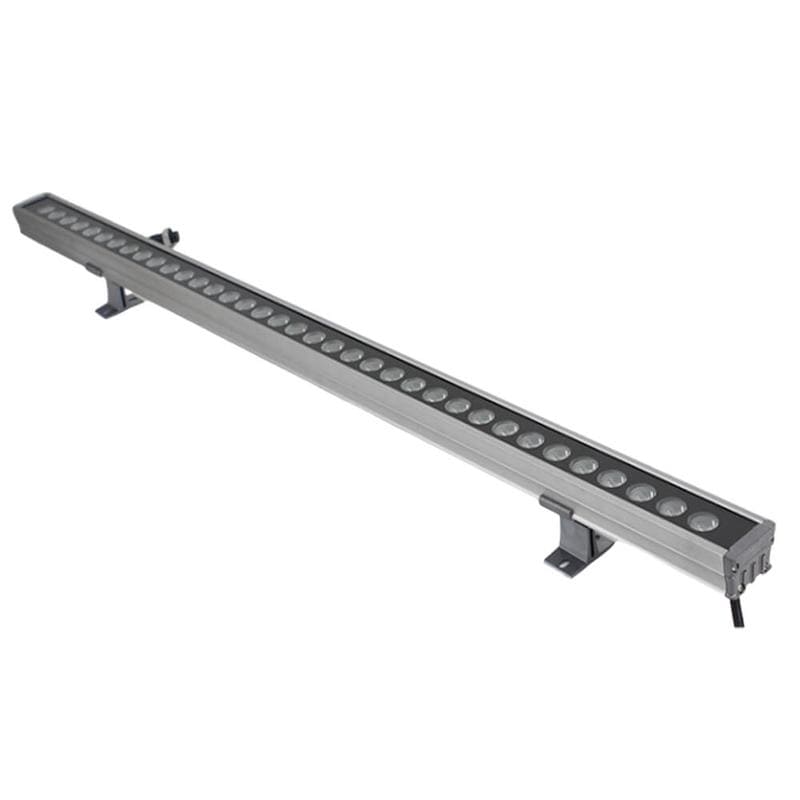
1. Rondelles murales linéaires :
Ce sont des luminaires longs et étroits qui produisent une ligne de lumière continue. Ils sont parfaits pour éclairer de longues étendues de mur ou pour créer un look élégant et moderne.
Avantages :
- Éclairage uniforme sur une longue surface.
- Aspect élégant et moderne.
- Relativement facile à installer.
Désavantages:
- Peut ne pas convenir aux murs très hauts.
- Peut être plus cher que d’autres types de luminaires.
Meilleures applications :
- De longs couloirs.
- Façades extérieures des bâtiments.
- Éclairage sous meuble.
2. Rondelles murales à panneaux :
Ces luminaires sont dotés de plusieurs LED disposées en panneau ou en grille. Ils sont parfaits pour éclairer de grandes surfaces ou pour créer un effet de lumière plus puissant.
Avantages :
- Peut couvrir une grande surface de lumière.
- Sortie haute luminosité.
- Souvent disponible avec des angles de faisceau réglables.
Désavantages:
- Peut être encombrant et moins discret que les autres types de luminaires.
- Peut nécessiter une installation plus complexe.
Meilleures applications :
- Grands murs.
- Éclairage de scène.
- Espaces commerciaux.
3. Rondelles murales réglables :
Ces luminaires ont un support ou un joint qui vous permet d'ajuster l'angle de la lumière. Cela vous donne plus de flexibilité pour diriger la lumière là où vous en avez besoin.
Avantages :
- Polyvalent et adaptable.
- Peut être utilisé à la fois pour le lavage des murs et pour le rasage des murs.
- Permet d'affiner l'effet d'éclairage.
Désavantages:
- Peut être plus cher que les luminaires fixes.
- Peut nécessiter un réglage plus minutieux lors de l'installation.
Meilleures applications :
- Mettre en valeur des œuvres d’art ou des détails architecturaux.
- Créer des effets de lumière dynamiques.
- Situations où les besoins en éclairage peuvent évoluer avec le temps.
4. Lèche-mur encastrés :
Ces luminaires sont installés au mur ou au plafond, créant un look épuré et minimaliste. C’est un bon choix pour les intérieurs modernes.
Avantages :
- Aspect propre et discret.
- Ne prend pas de place sur le mur.
- Idéal pour créer un look élégant et moderne.
Désavantages:
- Installation plus complexe (nécessite de créer une niche dans le mur).
- Peut ne pas convenir à tous les types de murs.
- Peut être plus difficile à ajuster ou à remplacer après l'installation.
Meilleures applications :
- Intérieurs modernes.
- Couloirs.
- Salles de bains.
5. Lèche-murs montés en surface :
Il s’agit du type de lèche-mur le plus courant. Ils sont fixés directement à la surface du mur ou du plafond. Ils sont relativement faciles à installer.
Avantages :
- Facile à installer.
- Polyvalent et adaptable.
- Disponible dans une large gamme de styles et de tailles.
Désavantages:
- Peut-être pas aussi esthétique que les luminaires encastrés.
- Peut être plus vulnérable aux dommages (surtout à l’extérieur).
Meilleures applications :
- La plupart des applications générales de lavage de murs.
- Façades extérieures des bâtiments.
- Éclairage paysager.
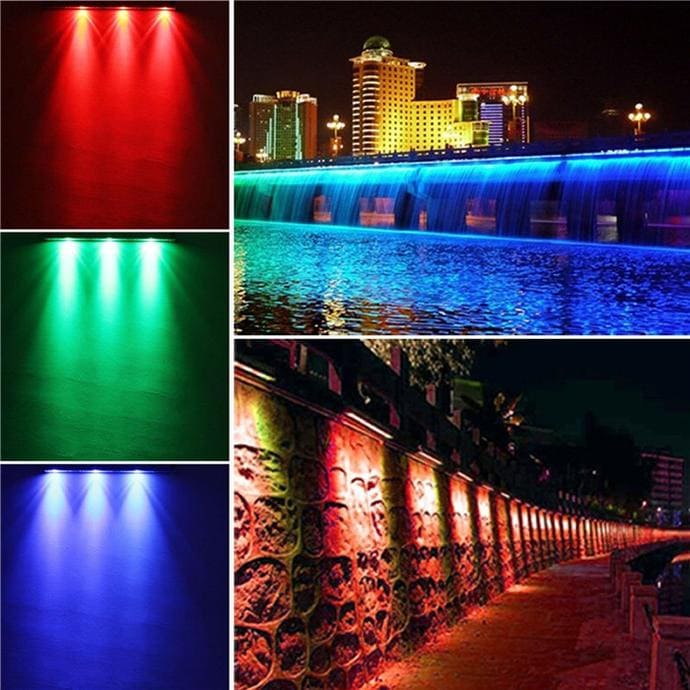
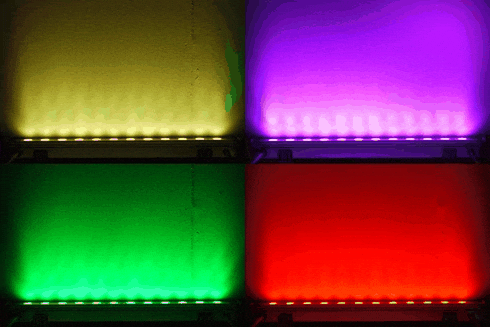
6. RVB/RGBW/Blanc réglable :
Ces options font référence aux capacités de couleur du luminaire :
- RVB: Peut produire des millions de couleurs en mélangeant la lumière rouge, verte et bleue.
- RGBW: Ajoute une LED blanche pour des blancs plus brillants et des nuances plus pastel.
- Blanc accordable: Permet de régler la température de couleur de la lumière blanche (de chaude à froide).
Le meilleur choix dépend de votre projet. Si vous avez juste besoin de lumière blanche, un luminaire monochrome fera l’affaire. Si vous souhaitez créer des effets colorés, choisissez RVB ou RGBW. Si vous souhaitez pouvoir régler la chaleur ou la fraîcheur de la lumière blanche, choisissez le blanc réglable.
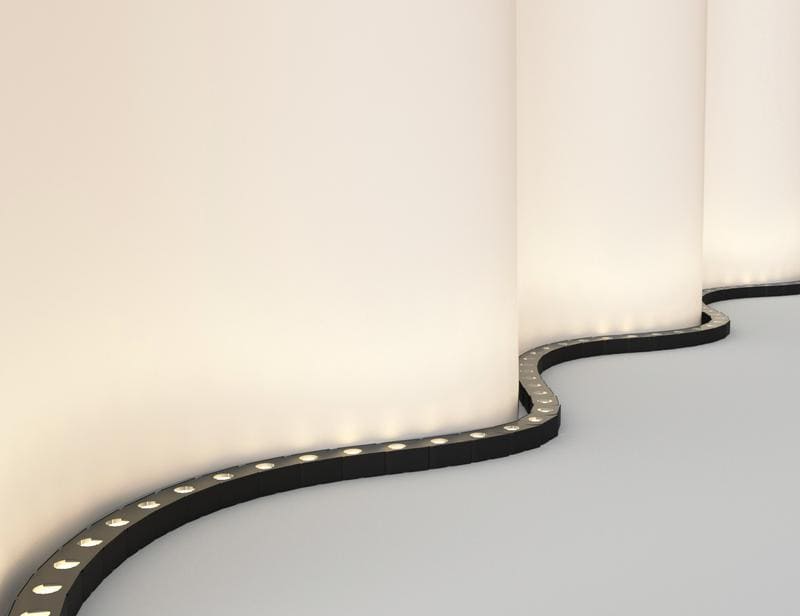
7. Lèche-mur LED rigide vs. Lèche-mur LED flexible
Lèche-mur LED rigide :
- Facteur de forme traditionnel, généralement logé dans un boîtier en aluminium robuste.
- Offre une structure fixe et linéaire.
- Idéal pour les applications nécessitant une ligne de lumière constante et droite.
Lèche-mur LED flexible :
- Innovation moderne, permettant le pliage et le façonnage.
- Très adaptable aux surfaces courbes et aux formes irrégulières.
- Offre une liberté créative en matière de conception, en particulier dans les espaces présentant des caractéristiques non linéaires.
D. Considérez l'effet de lumière
Lavage des murs :
- Crée une répartition large et uniforme de la lumière sur toute la surface.
- Minimise les ombres et les imperfections, produisant une apparence lisse et uniforme.
- Idéal pour rendre les espaces plus grands et plus lumineux.
Pâturage des murs :
- Souligne la texture et crée des ombres spectaculaires.
- Met en valeur les détails architecturaux et le caractère de la surface.
- Convient pour ajouter un intérêt visuel et de la profondeur à un espace.
V. Installation et placement: maîtriser l'art de l'éclairage
A. Planification de votre installation
Avant même de toucher à un luminaire, il faut un plan ! Une planification minutieuse vous fera gagner du temps, des efforts et vous évitera des maux de tête potentiels à long terme.
1. Création d'un plan d'éclairage :
Ne commencez pas simplement à fixer des lumières au hasard. Prenez le temps de réfléchir à ce que vous voulez réaliser et à la meilleure façon d’y parvenir.
Comment créer un plan d'éclairage
- Esquissez la zone : dessinez un croquis du mur, de la pièce ou de l’espace extérieur que vous éclairez.
- Identifiez les points focaux : que souhaitez-vous mettre en évidence ? Une œuvre d’art ? Caractéristiques architecturales ? Plantes?
- Déterminez l'effet souhaité : souhaitez-vous un lavage ou un effleurement des murs ? Quelle ambiance souhaitez-vous créer ?
- Choisissez les types de luminaires : en fonction de vos besoins et de l'effet souhaité, sélectionnez les types de lèche-mur LED appropriés.
- Marquer l'emplacement des luminaires : Sur votre croquis, marquez l'endroit où vous prévoyez d'installer chaque luminaire. Tenez compte de la distance par rapport au mur, de l’espacement entre les luminaires et de l’angle de la lumière.
- Calculer les distances et les angles : utilisez les directives dont nous avons discuté précédemment pour déterminer l'emplacement optimal pour chaque
fixation.
2. Considérations électriques :
La sécurité avant tout ! Les installations d’éclairage nécessitent de l’électricité, il est donc crucial de prendre les précautions nécessaires.
Considérations électriques importantes
- Exigences de câblage : avez-vous besoin d’installer un nouveau câblage ? Si tel est le cas, consultez un électricien qualifié.
- Capacité du circuit : assurez-vous que vos circuits existants peuvent supporter la charge supplémentaire des nouvelles lumières. Ne surchargez pas les circuits !
- Précautions de sécurité : coupez toujours l'alimentation au niveau du boîtier de disjoncteurs avant de travailler sur un câblage électrique. Utiliser un équipement de sécurité approprié (gants, lunettes de protection).
- Embauche d’un électricien : Si vous n’êtes pas à l’aise avec l’électricité, engagez un électricien qualifié. Il vaut mieux prévenir que guérir. L'aide d'un professionnel est fortement recommandée, en particulier pour les installations à tension secteur ou les câblages complexes.
3. Outils et matériels :
Rassemblez tout ce dont vous avez besoin avant de commencer l'installation. Cela vous fera gagner du temps et vous évitera de la frustration.
Outils et matériaux essentiels
- Luminaires lèche-mur à LED
- Matériel de montage (vis, supports, etc.)
- Percez (avec des forets adaptés à votre type de mur)
- Tournevis (correspondant aux vis)
- Pinces à dénuder/coupes-fils
- Connecteurs de fils (serre-fils ou autres connecteurs appropriés)
- Ruban électrique
- Niveau
- Mètre à ruban
- Crayon
- Lunettes de sécurité
- Gants
- Testeur de tension (pour s'assurer que l'alimentation est coupée)
- Échelle (si nécessaire)
- (Facultatif) Conduits et raccords de conduits (si le câblage passe sur la surface du mur)
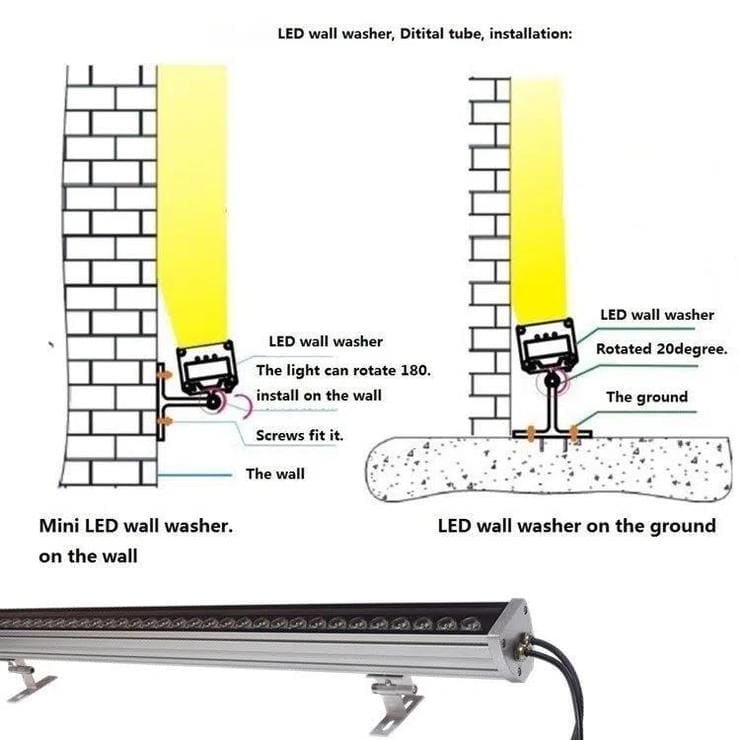
B. Techniques de montage
La technique de montage spécifique dépendra du type de luminaire et de la surface sur laquelle vous le fixez. Voici quelques méthodes courantes :
1. Montage en surface :
C'est la méthode la plus simple. Le luminaire se fixe directement à la surface du mur, du plafond ou du sol.
Instructions étape par étape (montage en surface) :
- Coupez l’alimentation : Au niveau du coffret de disjoncteurs.
- Marquez l'emplacement : utilisez un crayon et un niveau pour marquer l'endroit où vous souhaitez installer le luminaire.
- Percez des avant-trous : Si nécessaire (en fonction du matériau du mur et du type de vis), percez des avant-trous aux emplacements marqués.
- Fixez le support de montage : Si le luminaire dispose d'un support de montage séparé, fixez-le au mur à l'aide de vis.
- Connectez le câblage : connectez les fils du luminaire aux fils d'alimentation électrique, à l'aide de connecteurs de fils appropriés. Suivez attentivement les instructions du fabricant.
- Fixez le luminaire : fixez le luminaire au support de montage (ou directement au mur s'il n'y a pas de support séparé).
- Testez la lumière : remettez l’appareil sous tension et testez la lumière.
Conseils pour une installation sécurisée :
- Utilisez des vis adaptées au matériau du mur (par exemple, des vis à bois pour le bois, des vis à maçonnerie pour le béton).
- Utilisez des ancrages muraux si nécessaire (en particulier pour les cloisons sèches).
- Assurez-vous que le luminaire est solidement fixé et ne vacille pas.
- Pour les installations extérieures, utilisez des connecteurs résistants aux intempéries et un produit d'étanchéité pour protéger le câblage.
2. Montage encastré :
Cette méthode crée un aspect plus propre et plus intégré, mais elle est plus complexe à installer.
Instructions étape par étape (montage encastré) :
- Coupez l’alimentation : Au niveau du coffret de disjoncteurs.
- Marquez l'emplacement : utilisez un crayon et un niveau pour marquer le contour de la niche que vous devez créer.
- Découper l'évidement : Découpez soigneusement le trou dans le mur ou le plafond, à l'aide d'une scie appropriée (par exemple, une scie à cloisons sèches pour cloisons sèches).
- Installez un boîtier de montage (si nécessaire) : Certains luminaires encastrés nécessitent l'installation d'un boîtier de montage spécial dans la niche.
- Faites passer le câblage : Acheminez les fils d'alimentation jusqu'à l'évidement.
- Connectez le câblage : connectez les fils du luminaire aux fils d'alimentation électrique, à l'aide de connecteurs de fils appropriés.
- Insérez le luminaire : Insérez soigneusement le luminaire dans la niche.
- Fixez le luminaire : utilisez les clips ou les vis fournis pour fixer le luminaire en place.
- Testez la lumière : remettez l’appareil sous tension et testez la lumière.
Assurer un bon ajustement :
- Mesurez soigneusement avant de découper l'évidement.
- Utilisez un gabarit (si fourni) pour garantir la taille et la forme correctes de l'évidement.
- Testez le luminaire avant de connecter le câblage.
3. Supports réglables :
De nombreux lèche-murs sont livrés avec des supports réglables qui vous permettent de modifier l'angle de la lumière après l'installation. C’est idéal pour affiner l’effet d’éclairage.
Comment régler l'angle :
- Desserrez les vis ou les boulons qui maintiennent le support en place.
- Ajustez l'angle du luminaire à la position souhaitée.
- Serrez les vis ou les boulons pour fixer le luminaire en place.
4. Montage au sol (pour l'éclairage paysager) :
Pour éclairer les arbres, les arbustes ou d’autres éléments du paysage, vous utiliserez souvent des luminaires montés au sol.
Conseils d'installation
- Utilisez des piquets ou des supports au sol conçus pour une utilisation en extérieur.
- Assurez-vous que le luminaire est solidement ancré dans le sol.
- Enterrez le câblage basse tension à au moins 6 pouces de profondeur pour le protéger des dommages.
- Utilisez des connecteurs étanches pour toutes les connexions de câblage.
C. Câblage et connexions
Un câblage approprié est essentiel pour la sécurité et pour garantir le bon fonctionnement de vos lumières.
1. Câblage basse tension :
Les systèmes basse tension (12 V ou 24 V) sont généralement plus sûrs et plus faciles à utiliser que les systèmes à tension secteur.
Instructions étape par étape (câblage basse tension) :
- Couper l'alimentation : Au niveau du transformateur.
- Connectez le câble basse tension au transformateur : Suivez attentivement les instructions du transformateur.
- Acheminez le câble jusqu'aux emplacements des luminaires : enterrez le câble sous terre ou cachez-le d'une autre manière.
- Dénudez les extrémités des fils : utilisez une pince à dénuder pour exposer environ ½ pouce de fil nu.
- Connectez les fils au luminaire : utilisez des connecteurs de fils étanches pour connecter les fils du câble aux fils du luminaire. Faites correspondre la polarité (positive à positive, négative à négative).
- Testez les connexions : remettez l’appareil sous tension et testez la lumière.
Utilisation de connecteurs étanches :
- Les connecteurs étanches sont essentiels pour les installations extérieures. Ils protègent le câblage de l'humidité et de la corrosion.
- Il existe différents types de connecteurs étanches, notamment les connecteurs remplis de gel et les connecteurs thermorétractables. Choisissez le type qui convient le mieux à votre projet.
2. Câblage de tension de ligne :
Les systèmes à tension secteur (120 V ou 240 V) nécessitent plus de prudence. Si vous n’êtes pas à l’aise avec la tension secteur, engagez un électricien qualifié.
Précautions de sécurité :
- Coupez toujours l’alimentation au niveau du boîtier de disjoncteurs avant de travailler sur un câblage électrique.
- Utilisez un testeur de tension pour confirmer que l'alimentation est coupée.
- Suivez tous les codes électriques locaux.
- Utilisez des connecteurs de fils appropriés et du ruban isolant.
- En cas de doute, consultez un électricien qualifié.
Embaucher un électricien
- Installations complexes : Pour les configurations complexes, plusieurs luminaires ou un éclairage encastré, une aide professionnelle garantit une installation sûre et conforme au code.
- Systèmes de tension de ligne : Si vous n’êtes pas à l’aise avec la haute tension, l’expertise d’un électricien est cruciale pour votre sécurité.
- Incertitude: En cas de doute, il est toujours préférable de faire preuve de prudence et de demander l’aide d’un professionnel.
3. Connexion à un système de contrôle :
Si vous utilisez un système de contrôle (DMX, Wi-Fi, etc.), vous devrez connecter les lumières au contrôleur.
Connexion à un système de contrôle (DMX, Wi-Fi, télécommande)
- Câblage DMX : DMX utilise un type spécial de câble (généralement un câble XLR). Vous devrez connecter les appareils dans une configuration « en guirlande », en suivant les instructions du contrôleur.
- Configuration Wi-Fi : Suivez les instructions du fabricant pour connecter les lumières à votre réseau Wi-Fi. Vous utiliserez généralement une application pour smartphone pour contrôler les lumières.
- Appairage de la télécommande : Suivez les instructions du fabricant pour coupler la télécommande avec les lumières.
D. Stratégies de placement pour un effet optimal
L’endroit où vous placez vos lumières est tout aussi important que le type de lumières que vous choisissez. Voici quelques stratégies de placement pour vous aider à obtenir les meilleurs résultats :
1. Distance du mur (lavage des murs) :
La distance entre le luminaire et le mur est un facteur clé pour obtenir un bon effet de lavage du mur.
| Hauteur du mur | Distance recommandée du mur |
|---|---|
| 8 pieds | 2 à 2,5 pieds |
| 9 pieds | 2,5 à 3 pieds |
| 10 pieds | 3 à 3,5 pieds |
| plus de 10 pieds | 4+ pieds (Expérimentez !) |
Ce ne sont que des points de départ. Vous devrez peut-être ajuster la distance en fonction du luminaire spécifique, de l'angle du faisceau et de l'effet souhaité. L'expérimentation est la clé !
2. Distance du mur (pâturage du mur) :
Pour un éclairage rasant les murs, vous souhaitez que les lumières soient beaucoup plus proches du mur.
Ligne directrice générale :
- Placez les luminaires à moins de 6 à 12 pouces du mur. Plus le luminaire est proche, plus la texture et les ombres seront prononcées.
Encore une fois, l'expérimentation est importante. Essayez différentes distances pour voir ce qui convient le mieux à votre mur et à votre luminaire.
3. Espacement entre les luminaires :
L’espacement entre les luminaires détermine la répartition uniforme de la lumière.
Ligne directrice générale :
- Pour l’éclairage mural, un bon point de départ consiste à espacer les luminaires à peu près à la même distance qu’ils le sont par rapport au mur. Donc, si les luminaires sont à 3 pieds du mur, espacez-les d’environ 3 pieds.
- Pour raser les murs, vous pouvez souvent rapprocher les luminaires, car l’objectif est de créer des faisceaux de lumière superposés qui mettent en valeur la texture.
Éviter les points chauds et les ombres :
- Un espacement trop important peut créer des points sombres entre les luminaires.
- Un espacement trop faible peut créer des points chauds (zones de lumière trop vive).
- La meilleure façon de trouver l’espacement optimal est d’expérimenter. Allumez les lumières et observez l'effet. Ajustez l’espacement selon vos besoins.
4. Angle d'incidence :
Il s'agit de l'angle selon lequel la lumière frappe le mur. Cela affecte l’apparence de la surface.
- Pour l'éclairage mural : vous souhaitez généralement un angle d'incidence relativement large, afin que la lumière se répartisse uniformément.
- Pour le rasage des murs : vous souhaitez un angle d'incidence très étroit, afin que la lumière parcourt la surface, créant des ombres.
5. Superposition de lumière :
N’ayez pas peur de combiner les lèche-murs avec d’autres types d’éclairage. Cela peut créer un effet plus dynamique et intéressant.
Idées de superposition de lumière
- Utilisez des lèche-murs pour fournir une lumière ambiante générale, puis ajoutez des projecteurs pour mettre en valeur des éléments spécifiques (comme des œuvres d'art ou des détails architecturaux).
- Utilisez des lèche-murs pour éclairer un mur, puis ajoutez des luminaires à la base du mur pour créer un effet rasant spectaculaire.
- Combinez l’éclairage mural avec des downlights pour créer un système d’éclairage équilibré et superposé.
E. Étapes pour sélectionner un lèche-mur LED
Étape 1 : décidez de l'effet dont vous avez besoin
- Tout d’abord, vous devez décider de l’effet souhaité. Si votre mur est plat, vous pouvez opter pour une technique de lavage de mur pour éclairer tout le mur et agrandir la pièce.
- Si votre mur a une texture particulière, la technique d’observation du mur est une bonne option pour mettre en valeur la texture.
Étape 2 : Sélectionnez les motifs de couleur
- L'éclairage mural à LED peut être blanc statique, blanc réglable, RVB ou RGBW, en fonction de votre demande et de votre budget.
- Pour une sensation chaleureuse et confortable, optez pour des tons de couleurs plus chaudes de 2 400 000 à 3 000 000. Pendant ce temps, si vous souhaitez donner à votre éclairage un style rafraîchissant et calme, toute température de couleur comprise entre 5 000 K et 6 000 K serait la meilleure.
Étape 3 : prendre des mesures
- Utilisez un ruban à mesurer, mesurez la longueur de la zone d'éclairage. Cela vous donne une idée de la durée de lumière dont vous avez besoin pour votre projet d'éclairage.
- L'applique murale LED flexible est votre meilleur choix en raison de son option personnalisable. Ils s’adaptent parfaitement, quelle que soit la taille de votre zone d’éclairage.
Étape 4 : Consultez une marque de confiance
- Après avoir décidé de ce dont vous avez besoin pour votre projet d’éclairage, consultez une marque de confiance fabriquant des éclairages muraux à LED. Vous pouvez demander des lèche-murs LED personnalisés selon vos besoins et voir les offres qu'ils vous proposent.
- Sélectionnez l’éclairage mural LED qui correspond le mieux à vos besoins.
Vi. Idées et applications de conception créative
Passons maintenant à la partie amusante ! Explorons quelques façons créatives d'utiliser les lèche-murs LED pour améliorer vos espaces.
A. Éclairage architectural
Les lèche-murs LED sont parfaits pour mettre en valeur la beauté des bâtiments.
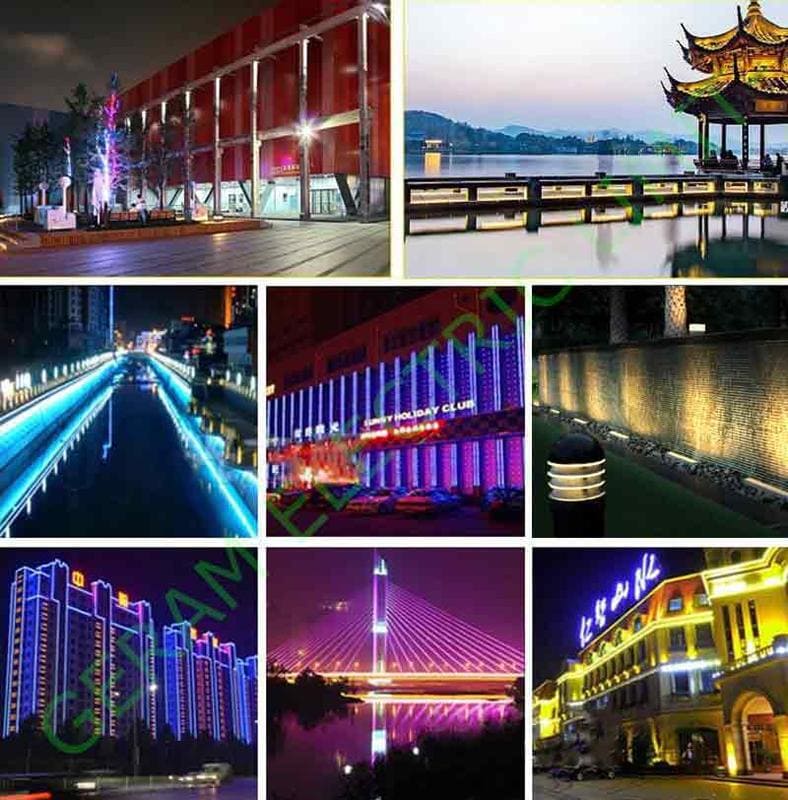
1. Mise en valeur des façades :
Utilisez des lèche-murs pour éclairer les murs extérieurs d'un bâtiment, créant ainsi une présence nocturne spectaculaire et invitante.
Techniques pour différents styles de construction :
- Bâtiments modernes : utilisez une lumière blanche froide et des luminaires élégants et minimalistes pour un look épuré et contemporain.
- Bâtiments traditionnels : utilisez une lumière blanche chaude et des luminaires plus ornés pour compléter l’architecture classique.
- Bâtiments historiques : utilisez le rasage des murs pour mettre en valeur la texture de la pierre ou de la maçonnerie. Pensez à utiliser une lumière ambrée ou blanche chaude pour créer une atmosphère authentique et historique.
2. Mettre l'accent sur les détails architecturaux :
Utilisez des lèche-murs pour attirer l'attention sur des éléments spécifiques, comme des colonnes, des arcs, des corniches ou des éléments décoratifs.
Utiliser des lèche-murs pour les détails architecturaux
- Utilisez des angles de faisceau étroits pour créer des faisceaux de lumière focalisés.
- Utilisez des luminaires réglables pour affiner l’effet d’éclairage.
- Pensez à utiliser différentes couleurs de lumière pour mettre en valeur différentes caractéristiques.
3. Création de silhouettes :
Placez les lèche-murs derrière des éléments architecturaux (comme des colonnes ou des statues) pour créer des silhouettes saisissantes sur un fond éclairé.
4. Bâtiments de lavage de couleurs :
Utilisez des luminaires RVB ou RGBW pour créer des effets dynamiques de changement de couleur sur les façades des bâtiments. C'est idéal pour des événements spéciaux ou pour créer une identité de marque mémorable.
5.Pâturage ou lavage sur le bâtiment
- Si vous souhaitez agrandir le bâtiment, la technique de lavage est une bonne option.
- Si votre bâtiment a une texture particulière, le pâturage est plus approprié.
B. Éclairage paysager
Les lèche-murs à LED peuvent transformer vos espaces extérieurs en paysages nocturnes magiques.
1. Illuminer les arbres et arbustes :
Utilisez l’éclairage vers le haut pour créer un effet dramatique, mettant en valeur la forme et la texture des arbres et des arbustes.
Uplighting, downlighting, silhouette :
- Éclairage vers le haut : placez les luminaires à la base de l’arbre ou de l’arbuste, pointant vers le haut.
- Éclairage vers le bas : Montez les luminaires en hauteur (dans un arbre ou sur un bâtiment) et dirigez-les vers le bas, créant un effet « clair de lune ».
- Silhouette : placez les luminaires derrière l'arbre ou l'arbuste, créant une silhouette sur un fond éclairé.
2. Mise en évidence des sentiers et des passerelles :
Utilisez des lèche-murs pour fournir un éclairage sûr et attrayant pour les chemins et les allées.
Sécurité et esthétique :
- Utilisez un éclairage de faible intensité pour éviter l’éblouissement.
- Choisissez des luminaires qui se fondent dans le paysage.
- Pensez à utiliser des détecteurs de mouvement pour allumer automatiquement les lumières lorsque quelqu'un s'approche.
3. Création de points focaux :
Utilisez des lèche-murs pour attirer l'attention sur les sculptures, les jeux d'eau ou d'autres éléments du jardin.
4. Effet de clair de lune :
Créez une lueur douce et naturelle en montant les luminaires en hauteur dans les arbres et en les pointant vers le bas, imitant la lumière de la lune.
C. Éclairage intérieur
Les lèche-murs LED peuvent également être utilisés à l’intérieur pour créer des effets époustouflants.
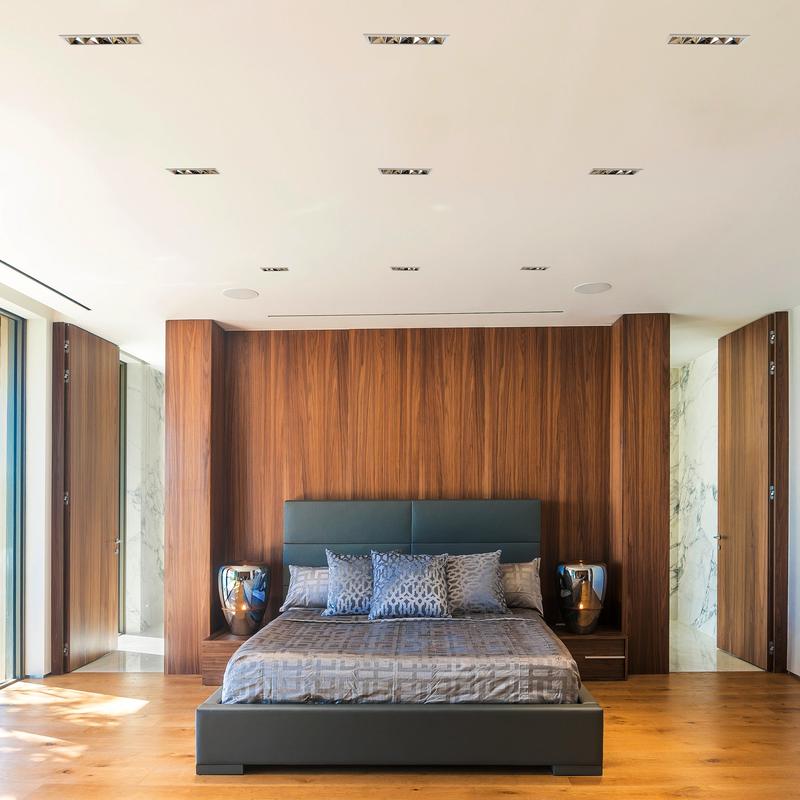
1. Murs d’accent :
Utilisez le lavage des murs ou le rasage des murs pour faire ressortir un mur d'une pièce. C'est un excellent moyen d'ajouter un intérêt visuel et de créer un point focal.
2. Mise en valeur des œuvres d'art :
Utilisez des lèche-murs pour éclairer des peintures, des sculptures ou d'autres œuvres d'art. Cela les fera se démarquer et les montrera sous leur meilleur jour.
Considérations importantes :
- Utilisez une source de lumière à IRC élevé pour garantir une représentation précise des couleurs.
- Évitez de placer les luminaires trop près de l’œuvre d’art, car cela pourrait créer des points chauds ou endommager l’œuvre d’art.
- Pensez à utiliser des luminaires réglables pour affiner l’effet d’éclairage.
3. Créer une ambiance dans les espaces de vie :
Utilisez l’éclairage mural pour créer une atmosphère douce, chaleureuse et invitante dans les salons et les chambres.
Éclairage pour différentes pièces
- La lumière blanche et chaude est généralement la meilleure solution pour créer une atmosphère chaleureuse et relaxante.
- Les capacités de gradation sont essentielles pour ajuster la luminosité en fonction des différentes activités et ambiances.
4. Éclairage de travail dans les cuisines et les salles de bains :
Utilisez des lèche-murs pour fournir un éclairage ciblé pour des tâches spécifiques, comme cuisiner ou se maquiller.
- La lumière blanche froide est souvent préférée pour l’éclairage de travail, car elle offre une meilleure visibilité.
- Pensez à utiliser des luminaires réglables pour diriger la lumière là où vous en avez le plus besoin.
D. Éclairage commercial et de détail
Les lèche-murs à LED peuvent aider les entreprises à attirer des clients et à créer une expérience d'achat positive.
1. Attirer des clients :
Utilisez des effets de lavage des murs ou de changement de couleur pour rendre les vitrines et les présentoirs plus accrocheurs.
2. Mise en avant des marchandises :
Utilisez des lèche-murs pour attirer l'attention sur des produits spécifiques, les rendant ainsi plus attrayants pour les clients.
3. Créer une atmosphère accueillante :
Utilisez un éclairage chaleureux et invitant pour améliorer l’expérience client et les encourager à rester plus longtemps.
4. Éclairage de signalisation :
Rendez vos panneaux plus faciles à lire en les lavant à la lumière.
E. Éclairage pour événements et divertissements
Les lèche-murs à LED sont un élément essentiel de l'éclairage des événements et des divertissements.
1. Éclairage de scène :
Utilisez des lèche-murs pour créer des effets dynamiques et colorés sur scène, ajoutant ainsi de l'excitation et un intérêt visuel aux performances.
2. Éclairage pour les mariages et les fêtes :
Utilisez des lèche-murs pour ajouter de l'élégance et de l'ambiance aux espaces événementiels. L’éclairage de colonnes, de murs ou de tentures peut créer une atmosphère magique.
3. Effets de changement de couleur :
Utilisez des luminaires RVB ou RGBW pour créer des affichages dynamiques aux couleurs changeantes qui peuvent être synchronisés avec de la musique ou d'autres signaux.
Vii. Entretien, dépannage et longévité
Pour conserver l'apparence et les performances optimales de vos lèche-murs LED, suivez ces conseils d'entretien et de dépannage :
A. Entretien régulier
1. Nettoyage :
La poussière, la saleté et les débris peuvent s'accumuler à la surface des lèche-murs à LED, réduisant ainsi leur rendement lumineux et pouvant potentiellement provoquer leur surchauffe. Un nettoyage régulier est indispensable, notamment pour les luminaires extérieurs.
- Coupez l’alimentation : coupez toujours l’alimentation des luminaires avant de les nettoyer.
- Utilisez un chiffon doux : Essuyez délicatement la surface du luminaire avec un chiffon doux et humide. Évitez d'utiliser des nettoyants abrasifs ou des produits chimiques agressifs, car ils pourraient endommager la finition.
- Nettoyer la lentille : si le luminaire est équipé d'une lentille, utilisez un nettoyant pour lentille ou une solution d'eau et de savon doux pour éliminer toute saleté ou crasse.
- Vérifiez s'il y a des obstructions : assurez-vous qu'il n'y a pas de feuilles, de branches ou d'autres objets qui bloquent la lumière.
2. Inspection des connexions :
Des connexions de câblage desserrées ou corrodées peuvent provoquer des lumières vacillantes, voire une panne complète. Vérifiez périodiquement les connexions de câblage pour vous assurer qu’elles sont sécurisées et exemptes de corrosion.
- Coupez l’alimentation : coupez toujours l’alimentation avant d’inspecter un câblage.
- Vérifiez les fils lâches : tirez doucement sur chaque fil pour vous assurer qu’il est bien connecté.
- Recherchez des signes de corrosion : si vous voyez de la corrosion (accumulation de poudre verte ou blanche), nettoyez la connexion avec une brosse métallique et appliquez un inhibiteur de corrosion.
- Serrez toutes les connexions desserrées : utilisez un tournevis ou une pince pour serrer les vis ou les serre-fils desserrés.
3. Vérification des dommages :
Inspectez régulièrement les luminaires pour déceler tout signe de dommage physique, tel que des fissures, des bosses ou des lentilles cassées.
- Recherchez tout signe de dégât des eaux, en particulier pour les luminaires extérieurs.
- Si vous constatez des dommages, réparez ou remplacez le luminaire dès que possible.
4. Fonctionnalité de test :
Testez périodiquement les lumières pour vous assurer que toutes les LED fonctionnent correctement et que toutes les fonctions de gradation ou de changement de couleur fonctionnent comme prévu.
B. Dépannage des problèmes courants
Voici quelques solutions aux problèmes courants que vous pourriez rencontrer avec les lèche-murs à LED :
1. Les lumières ne s’allument pas :
Si les lumières ne s'allument pas, la première étape consiste à vérifier l'alimentation électrique. Assurez-vous que le disjoncteur n'est pas déclenché et que la prise (le cas échéant) fonctionne. Ensuite, examinez les connexions de câblage du luminaire pour vous assurer qu’elles sont sécurisées. Si le problème persiste, le problème peut provenir de l'appareil lui-même ou du pilote. Essayez de remplacer le pilote ou consultez un professionnel.
2. Lumières vacillantes :
Les lumières scintillantes peuvent être causées par plusieurs facteurs. Vérifiez le câblage pour détecter les connexions desserrées, qui sont un coupable courant. Les fluctuations de tension peuvent également provoquer un scintillement, notamment avec les LED à intensité variable. Utilisez un régulateur de tension si les fluctuations constituent un problème constant. Enfin, assurez-vous que le variateur (le cas échéant) est compatible avec les lumières LED, car une incompatibilité peut entraîner un scintillement.
3. Problèmes de gradation :
Si la gradation ne fonctionne pas correctement, la première étape consiste à vérifier la compatibilité entre les luminaires LED et le variateur. Tous les gradateurs ne fonctionnent pas bien avec toutes les LED. Si la compatibilité n'est pas le problème, vérifiez les connexions de câblage pour déceler du jeu ou de la corrosion. Si le problème persiste, le gradateur lui-même est peut-être défectueux et doit être remplacé.
4. Incohérences de couleur :
Des incohérences de couleur entre les luminaires peuvent survenir si les LED proviennent de lots différents ou se sont dégradées différemment. Essayez d'utiliser des luminaires du même fabricant et du même lot pour lesquels la correspondance des couleurs est essentielle. Pour les appareils RVB ou RGBW, vérifiez les paramètres de contrôle pour vous assurer qu'ils sont correctement configurés. Si des LED individuelles tombent en panne, l'ensemble du luminaire ou du module LED devra peut-être être remplacé.
5. Dégâts des eaux :
Les signes de dégâts d'eau comprennent un scintillement, une atténuation ou une panne complète de la lumière, souvent accompagnés d'humidité ou de corrosion visible à l'intérieur du luminaire. Pour les luminaires extérieurs, assurez-vous qu’ils disposent d’un indice IP approprié à leur environnement. Si des dégâts d’eau sont détectés, coupez immédiatement l’alimentation. Inspectez et remplacez les joints ou les joints s’ils sont endommagés. Dans les cas graves, l’ensemble du luminaire devra peut-être être remplacé.
C. Prolonger la durée de vie de vos lèche-murs LED
Suivez ces conseils pour maximiser la durée de vie de vos lèche-murs LED :
1. Installation correcte :
Suivez attentivement les instructions du fabricant lors de l’installation des luminaires. Assurez-vous qu'ils sont solidement montés et que toutes les connexions de câblage sont correctes.
2. Gestion de la chaleur :
Les LED sont sensibles à la chaleur. Assurez-vous que les luminaires disposent d'une ventilation adéquate et ne sont pas installés dans des espaces clos où la chaleur peut s'accumuler.
- Évitez d'installer des luminaires à proximité de sources de chaleur (comme d'autres lumières ou bouches de chauffage).
- Si les luminaires sont équipés de dissipateurs thermiques, assurez-vous qu'ils sont propres et exempts de débris.
3. Régulation de tension :
Les fluctuations de tension peuvent endommager les LED. Utilisez un parasurtenseur pour protéger les luminaires des surtensions.
- Si vous vivez dans une zone où les pannes de courant ou les fluctuations de tension sont fréquentes, envisagez d'utiliser un régulateur de tension.
4. Nettoyage et entretien réguliers :
Suivez les conseils d'entretien décrits ci-dessus.
5. Choisir des luminaires de haute qualité :
Investissez dans des lèche-murs LED de haute qualité provenant de fabricants réputés. Ils peuvent coûter plus cher au départ, mais ils dureront probablement plus longtemps et seront plus performants.
Viii. Sujets avancés: Éclairage intelligent et systèmes de contrôle

Faites passer votre éclairage au niveau supérieur avec des systèmes de contrôle avancés.
A. Contrôle de l'éclairage DMX
1. Qu'est-ce que le DMX ?
DMX (Digital Multiplex) est un protocole standard pour contrôler l'éclairage et les effets de scène. Il est également utilisé pour l’éclairage architectural et d’autres applications où un contrôle précis de plusieurs luminaires est nécessaire.
2. Comment fonctionne DMX :
DMX utilise une configuration en « daisy chain », dans laquelle chaque appareil est connecté au suivant sur une ligne. Un contrôleur DMX envoie des signaux sur toute la ligne, indiquant à chaque appareil quoi faire (luminosité, couleur, etc.).
- Appareils d'adressage : Chaque appareil se voit attribuer une « adresse » unique afin que le contrôleur puisse communiquer avec lui individuellement.
- Envoi de signaux : Le contrôleur envoie des signaux numériques qui indiquent aux appareils comment se comporter.
- Création de scènes : Vous pouvez programmer différentes « scènes » d’éclairage (préréglages) et les rappeler en appuyant simplement sur un bouton.
3. Avantages du DMX :
- Contrôle précis : Vous avez un contrôle très précis sur la luminosité, la couleur et d’autres paramètres de chaque appareil.
- Séquences lumineuses complexes : Vous pouvez créer des effets d'éclairage complexes et dynamiques qui changent au fil du temps.
- Synchronisation: Vous pouvez synchroniser plusieurs appareils pour créer des effets coordonnés.
4. Contrôleurs DMX :
- Il existe de nombreux types de contrôleurs DMX, allant des simples contrôleurs muraux aux logiciels informatiques sophistiqués.
- Le choix du bon contrôleur dépend de la complexité de votre configuration d'éclairage et de votre budget.
B. Intégration Wi-Fi et Smart Home
Contrôlez vos lumières où que vous soyez grâce au Wi-Fi et à la technologie de maison intelligente.
1. Connexion à un réseau Wi-Fi :
De nombreux lèche-murs LED modernes peuvent se connecter à votre réseau Wi-Fi domestique. Cela vous permet de les contrôler depuis votre smartphone, tablette ou ordinateur.
Configuration Wi-Fi
- Suivez les instructions du fabricant pour connecter les lumières à votre réseau Wi-Fi.
- Vous utiliserez généralement une application pour smartphone pour configurer les lumières et les connecter à votre réseau.
2. Utilisation des applications Smart Home :
Une fois les lumières connectées à votre réseau Wi-Fi, vous pouvez utiliser une application pour maison intelligente pour les contrôler.
Fonctionnalités de l'application Maison intelligente
- Allumez/éteignez les lumières à distance.
- Ajustez la luminosité et la couleur.
- Créez des scènes et des horaires.
- Regroupez les lumières pour les contrôler comme une seule unité.
3. Commande vocale :
De nombreux systèmes d'éclairage intelligents peuvent être intégrés à des assistants vocaux comme Amazon Alexa, Google Assistant et Apple Siri. Cela vous permet de contrôler vos lumières avec des commandes vocales.
Commandes de commande vocale
- "Alexa, allume les appliques murales."
- "Ok Google, baisse les lumières du salon à 50 %."
- "Siri, mets les appliques murales en bleu."
4. Création d'automatisations :
Les systèmes d'éclairage intelligents vous permettent de créer des automatisations dans lesquelles les lumières réagissent à certains événements ou conditions.
Exemples d'automatisation
- Horaires : réglez les lumières pour qu'elles s'allument/s'éteignent automatiquement à des moments spécifiques de la journée.
- Lever/coucher du soleil : les lumières s'allument automatiquement au coucher du soleil et s'éteignent au lever du soleil.
- Détection de mouvement : utilisez des capteurs de mouvement pour allumer les lumières lorsque quelqu'un entre dans une pièce ou s'approche d'un bâtiment.
- Géolocalisation : faites en sorte que les lumières s'allument automatiquement lorsque vous arrivez chez vous (en fonction de l'emplacement de votre téléphone).
C. Tendances futures de la technologie des lèche-murs à LED
Le monde de l’éclairage LED est en constante évolution. Voici quelques-unes des tendances à surveiller :
- LED à haut rendement : Attendez-vous à des LED encore plus économes en énergie à l’avenir, avec un flux lumineux par watt plus élevé et une durée de vie encore plus longue.
- Rendu des couleurs amélioré : Les progrès de la technologie LED continueront d’améliorer le rendu des couleurs, rendant les couleurs encore plus naturelles et éclatantes.
- Miniaturisation : Les luminaires LED continueront probablement à devenir plus petits et plus discrets, permettant des conceptions d'éclairage encore plus créatives et flexibles.
- Systèmes de contrôle sans fil : Les systèmes de contrôle sans fil deviendront encore plus fiables et conviviaux, avec une portée et une réactivité améliorées.
- Intégration avec d'autres appareils Smart Home : Attendez-vous à une intégration encore plus étroite entre l’éclairage LED et d’autres appareils domestiques intelligents, tels que les thermostats, les systèmes de sécurité et les systèmes de divertissement. Cela permettra des automatisations et des options de contrôle encore plus sophistiquées.
Ix. Études de cas

Examinons quelques exemples concrets de la façon dont les lèche-murs LED ont été utilisés pour créer des effets d'éclairage époustouflants :
Étude de cas 1 : Éclairage architectural résidentiel
Projet: Un propriétaire souhaitait rehausser l’attrait extérieur de sa maison moderne et mettre en valeur ses caractéristiques architecturales.
Solution: Des lèche-murs à LED ont été installés pour effleurer la façade en pierre texturée de la maison, créant des ombres spectaculaires et soulignant le design unique. Une lumière blanche et chaude a été utilisée pour créer une atmosphère accueillante et invitante.
Résultats: L’éclairage a transformé l’apparence nocturne de la maison, ce qui en fait un élément remarquable dans le quartier. Les propriétaires ont été ravis de la beauté et de la sécurité améliorées.
Étude de cas 2 : Éclairage commercial pour les commerces de détail
Projet: Une boutique de vêtements souhaitait attirer plus de clients et rendre sa vitrine plus attrayante.
Solution: Des lèche-murs LED RGBW ont été installés au-dessus des vitrines des magasins, programmés pour parcourir différentes couleurs et créer des effets d'éclairage dynamiques. Cela a attiré l'attention sur le magasin et mis en valeur les marchandises exposées dans les vitrines.
Résultats: Le magasin a signalé une augmentation significative de la fréquentation et des ventes après l'installation de l'éclairage. L'éclairage dynamique a créé une expérience de magasinage plus engageante et mémorable.
Étude de cas 3 : Projet d'éclairage paysager
Projet: Un propriétaire souhaitait créer un paysage nocturne spectaculaire et invitant.
Solution: Des lèche-murs à LED ont été utilisés pour éclairer des arbres, des arbustes et un mur de soutènement en pierre. Une lumière blanche chaude a été utilisée pour créer une lueur douce et naturelle. L'éclairage mettait en valeur les textures et les formes des éléments du paysage, créant un espace extérieur magnifique et relaxant.
Résultats: Le propriétaire était ravi de la transformation de son jardin en une oasis nocturne. L'éclairage a étendu la convivialité de l'espace extérieur et a créé un affichage visuel époustouflant.
Étude de cas 4 : Événement utilisant des lèche-murs dynamiques à changement de couleur.
Projet: Pour créer un environnement romantique pour un mariage.
Solution: La lumière murale RGBW peut fournir des millions de couleurs pour répondre au thème du mariage.
Résultats: L'événement est devenu plus charmant et a créé une atmosphère magique.
Étude de cas 5 : Musée/galerie d'art mettant en évidence les caractéristiques.
Projet: Mettez en valeur la texture de l’œuvre d’art.
Solution: En sélectionnant soigneusement l'intensité et la température de couleur de la lumière, avec un IRC élevé, les concepteurs peuvent évoquer différentes émotions, de la chaleur et du confort à un sentiment d'ouverture et de tranquillité.
Résultats: La texture de l'œuvre d'art peut être parfaitement montrée.
X. Conclusion
Les lèche-murs LED sont un outil puissant pour transformer les espaces, tant à l’intérieur qu’à l’extérieur. Ils offrent une combinaison unique d’attrait esthétique, d’avantages fonctionnels, d’efficacité énergétique et de polyvalence. Que vous cherchiez à rehausser l’architecture de votre maison
, créez un paysage spectaculaire, attirez des clients dans votre entreprise ou créez l'ambiance d'un événement spécial, les lèche-murs à LED peuvent vous aider à réaliser votre vision.
N’oubliez pas que la clé d’un éclairage mural réussi est une planification minutieuse. Pensez à vos besoins, choisissez les bons luminaires, installez-les correctement et n'ayez pas peur d'expérimenter différentes stratégies de placement et idées de conception. Et bien sûr, donnez la priorité à la sécurité en respectant tous les codes électriques et en prenant les précautions appropriées.
Grâce aux connaissances que vous avez acquises grâce à ce guide, vous êtes désormais bien équipé pour explorer les possibilités passionnantes de l’éclairage mural à LED. Alors n'hésitez plus, libérez votre créativité et illuminez votre monde !
Xi. Appendice
Ressources pour sélectionner un bon fabricant.
- Vérifiez les avis et les notes en ligne : des sites Web tels que Trustpilot, Yelp et Google Reviews peuvent fournir des informations sur les expériences des clients avec différents fabricants.
- Certifications industrielles : recherchez des fabricants possédant des certifications telles que UL, ETL, Energy Star ou RoHS, indiquant le respect des normes de sécurité et de qualité.
- Garantie et assistance : optez pour des fabricants offrant des garanties complètes et un support client réactif, démontrant leur confiance dans leurs produits.
- Portefeuille de projets : examinez les projets ou études de cas antérieurs du fabricant pour évaluer son expérience et la qualité de son travail.
- Demandez des recommandations : demandez des recommandations à des professionnels de l'éclairage, des architectes ou des entrepreneurs qui ont de l'expérience avec les lèche-murs à LED.
Glossaire de tous les termes utilisés dans l'article
- Éclairage d'accent: Éclairage utilisé pour mettre en valeur des éléments ou des objets spécifiques.
- Éclairage ambiant: Éclairage général et global qui offre un niveau de luminosité confortable.
- Angle de faisceau: L'angle selon lequel la lumière est émise par un luminaire.
- CCT (température de couleur corrélée) : Une mesure de l'apparence de la couleur de la lumière blanche, mesurée en Kelvins (K).
- COB (puce à bord) : Type de technologie LED dans lequel plusieurs puces LED sont montées directement sur un substrat.
- Indice de rendu des couleurs (IRC) : Une mesure de la précision avec laquelle une source de lumière montre les vraies couleurs des objets.
- DMX (Multiplex numérique) : Un protocole pour contrôler l’éclairage et les effets de la scène.
- Conducteur: Un composant électronique qui régule la puissance fournie aux LED.
- Pied-bougie : Unité d'éclairement (lumière tombant sur une surface).
- Dissipateur de chaleur: Un composant qui dissipe la chaleur des LED.
- Indice IP (indice de protection contre la pénétration) : Une mesure de protection d’un luminaire contre la poussière et l’eau.
- Kelvin (K) : Une unité de mesure pour la température de couleur.
- LED (diode électroluminescente) : Dispositif semi-conducteur qui émet de la lumière lorsqu'un courant électrique le traverse.
- Tension de ligne : Tension domestique standard (généralement 120 V ou 240 V).
- Basse tension : Une tension inférieure (généralement 12 V ou 24 V) qui nécessite un transformateur.
- Lumen: Unité de flux lumineux (la quantité totale de lumière émise par une source).
- Lux: Unité d'éclairement (lumière tombant sur une surface), égale à un lumen par mètre carré.
- Optique: Lentilles ou réflecteurs qui façonnent et dirigent la lumière émise par les LED.
- RVB: Rouge, vert et bleu (faisant référence aux LED capables de produire une large gamme de couleurs).
- RGBW: Rouge, vert, bleu et blanc (faisant référence aux LED qui incluent une LED blanche pour un meilleur mélange des couleurs).
- CMS (dispositif monté en surface) : Type de technologie LED dans laquelle la puce LED est montée directement sur un circuit imprimé.
- Éclairage de tâche: Éclairage conçu pour éclairer des activités spécifiques.
- Blanc accordable: LED qui permettent de régler la température de couleur de la lumière blanche.
- Mise en lumière : Éclairage dirigé vers le haut.
- Pâturage des murs : Une technique d'éclairage où les lumières sont placées près d'un mur pour mettre en valeur sa texture.
- Lavage des murs : Une technique d'éclairage où les lumières sont placées plus loin d'un mur pour créer un effet de lumière doux et uniforme.
- Watt: Une unité de consommation d’énergie.