Sei mai entrato in una stanza e ti sei sentito... giusto? Lo spazio sembra caldo, invitante e tutto è perfettamente visibile. Ora immagina un’altra stanza, magari quella in cui sei già stato. Potrebbe avere angoli bui che sembrano una grotta, o potrebbe essere così intensamente illuminato da sembrare una sala operatoria. La differenza tra queste due esperienze spesso si riduce a una cosa: un piano di illuminazione intelligente.
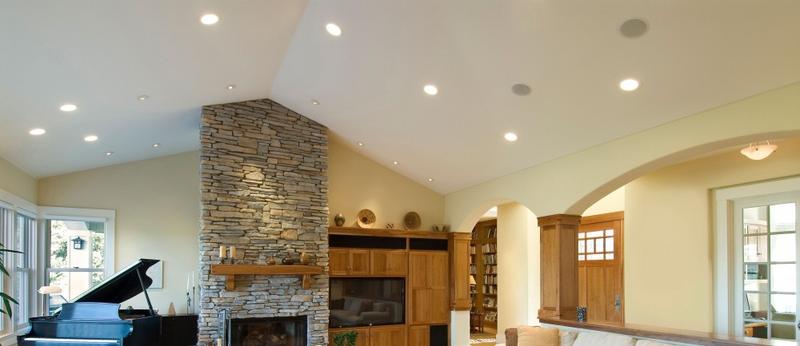
Scegliere il numero corretto di downlight può sembrare una sfida progettuale ad alto rischio. Troppo pochi e rimarrai nell’ombra. Troppi e hai creato un pasticcio accecante che assomiglia alla pista di un aeroporto sul soffitto. È una preoccupazione comune, ma non deve essere un problema complicato da risolvere.
Non preoccuparti. Questa è l'unica guida di cui avrai mai bisogno per illuminare perfettamente la tua casa. Elimineremo tutte le congetture. Insieme, esamineremo tutto, dalle semplici formule utilizzate dagli installatori professionisti ai principi di progettazione avanzati che creano uno spazio veramente bello e funzionale. Combinando la consulenza di esperti provenienti da tutto il settore dell'illuminazione, diversi metodi di calcolo e progetti stanza per stanza, otterrai la totale sicurezza necessaria per pianificare la tua illuminazione come un professionista.
In questa masterclass imparerai come decodificare il linguaggio della luce, identificare i fattori chiave che daranno forma al tuo piano e applicare formule collaudate per un layout impeccabile. Cominciamo.
Le basi: comprendere il linguaggio della luce prima di iniziare
Prima di poter iniziare a misurare e calcolare, è essenziale comprendere i termini e i concetti di base. Conoscere correttamente questi principi fondamentali è il primo passo verso la creazione di un piano di illuminazione di successo. Questa conoscenza ti consentirà di prendere decisioni informate, non solo supposizioni.
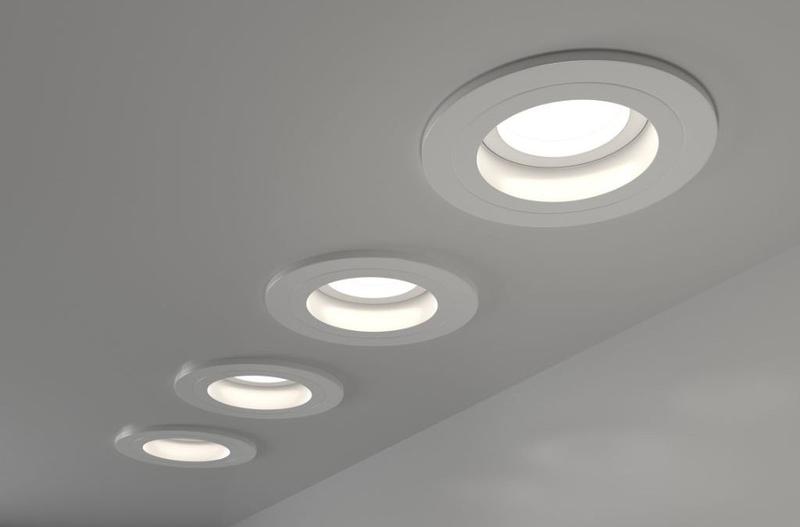
Cosa sono esattamente i downlight e le luci da incasso?
Probabilmente hai sentito alcuni nomi diversi in giro: downlight, luci da incasso, luci per lattine o anche luci per pentole. Nella maggior parte dei casi, questi termini sono usati in modo intercambiabile per descrivere la stessa cosa: una lampada installata in un'apertura cava nel soffitto.
La loro funzione principale è semplice ma efficace: irradiano la luce verso il basso, creando un aspetto pulito, moderno e discreto. Poiché l'apparecchio stesso è nascosto o a filo con il soffitto, si ottiene il vantaggio della luce senza l'ingombro visivo di un tradizionale apparecchio a sospensione. Questo fascino minimalista è il motivo per cui sono i preferiti nel design degli interni contemporaneo.
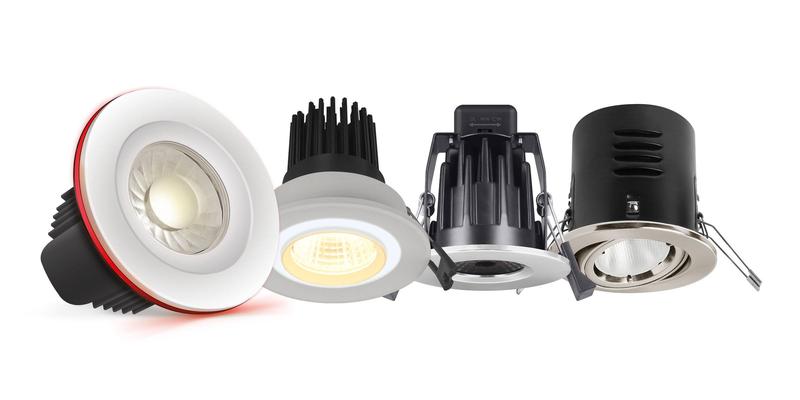
Quali sono i diversi tipi di downlight LED tra cui posso scegliere?
Non tutti i downlight sono uguali. Il tipo che sceglierai dipenderà dallo scopo della tua stanza e dai tuoi obiettivi di progettazione. Ecco una rapida ripartizione delle opzioni più comuni:
- Downlight fissi: Questo è il classico affidabile. Un downlight fisso proietta la luce verso il basso, come un semplice faretto. È perfetto per l'illuminazione generale e completa (nota come illuminazione ambientale) nelle zone giorno e nei corridoi. Il vantaggio principale è la sua semplicità e la capacità di creare una copertura uniforme se distanziati correttamente. Lo svantaggio? Offre flessibilità zero.
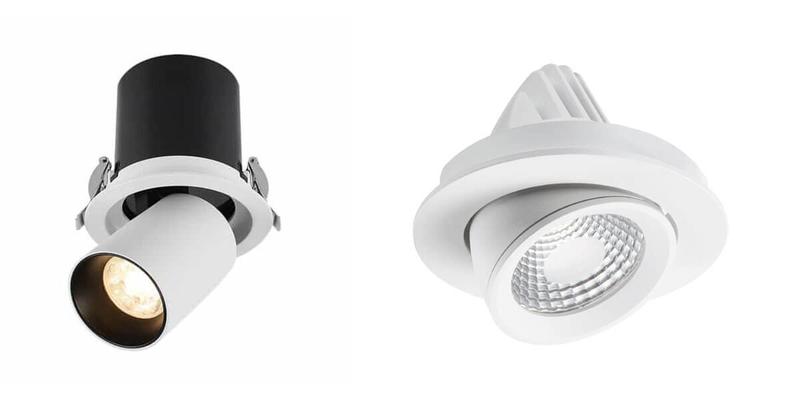
- Downlight orientabili (o Gimbal): Per coloro che desiderano un po’ più di controllo, i downlight regolabili sono la risposta. Questi apparecchi possono inclinarsi e ruotare, consentendoti di puntare il fascio di luce esattamente dove ne hai bisogno. Questo li rende ideali per:
- Illuminazione delle attività: Puntare la luce direttamente sul bancone della cucina o su una scrivania.
- Illuminazione accento: Evidenziare un'opera d'arte, una parete strutturata o un elemento architettonico come un soffitto inclinato.
- Downlight da incasso: Questo è il campione elegante e senza soluzione di continuità e il tipo più comune. L'apparecchio si trova a filo del soffitto, facendo sembrare che la luce appaia magicamente da un foro pulito. Sono perfetti per i design minimalisti, ma richiedono una cavità (spazio vuoto) sopra il soffitto per l'installazione.
- Downlight a montaggio superficiale: Cosa succede se hai un soffitto senza cavità, come una solida lastra di cemento? I downlight a plafone sono la vostra soluzione. Questi apparecchi si trovano appena sotto la superficie del soffitto, offrendo un aspetto moderno e audace senza la necessità di praticare un grande foro. Sono più evidenti delle opzioni ad incasso, quindi diventano parte del design stesso.
Perché il calcolo e la spaziatura corretti sono così cruciali?
Potresti essere tentato di guardarlo semplicemente a occhio, ma pianificare il posizionamento del downlight è il segreto per evitare un disastro luminoso. Una cattiva pianificazione può portare a diversi problemi che rovineranno l’aspetto della tua stanza:
- Sottoilluminazione: Ciò accade quando le luci sono troppo poche o sono troppo distanti tra loro. Il risultato sono angoli cupi e bui e un’atmosfera inospitale. Lo chiamiamo effetto “caverna oscura”.
- Illuminazione eccessiva: Il problema opposto. Troppe luci possono creare un bagliore aspro e clinico che sembra sterile e scomodo: il temuto aspetto di una “sala operatoria”. È anche un notevole spreco di energia.
- Scarsa spaziatura: Anche con il giusto numero di luci, una spaziatura casuale o irregolare può creare un caos caotico sul soffitto. Porta a una luce irregolare con punti caldi eccessivamente luminosi proprio accanto a punti scuri, il che è visivamente stridente.
Una spaziatura adeguata garantisce un flusso di luce uniforme ed equilibrato che fa sembrare la stanza completa, funzionale e dal design professionale.
Decodifica delle specifiche: spiegazione di lumen, lux, watt, angolo del fascio e temperatura del colore
Quando guardi la scatola di un downlight, vedrai molti termini tecnici. Non lasciarti intimidire! Comprendere questi cinque parametri chiave è più semplice di quanto pensi e ti renderà un acquirente molto più intelligente.
| Termine di illuminazione | Cosa significa & Perché è importante |
|---|---|
| Lumen (lm) | Questa è la metrica più importante. I lumen misurano la luminosità totale di una sorgente luminosa. Più alto è il numero di lumen, più luminosa sarà la luce. Dimentica per un momento i watt; i lumen ti dicono quanta luce stai effettivamente ricevendo. |
| Watt (W) e lumen | Questo è un punto comune di confusione. Ai vecchi tempi delle lampadine alogene, un wattaggio più elevato significava una lampadina più luminosa. Oggi, con i LED ad alta efficienza energetica, questo non è più vero. I Watt misurano il consumo energetico, mentre i Lumen misurano la luminosità. È possibile avere un LED a basso wattaggio che produce lumen molto elevati. Scegli sempre i tuoi downlight in base al loro flusso luminoso, non alla loro potenza. |
| Lux (lx) | Lux misura quanto appare luminosa una superficie. Nello specifico, un lux equivale ad un lumen distribuito su un metro quadrato (1 lux = 1 lm/m²). Questo è l'obiettivo a cui mirerai quando calcoli le esigenze di illuminazione di una stanza. Determina la luminosità della stanza *sembra*. |
| Angolo del fascio | L'angolo del fascio descrive l'ampiezza della diffusione della luce dall'apparecchio. Un fascio stretto crea un riflettore focalizzato, mentre un fascio ampio crea un fascio di luce più morbido e ampio.
|
| Temperatura del colore (Kelvin o K) | Questo misura il “calore” o la “freddezza” del colore della luce, misurato sulla scala Kelvin. Scegliere la giusta temperatura di colore è fondamentale per creare l'atmosfera.
|
I 7 fattori chiave che influenzano il calcolo del downlight
Ora che parli il linguaggio della luce, tuffiamoci nelle variabili. Un piano di illuminazione perfetto non è valido per tutti. È una soluzione personalizzata basata sul tuo spazio unico. Ecco i sette fattori chiave che devi considerare prima di calcolare qualsiasi cosa.
Fattore 1: dimensioni e forma della stanza
Questo è semplice: più grande è la stanza, più luce avrai bisogno per riempirla. Ma non fermarti solo alla superficie totale. Presta molta attenzione alla forma della stanza. Una forma insolita, come un soggiorno a forma di L o un corridoio lungo e stretto, richiederà una disposizione più attenta per evitare macchie scure. Le cucine open space che confluiscono nella zona pranzo devono essere trattate come “zone” diverse, ciascuna con le proprie esigenze di illuminazione.
La tua fase di azione: Prendi un metro a nastro. Misura la lunghezza e la larghezza della tua stanza e moltiplicale per ottenere la superficie totale in metri quadrati (m²) o piedi quadrati (ft²). Fai un rapido schizzo della forma della stanza, annotando eventuali caratteristiche insolite.
Fattore 2: Altezza del soffitto: la variabile più trascurata
In base alla mia esperienza, l’altezza del soffitto è il fattore più spesso dimenticato dai proprietari di casa e ha un impatto enorme sul piano di illuminazione. Immaginatelo come un annaffiatoio: più lo tenete in alto, più l'acqua si diffonde e meno è concentrata quando tocca il suolo. La luce funziona allo stesso modo.
Quando il soffitto è più alto, la luce deve viaggiare più lontano per raggiungere pavimenti, tavoli e banconi. Di conseguenza, la luce diventa più debole e più diffusa. Un piano che funziona perfettamente per un soffitto standard apparirà fioco e irregolare in una stanza con un soffitto alto.
Linee guida per diverse altezze del soffitto:
- Soffitti standard (circa 2,4 metri/8 piedi): Puoi attenersi ai calcoli standard e alle regole di spaziatura. Questa è la linea di base.
- Soffitti più alti (circa da 2,7 a 3 metri / da 9 a 10 piedi): Dovrai modificare il tuo piano. Hai tre opzioni:
- Utilizzare downlight con un flusso luminoso più elevato (lampadine più luminose).
- Distanziare leggermente gli apparecchi tra loro per garantire che le piscine luminose si sovrappongano.
- Scegli downlight con un angolo del fascio più stretto per focalizzare la luce verso il basso in modo più efficace.
- Soffitti molto alti o a volta (oltre 3 metri/10+ piedi): Per questi spazi drammatici, probabilmente avrai bisogno di una combinazione di tutte e tre le strategie. Le luci più forti con fasci stretti diventano fondamentali per evitare un'atmosfera cupa.
Una pratica regola pratica: Per ogni metro in più di altezza del soffitto rispetto allo standard di 2,4 m, dovresti mirare ad aumentare il flusso luminoso dei tuoi downlight di circa il 20-30% per mantenere lo stesso livello di luminosità a livello del suolo.
Fattore 3: funzione della stanza e luminosità desiderata (livello Lux)
Come pensi di utilizzare la stanza? La risposta a questa domanda determina quanto deve essere luminoso. Una cucina in cui si tagliano le verdure con un coltello affilato ha bisogno di molta più luce di una camera da letto progettata per rilassarsi durante la notte. Questa luminosità desiderata viene misurata Lux.
Ecco una tabella dettagliata con i livelli di lux consigliati per le diverse stanze. Pensa a questo come al tuo cheat sheet sulla luminosità.
| Tipologia di camera | Funzione primaria | Lux consigliati (luminosità) | Umore/Sentimento |
|---|---|---|---|
| Soggiorno | Rilassamento, Socializzazione, Guardare la TV | 100 – 150 Lux | Morbido, accogliente e invitante |
| Camera da letto | Riposarsi, Vestirsi, Leggere | 100 – 150 Lux | Calmo, intimo e rilassante |
| Cucina (Area Generale) | Uso generale, movimento, socializzazione | 200 – 300 Lux | Luminoso, pulito e accogliente |
| Cucina (aree di attività) | Preparazione del cibo, cucina, lettura di ricette | 300 – 500 Lux | Molto luminoso, funzionale e chiaro |
| Bagno (Area Generale) | Uso generale | 150 – 200 Lux | Pulito e simile ad una spa |
| Bagno (toeletta/specchio) | Toelettatura, rasatura, trucco | 300 – 500 Lux | Luminoso e senza ombre |
| Ufficio/Studio | Lavoro, lettura, concentrazione | 400 – 500+ Lux | Molto luminoso, energizzante e concentrato |
| Corridoio/corridoio | Transizione, Accoglienza, Sicurezza | 100 – 150 Lux | Sicuro, aperto e invitante |
Fattore 4: specifiche del downlight (flusso luminoso & Angolo del fascio)
Questo fattore è semplice ma fondamentale. Devi conoscere le specifiche esatte del downlight che intendi acquistare Prima finalizzi il tuo piano. Un downlight che produce 800 lumen è molto più potente di uno che ne produce 400. Se usi la luce più intensa, avrai bisogno di meno apparecchi. Controllare sempre le specifiche del prodotto per quanto riguarda l'emissione di lumen e gli angoli del fascio disponibili.
Fattore 5: colori di pareti, pavimenti e soffitti (riflettanza)
Hai mai notato come una stanza sembri immediatamente più luminosa dopo una nuova mano di vernice bianca? Ciò è dovuto alla riflessione della luce. I colori delle superfici della tua stanza giocano un ruolo nella quantità di luce necessaria.
- Pareti, pavimenti e mobili di colore scuro assorbirà la luce. In una stanza con pareti blu scuro o un tappeto grigio scuro, potrebbe essere necessario aumentare i lumen totali richiesti del 10-20% per compensare.
- Pareti e superfici chiare rifletterà la luce nella stanza, rendendo lo spazio più luminoso e più aperto. In questi casi, i calcoli standard di solito funzionano bene.
Fattore 6: disposizione dei mobili e punti focali
Non stai illuminando una scatola vuota; stai illuminando uno spazio arredato e vissuto. La disposizione dei tuoi mobili dovrebbe assolutamente guidare il tuo piano di illuminazione.
Suggerimenti professionali per l'illuminazione attorno ai mobili:
- Evitare l'"abbagliamento della testa": Non posizionare mai un downlight direttamente sul punto in cui si troverà la testa di qualcuno quando sarà seduto sul divano o sdraiato sul letto. Ciò crea un abbagliamento fastidioso. Posiziona invece la lampada leggermente davanti alla zona salotto.
- Attenzione alle riflessioni: Posizionando un downlight direttamente sopra un tavolino in vetro o un pavimento lucido puoi creare un riflesso accecante. Regola il posizionamento per evitarlo.
- Illumina il compito, non la persona: Per le aree operative come i banconi della cucina o le scrivanie, posiziona la luce direttamente sullo spazio di lavoro per illuminarlo perfettamente.
- Identifica i tuoi punti focali: La tua stanza ha un bellissimo caminetto, una splendida opera d'arte o una parete strutturata? Utilizza i downlight regolabili per accentuare questi punti focali e aggiungere uno strato di design professionale alla tua stanza.
Fattore 7: esigenze specifiche dell'utente
Infine, considera chi utilizzerà la stanza. Le esigenze di illuminazione possono cambiare in base all’età e alla sensibilità.
- Per gli utenti anziani: Invecchiando, la nostra vista si indebolisce naturalmente. Una stanza che sembra perfettamente luminosa per un trentenne potrebbe sembrare fioca per un ottantenne. Per una stanza utilizzata principalmente da una persona anziana, valutare la possibilità di aumentare il livello di lux consigliato del 50% o più per garantire sicurezza e comfort.
- Per le camerette dei bambini: La retina di un bambino è ancora in via di sviluppo e una luce eccessivamente intensa o intensa può essere eccessivamente stimolante. Per la cameretta o l'asilo nido di un bambino, è meglio optare per un'illuminazione più morbida, calda e sempre regolabile per creare un ambiente tranquillo.
Come calcolare il numero di downlight: 3 metodi comprovati, da rapidi a precisi
Va bene, hai fatto i compiti. Conosci le dimensioni della tua stanza, hai impostato i tuoi obiettivi di luminosità e hai considerato tutti i fattori chiave. Ora è il momento di fare i conti. Tratteremo tre diversi metodi, che vanno da una stima rapida allo standard professionale.
Metodo 1: la regola della divisione dell'area (una stima rapida)
Questo è un metodo semplice e veloce che molti installatori utilizzano da anni. Fornisce una stima approssimativa ed è più adatto per l’illuminazione generale in stanze di altezza standard dove la precisione non è la massima priorità.
- La formula per l’illuminazione generale:
Number of Downlights = Total Room Area (in m²) ÷ 1.4 - La formula per ambienti più luminosi (come le cucine):
Number of Downlights = Total Room Area (in m²) ÷ 1.2
Esempio lavorato:
- Camera: Un soggiorno che misura 5 metri per 4 metri.
- Zona: 5m × 4m = 20 m².
- Calcolo:
20 ÷ 1.4 = 14.28 - Risultato: Secondo questa regola, avresti bisogno di circa 14 o 15 downlight.
La mia opinione da esperto: Sebbene questo metodo sia rapido, spesso sovrastima il numero di luci necessarie con i LED luminosi ed efficienti di oggi. L'uso di questa regola può portare a quell'aspetto da "soffitto sovraffollato". Consiglio di utilizzarlo solo come punto di partenza preliminare.
Metodo 2: La formula di spaziatura (un approccio basato innanzitutto sul layout)
Questo metodo dà priorità alla creazione di una griglia visivamente ordinata e simmetrica. È un modo eccellente per garantire che il tuo layout appaia equilibrato e professionale, piuttosto che casuale.
La regola d'oro della spaziatura: Ideal Spacing Between Lights = Ceiling Height ÷ 2
Guida passo passo:
- Determina la tua spaziatura ideale: Per un soffitto standard da 2,4 m, la spaziatura ideale sarebbe
2.4 ÷ 2 = 1.2 metersa parte. - Determina la tua distanza dalle mura: Questo è un passo cruciale per evitare l’“effetto caverna”. La tua prima fila di luci dovrebbe essere posizionata a metà della distanza principale dal muro. Quindi, nel nostro esempio, è così
1.2m ÷ 2 = 0.6 meters (or 60cm)da ogni parete. - Calcolare le luci per riga (in lunghezza): Dividi la lunghezza della stanza per la distanza che preferisci.
- Calcolare le luci per riga (in larghezza): Dividi la larghezza della stanza per la distanza che hai scelto.
- Calcola il numero totale di luci: Moltiplicare il numero di luci per la lunghezza per il numero di luci per la larghezza.
Esempio lavorato:
- Camera: Un soggiorno, 5m x 4m, con un soffitto di 2,4m.
- Spaziatura: 1,2 metri.
- Luci lungo la lunghezza di 5 m:
5m ÷ 1.2m = 4.16. Non puoi avere parte di una luce, quindi pianificheremo 4 luci. - Luci lungo la larghezza di 4 m:
4m ÷ 1.2m = 3.33. Pianificheremo 3 luci. - Luci totali:
4 lights × 3 lights = 12 downlights.
Questo metodo ci fornisce una griglia 4×3 pulita. È un approccio molto migliore rispetto al Metodo 1, poiché si concentra su un layout uniforme. Tuttavia, non tiene ancora conto della *luminosità* delle luci scelte.
Metodo 3: Il metodo di calcolo dei lumen (standard professionale)
Questo è tutto. Questo è il metodo più accurato e affidabile e quello che consiglio per ogni progetto, soprattutto per spazi funzionali come cucine, bagni e uffici. Basa il calcolo sulla luce effettiva necessaria per lo scopo della stanza.
La formula principale: Number of Downlights = (Room Area × Target Lux Level) ÷ Lumens per Downlight
Guida passo passo:
- Passaggio 1: calcola l'area della tua stanza.
Esempio: Cucina che misura 5m x 4m = 20 m². - Passaggio 2: determina il livello di Lux target.
Fare riferimento alla nostra tabella di raccomandazioni Lux. Per una cucina luminosa puntiamo ai 400 lux.
Esempio: Lux target = 400. - Passaggio 3: calcolare i lumen totali necessari per la stanza.
Questo è semplicemente Area × Target Lux.
Esempio:20 m² × 400 lux = 8,000 total lumens needed. - Passaggio 4: scegli il tuo downlight e trova il suo flusso luminoso.
Supponiamo che tu abbia scelto un downlight elegante che produce 700 lumen.
Esempio: Lumen per downlight = 700 lm. - Passaggio 5: calcolare il numero di downlight richiesti.
Ora applica la formula principale.
Esempio:8,000 total lumens ÷ 700 lumens per light = 11.42. - Passaggio 6: arrotonda e pianifica il layout.
Non puoi installare 0,42 di luce, quindi dovrai arrotondare per eccesso 12 faretti. Ora sai che ti servono 12 apparecchi e puoi disporli in una griglia ordinata 4×3 utilizzando i principi di spaziatura del Metodo 2.
Questo metodo combina precisione e pianificazione del layout, garantendo che la tua stanza non solo sia sufficientemente luminosa ma anche ben illuminata e uniforme. È il gold standard per un motivo.
| Metodo di calcolo | Meglio per | Professionisti | Contro |
|---|---|---|---|
| 1. Regola sulla divisione dell'area | Stime rapide e approssimative per aree non critiche. | Molto veloce e semplice. | Impreciso con i LED moderni; spesso suggerisce troppe luci. |
| 2. Formula di spaziatura | Creazione di un layout di griglia visivamente pulito e simmetrico. | Garantisce un layout uniforme e dall'aspetto professionale. | Non tiene conto della luminosità (lumen) delle luci o della funzione della stanza. |
| 3. Metodo di calcolo dei lumen | Tutte le situazioni. Questo è il metodo più accurato e consigliato. | Preciso, personalizzato in base allo scopo della stanza e tiene conto della luminosità. | Richiede alcuni passaggi di calcolo in più. |
Il tuo progetto di downlight stanza per stanza
La teoria è fantastica, ma passiamo alla pratica. Ogni stanza ha la sua personalità e il suo scopo e la tua illuminazione dovrebbe abbinarli. Ecco un progetto dettagliato per le stanze più comuni della tua casa, mettendo in azione tutta la nostra conoscenza.
La Cucina: il cuore funzionale della casa
- Obiettivi di illuminazione: La cucina richiede un approccio illuminotecnico a più livelli. Hai bisogno di brillante, concentrato illuminazione del compito sopra i controsoffitti, l'isola e il lavandino dove svolgi la maggior parte del tuo lavoro. Questo dovrebbe essere bilanciato con il bene illuminazione ambientale generale per il resto dello spazio.
- Specifiche consigliate: Puntare a 300-500 lux per aree di attività e 200-300 lux per le aree generali. UN Bianco freddo 4000K la temperatura del colore mantiene le cose pulite e luminose. Utilizzare un angolo del fascio più ampio (~60°) per l'illuminazione generale e uno leggermente più stretto (~40°) per le aree di attività mirate.
- Strategia di layout: Questo è un consiglio professionale cruciale. Posiziona i downlight delle tue attività sopra bordo anteriore dei tuoi controsoffitti, non al centro della passerella. Questo illumina il tuo spazio di lavoro senza che il tuo corpo proietti un'ombra su ciò che stai facendo. Distanziali di circa 1-1,5 metri l'uno dall'altro. Prendi in considerazione l'aggiunta di lampade a sospensione decorative su un'isola per un ulteriore livello di design.
- Mini esempio: Per una cucina di 15 m² che punta a una luminosità di 300 lux, avresti bisogno
15 × 300 = 4,500 lumens. Utilizzando downlight da 600 lumen, avresti bisogno4500 ÷ 600 = 7.5, quindi dovresti installare 8 faretti.
Il soggiorno: creare un hub versatile e accogliente
- Obiettivi di illuminazione: La flessibilità è il nome del gioco qui. Il tuo soggiorno è dedicato al relax, all'intrattenimento e talvolta anche al lavoro. Devi essere in grado di cambiare l’umore in un attimo. L’illuminazione stratificata è essenziale.
- Specifiche consigliate: Uno più morbido 100-150 lux è perfetto per l'atmosfera generale. Scegli un ambiente caldo e accogliente Bianco caldo 2700K-3000K temperatura del colore. Un ampio angolo del fascio (60°-120°) creerà un lavaggio morbido e uniforme.
- Strategia di layout: I dimmer non sono negoziabili in un soggiorno! Usali per controllare la luminosità e creare l'atmosfera. Invece di una griglia rigida, valuta la possibilità di posizionare dei downlight attorno al perimetro della stanza per farla sembrare più grande. Combina i tuoi downlight con altre fonti di luce come lampade da terra per angoli lettura, lampade da tavolo per il calore e downlight regolabili per evidenziare un caminetto o un'opera d'arte.
- Mini esempio: Un soggiorno di 25 m² che mira a soddisfare le esigenze di 100 lux morbidi
25 × 100 = 2,500 lumens. Utilizzando downlight da 500 lumen, ti basterebbero solo 5 faretti per il tuo livello ambientale, che poi integreresti con le lampade.
La camera da letto: il tuo rifugio per il riposo e il relax
- Obiettivi di illuminazione: La camera da letto è un rifugio privato. L'illuminazione dovrebbe essere morbida, rilassante e confortevole, ma comunque sufficientemente funzionale per vestirsi e pulire.
- Specifiche consigliate: Come il soggiorno, mira a 100-150 lux e un Bianco caldo 2700K temperatura. Un ampio angolo del fascio fornirà una luce delicata.
- Strategia di layout: Un errore fondamentale è posizionare i faretti direttamente sopra il letto, che proiettano una luce intensa nei tuoi occhi. Posizionali invece attorno al perimetro della stanza o concentrali vicino a zone funzionali come armadi e specchiere. I dimmer sono un must per rilassarsi durante la notte. Completa i downlight con morbide lampade da comodino o eleganti lampade a sospensione.
- Mini esempio: Una camera da letto di 20 m² che mira a soddisfare le esigenze di 100 lux
20 × 100 = 2,000 lumens. Con i downlight da 500 lumen, installeresti 4 faretti per illuminazione generale.
Il bagno: equilibrio tra funzionalità e atmosfera da spa
- Obiettivi di illuminazione: I bagni necessitano di un attento mix di luce brillante e funzionale per la cura della persona e di luce ambientale più morbida per creare un'atmosfera rilassante, simile a quella di una spa. Anche la sicurezza è fondamentale.
- Specifiche consigliate: Per lo specchio cosmetico, hai bisogno di una luce intensa: 300-500 lux. Per l'area generale, 150-200 lux è sufficiente. UN Bianco freddo 4000K La temperatura fornisce un'eccellente resa cromatica per il trucco e la rasatura.
- Strategia di layout: È necessario utilizzare downlight con classificazione IP per la sicurezza nelle aree umide. Per la maggior parte del bagno è necessaria una classificazione IP (protezione ingresso) pari a IP44 o superiore, mentre per le luci posizionate direttamente all'interno della cabina doccia è necessaria una classificazione IP65. Per un'illuminazione perfetta e priva di ombre, posiziona due faretti su entrambi i lati dello specchio cosmetico, non direttamente sopra di esso. Aggiungi una o due luci centrali per l'illuminazione generale.
- Mini esempio: Un bagno di 8 m² che mira a soddisfare le esigenze di 200 lux
8 × 200 = 1,600 lumens. Utilizzando downlight con classificazione IP da 400 lumen, avresti bisogno 4 faretti.
Il corridoio & Corridoi: orientare la strada
- Obiettivi di illuminazione: Spesso trascurata, l’illuminazione del corridoio è fondamentale per creare una transizione sicura e accogliente tra gli spazi. Una buona illuminazione può far sembrare più aperto un corridoio stretto.
- Specifiche consigliate: Puntare a 100-150 lux con un neutro 3000K-4000K temperatura del colore.
- Strategia di layout: Distribuisci i downlight in modo uniforme, a circa 1,5-2 metri di distanza, al centro del corridoio. Per un look più drammatico ed esclusivo, utilizza i downlight regolabili per "lampeggiare le pareti", inclinandoli per proiettare un flusso di luce uniforme lungo un lato del corridoio, perfetto per evidenziare una galleria di foto.
- Mini esempio: Un corridoio lungo 10 metri richiederebbe circa 4 o 5 downlight distanziati di circa 2 metri l'uno dall'altro.
Risoluzione dei problemi ed prevenzione dei comuni disastri dovuti al downlight
Anche con il miglior piano, le cose possono andare storte. Ecco alcuni degli errori più comuni che vedo e come puoi evitarli per garantire che il tuo progetto abbia successo.
Errore 1: il soffitto della “pista dell’aeroporto”.
Il problema: Il soffitto è ingombro di troppe luci disposte in una griglia dura e rigida. Questo fa sì che la stanza sembri sterile e istituzionale, non come una casa.
La soluzione: Affidati al metodo di calcolo dei lumen (metodo 3) per trovare il numero corretto di luci. Ricorda che con la tecnologia odierna, poche luci più luminose sono spesso migliori di molte luci fioche. E stratifica sempre la tua illuminazione: non fare affidamento solo sui downlight.
Errore 2: “Effetto caverna”
Il problema: Tutti i downlight sono raggruppati al centro della stanza. Ciò lascia le pareti e gli angoli in ombra, il che può far sembrare la stanza più piccola e chiusa.
La soluzione: Rispetta la regola del distanziamento! Posiziona sempre la prima fila di luci a metà della distanza dalle pareti. Questo spinge la luce verso i bordi della stanza e rende l’intero spazio più luminoso e più aperto.
Errore 3: creare ombre indesiderate
Il problema: Stai al bancone della cucina per tagliare le verdure, ma il tuo corpo blocca la luce, proiettando un'ombra proprio dove devi vedere.
La soluzione: Ciò accade quando le luci da lavoro sono posizionate dietro l'utente. Posiziona sempre l'illuminazione da lavoro leggermente davanti a te, direttamente sopra la superficie di lavoro. Per i banconi della cucina, ciò significa posizionare i downlight oltre il bordo del bancone, non al centro del passaggio.
Errore 4: ignorare le ostruzioni del soffitto
Il problema: Hai tracciato la tua griglia perfetta, inizi a perforare e... tonfo. Hai colpito un travetto del soffitto, un tubo dell'acqua o un condotto HVAC.
La soluzione: Pianifica in anticipo! Usa un rilevatore di montanti per mappare i travetti e qualsiasi altro potenziale ostacolo nel soffitto Prima fai un solo foro. Tieni sempre in mente un layout leggermente flessibile, in modo da poter regolare la posizione di una luce di pochi centimetri, se necessario.
Errore 5: l'effetto strobo o sfarfallio
Il problema: Le tue luci nuove di zecca tremolano, ronzano o creano un effetto stroboscopico pulsante, soprattutto se utilizzate con un ventilatore da soffitto.
La soluzione: Questo è quasi sempre un problema di qualità o compatibilità.
- Acquista downlight LED di alta qualità e privi di sfarfallio. Vale la pena spendere qualcosa in più per un prodotto migliore.
- Assicurati che il tuo dimmer sia compatibile. È necessario un dimmer specifico per l'illuminazione a LED. I moderni dimmer “trailing edge” sono solitamente la scelta migliore.
Conclusione: pianifica con fiducia, luce con perfezione
Ottenere il giusto piano di downlight è una delle cose più trasformative che puoi fare per la tua casa. Non si tratta solo di visibilità; si tratta di creare un'atmosfera, migliorare la funzionalità e rendere il tuo spazio un luogo in cui ami veramente essere. A questo punto, comprendi l'importanza della pianificazione, la potenza del metodo di calcolo dei lumen e l'arte di adattare il tuo design allo scopo unico di ogni stanza.
Non è più necessario indovinare o sperare per il meglio. Con le formule, i progetti e i consigli degli esperti contenuti in questa guida, ora disponi di tutti gli strumenti e le conoscenze necessarie per progettare la tua illuminazione con la sicurezza di un professionista. Il potere di creare una casa splendidamente illuminata è nelle tue mani.
Inizia oggi a pianificare il tuo progetto di illuminazione perfetto!
Domande frequenti (FAQ)
- Q1: Di quanti downlight ho bisogno per metro quadrato?
- R: La vecchia regola pratica suggeriva un downlight ogni 1,2-1,4 metri quadrati. Tuttavia, con la tecnologia LED moderna e più luminosa, questa tecnologia è spesso obsoleta e può portare a un soffitto sovraffollato. Per ottenere risultati più accurati, consigliamo vivamente di utilizzare invece il metodo di calcolo dei lumen.
- Q2: Qual è la differenza tra lumen e watt?
- R: I lumen misurano la luminosità di una lampadina (la sua emissione luminosa), mentre i watt misurano il suo consumo energetico. Quando scegli i downlight LED, dovresti sempre prendere la tua decisione in base al valore dei lumen per assicurarti di ottenere la luminosità di cui hai bisogno.
- Q3: Posso installare downlight LED in qualsiasi stanza?
- R: Sì, sono abbastanza versatili per quasi tutte le stanze. Tuttavia, per bagni, cucine e qualsiasi altra area con umidità, è necessario utilizzare downlight con un grado di protezione IP (Ingress Protection) appropriato, come IP44 o superiore, per garantire la sicurezza.
- Q4: Ho bisogno di un dimmer speciale per i downlight a LED?
- R: Sì, nella maggior parte dei casi sì. Per evitare sfarfallio, ronzio o prestazioni scadenti, è necessario utilizzare un dimmer appositamente progettato e classificato per l'uso con l'illuminazione a LED. Questi sono spesso chiamati dimmer “trailing edge”.
- Q5: Quanto dovrebbero essere distanti i downlight?
- R: Una regola pratica affidabile è dividere l'altezza del soffitto per due. Per un soffitto standard da 2,4 metri (8 piedi), ciò significa che dovresti distanziare i downlight a circa 1,2 metri (4 piedi) l'uno dall'altro. Ricorda di posizionare la prima fila solo a metà distanza dalle pareti.
- Q6: I downlight LED sono convenienti nel lungo periodo?
- R: Assolutamente. Sebbene il costo iniziale possa essere leggermente superiore rispetto alle tecnologie precedenti, i LED consumano molta meno energia e hanno una durata molto più lunga (spesso dura anni o addirittura decenni). Ciò ti consente di risparmiare una notevole quantità di denaro sia sulle bollette elettriche che sul costo della sostituzione delle lampadine nel tempo.