Har du noen gang gått inn i et rom og bare følt... ikke sant? Plassen føles varm, innbydende, og alt er perfekt synlig. Se nå for deg et annet rom, kanskje et du har vært i før. Det kan ha dystre hjørner som føles som en hule, eller det kan være så intenst opplyst at det føles som en operasjonsstue. Forskjellen mellom disse to opplevelsene kommer ofte ned til én ting: en smart belysningsplan.
Å velge riktig antall downlights kan føles som en utfordrende designutfordring. For få, og du blir stående i skyggen. For mange, og du har skapt et blendende rot som ser ut som en rullebane på flyplassen i taket ditt. Det er en vanlig bekymring, men det trenger ikke å være et komplisert problem å løse.
Ikke bekymre deg. Dette er den eneste guiden du noen gang trenger for å lyse opp hjemmet ditt perfekt. Vi skal fjerne alle gjetninger. Sammen vil vi gå gjennom alt fra de enkle formlene som profesjonelle installatører bruker til de avanserte designprinsippene som skaper et virkelig vakkert og funksjonelt rom. Ved å kombinere ekspertråd fra hele belysningsbransjen, flere beregningsmetoder og rom-for-rom-tegninger, vil du få full tillit til å planlegge belysningen din som en proff.
I denne mesterklassen lærer du hvordan du kan dekode lysets språk, identifisere nøkkelfaktorene som vil forme planen din, og bruke velprøvde formler for en feilfri layout. La oss komme i gang.
Grunnlaget: Forstå lysets språk før du begynner
Før du kan begynne å måle og beregne, er det viktig å forstå de grunnleggende begrepene og begrepene. Å få disse grunnleggende tingene riktig er det første skrittet mot å bygge en vellykket belysningsplan. Denne kunnskapen vil gi deg mulighet til å ta informerte beslutninger, ikke bare gjetninger.
Hva er egentlig downlights og innfelte lys?
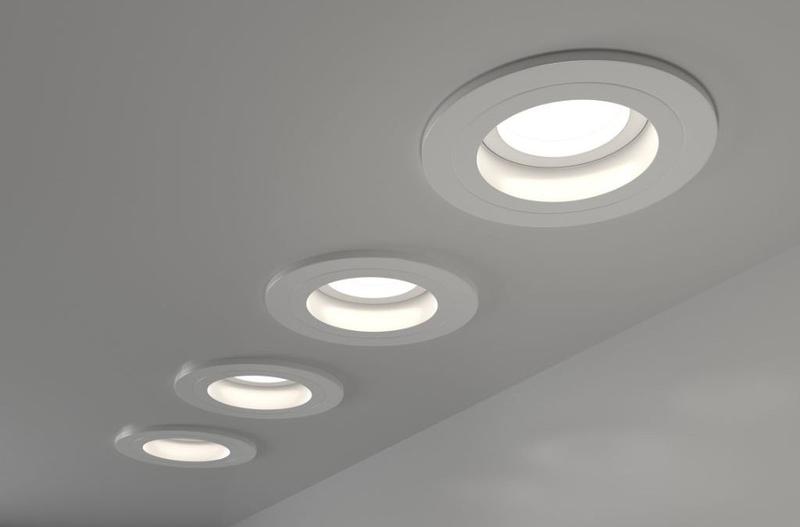
Du har sikkert hørt noen forskjellige navn kastet rundt: downlights, innfelte lys, bokslys eller til og med pottelys. For det meste brukes disse begrepene om hverandre for å beskrive det samme: en lysarmatur som er installert i en hul åpning i et tak.
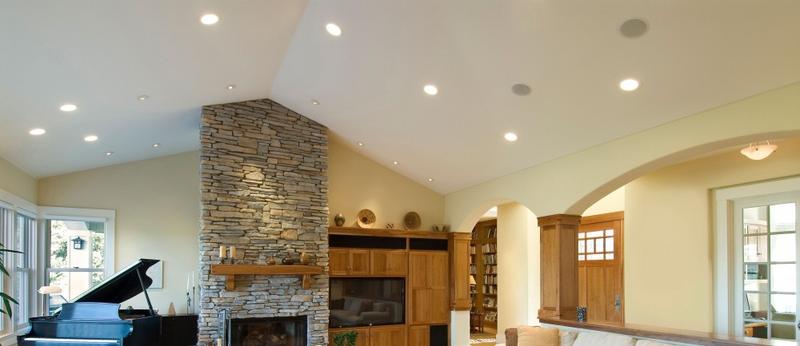
Kjernefunksjonen deres er enkel, men effektiv: de skinner lys i en nedadgående retning, og skaper et rent, moderne og diskret utseende. Fordi selve armaturet er skjult eller i flukt med taket, får du fordelen av lyset uten det visuelle rotet til en tradisjonell hengende armatur. Denne minimalistiske appellen er grunnen til at de er en favoritt innen moderne interiørdesign.
Hva er de forskjellige typene LED-downlights jeg kan velge mellom?
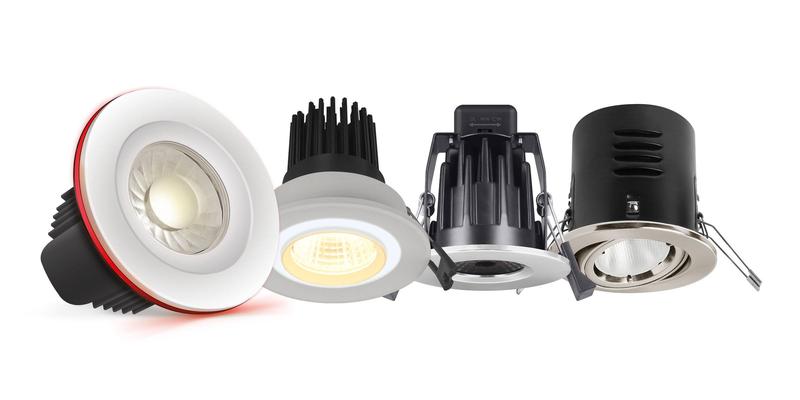
Ikke alle downlights er skapt like. Typen du velger vil avhenge av rommets formål og designmålene dine. Her er en rask oversikt over de vanligste alternativene:
- Faste downlights: Dette er den pålitelige klassikeren. En fast downlight lyser rett ned, som en enkel spotlight. Den er perfekt for generell, all-over belysning (kjent som ambient lighting) i oppholdsrom og ganger. Den største fordelen er dens enkelhet og evne til å skape jevn dekning når den er plassert riktig. Ulempen? Det gir null fleksibilitet.
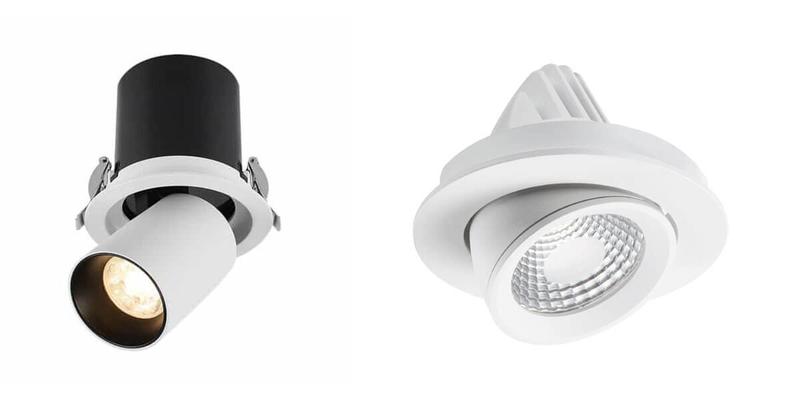
- Justerbare (eller Gimbal) downlights: For de som ønsker litt mer kontroll er justerbare downlights svaret. Disse armaturene kan vippe og svinge, slik at du kan rette lysstrålen nøyaktig dit du trenger den. Dette gjør dem ideelle for:
- Oppgavebelysning: Retter lyset direkte mot en kjøkkenbenk eller et skrivebord.
- Aksentbelysning: Fremheve et kunstverk, en teksturert vegg eller en arkitektonisk funksjon som et skråtak.
- Innfelte downlights: Dette er den slanke, sømløse mesteren og den vanligste typen. Armaturet sitter i flukt i taket, slik at det ser ut som lyset på magisk vis dukker opp fra et rent hull. De er perfekte for minimalistiske design, men de krever et hulrom (tom plass) over taket for installasjon.
- Utenpåliggende downlights: Hva om du har et tak uten hulrom, som en solid betongplate? Utenpåliggende downlights er din løsning. Disse armaturene sitter rett under takflaten, og gir et moderne, dristig utseende uten å måtte kutte et stort hull. De er mer merkbare enn innfelte alternativer, så de blir en del av selve designet.
Hvorfor er riktig beregning og avstand så avgjørende?
Du kan bli fristet til å bare se på det, men planlegging av downlight-plasseringen er hemmeligheten for å unngå en lyskatastrofe. Dårlig planlegging kan føre til flere problemer som vil ødelegge utseendet og følelsen av rommet ditt:
- Underbelysning: Dette skjer når du har for få lys eller de er plassert for langt fra hverandre. Det resulterer i dystre, mørke kroker og en lite innbydende atmosfære. Vi kaller dette den "skyggefulle hule"-effekten.
- Overbelysning: Det motsatte problemet. For mange lys kan skape et hardt, klinisk gjenskinn som føles sterilt og ubehagelig – det fryktede "operasjonsstue"-utseendet. Det er også en betydelig sløsing med energi.
- Dårlig mellomrom: Selv med riktig antall lys, kan tilfeldig eller ujevn avstand skape et kaotisk rot i taket ditt. Det fører til flekkvis lys med altfor lyse hotspots rett ved siden av mørke flekker, noe som er visuelt skurrende.
Riktig avstand sikrer en jevn, balansert vask av lys som får et rom til å føles komplett, funksjonelt og profesjonelt designet.
Dekoding av spesifikasjonene: lumen, lux, watt, strålevinkel og fargetemperatur forklart
Når du ser på boksen for en downlight, vil du se mange tekniske termer. Ikke la deg skremme! Å forstå disse fem nøkkelberegningene er enklere enn du tror, og vil gjøre deg til en mye smartere shopper.
| Belysning Term | Hva det betyr & Hvorfor det betyr noe |
|---|---|
| Lumens (lm) | Dette er den viktigste enkeltverdien. Lumen måler den totale lysstyrken til en lyskilde. Jo høyere lumentallet er, desto sterkere blir lyset. Glem watt et øyeblikk; lumen forteller deg hvor mye lys du faktisk får. |
| Watt (W) vs. Lumens | Dette er et vanlig forvirringspunkt. I gamle dager med halogenpærer betydde høyere wattstyrke en lysere pære. I dag, med energieffektive LED-er, er det ikke lenger sant. Watt måler energiforbruk, mens lumen måler lysstyrke. Du kan ha en lav-watt LED som produserer svært høy lumen. Velg alltid downlights basert på deres lumeneffekt, ikke deres wattstyrke. |
| Lux (lx) | Lux måler hvor lys en overflate ser ut. Nærmere bestemt, en lux er lik en lumen fordelt på en kvadratmeter (1 lux = 1 lm/m²). Dette er målet du sikter mot når du beregner belysningsbehovet ditt for et rom. Det bestemmer hvor lyst rommet *føles*. |
| Strålevinkel | Strålevinkelen beskriver hvor bredt lyset sprer seg ut fra armaturet. En smal stråle skaper et fokusert spotlight, mens en bred stråle skaper en mykere, bredere stråle av lys.
|
| Fargetemperatur (Kelvin eller K) | Dette måler "varmen" eller "kjøligheten" til lysets farge, målt på Kelvin-skalaen. Å velge riktig fargetemperatur er avgjørende for å sette stemningen.
|
De 7 nøkkelfaktorene som påvirker Downlight-beregningen din
Nå som du snakker lysets språk, la oss dykke ned i variablene. En perfekt belysningsplan passer ikke for alle. Det er en tilpasset løsning basert på din unike plass. Her er de syv nøkkelfaktorene du må vurdere før du beregner noe.
Faktor 1: Romdimensjoner og form
Denne er grei: Jo større rommet er, jo mer lys trenger du for å fylle det. Men ikke bare stopp ved det totale arealet. Vær nøye med rommets form. En uvanlig form, som en L-formet stue eller en lang, smal gang, vil kreve en mer gjennomtenkt layout for å forhindre mørke flekker. Åpne kjøkken som flyter inn i et spiseområde må behandles som forskjellige "soner", hver med sine egne belysningskrav.
Handlingstrinn: Ta et målebånd. Mål hele lengden og bredden på rommet ditt og multipliser dem for å få det totale arealet i kvadratmeter (m²) eller kvadratfot (ft²). Lag en rask skisse av rommets form, og merk eventuelle uvanlige funksjoner.
Faktor 2: Takhøyde – den mest oversett variabelen
Fra min erfaring er takhøyde den faktoren som oftest glemmes av huseiere, og den har en massiv innvirkning på en belysningsplan. Tenk på den som en vannkanne: Jo høyere du holder den, jo mer sprer vannet seg, og jo mindre konsentrert er det når det treffer bakken. Lys fungerer på samme måte.
Når taket ditt er høyere, må lyset reise lenger for å nå gulvene, bordene og benkene dine. Som et resultat blir lyset svakere og mer spredt. En plan som fungerer perfekt for et standardtak vil se svak og usammenhengende ut i et rom med høyt tak.
Retningslinjer for ulike takhøyder:
- Standardtak (ca. 2,4 meter / 8 fot): Du kan holde deg til standardberegninger og avstandsregler. Dette er grunnlinjen.
- Høyere tak (ca. 2,7 til 3 meter / 9 til 10 fot): Du må justere planen din. Du har tre alternativer:
- Bruk downlights med høyere lumeneffekt (lysere pærer).
- Plasser armaturene litt nærmere hverandre for å sikre at lysbassengene overlapper hverandre.
- Velg downlights med en smalere strålevinkel for å fokusere lyset nedover mer effektivt.
- Svært høye eller hvelvede tak (over 3 meter / 10+ fot): For disse dramatiske områdene trenger du sannsynligvis en kombinasjon av alle tre strategiene. Sterkere lys med smale stråler blir avgjørende for å unngå en dyster følelse.
En praktisk tommelfingerregel: For hver ekstra meter takhøyde over standard 2,4 m bør du sikte på å øke lumeneffekten til downlightene dine med ca. 20-30 % for å opprettholde samme lysstyrkenivå på bakkenivå.
Faktor 3: Romfunksjon og ønsket lysstyrke (Lux Level)
Hvordan planlegger du å bruke rommet? Svaret på dette spørsmålet avgjør hvor lyst det må være. Et kjøkken hvor du kutter grønnsaker med en skarp kniv trenger mye mer lys enn et soverom designet for å slappe av om natten. Denne ønskede lysstyrken måles i lux.
Her er en detaljert tabell med anbefalte lux-nivåer for ulike rom. Tenk på dette som juksearket for lysstyrke.
| Romtype | Primærfunksjon | Anbefalt Lux (lysstyrke) | Stemning/følelse |
|---|---|---|---|
| Stue | Avslapping, sosialt samvær, se på TV | 100 – 150 lux | Myk, koselig og innbydende |
| Soverom | Hvile, påkledning, lesing | 100 – 150 lux | Rolig, intim og avslappende |
| Kjøkken (Generelt område) | Generell bruk, bevegelse, sosialt samvær | 200 – 300 lux | Lyst, rent og innbydende |
| Kjøkken (oppgaveområder) | Matlaging, matlaging, leseoppskrifter | 300 – 500 lux | Veldig lys, funksjonell og klar |
| Bad (Generelt område) | Generell bruk | 150 – 200 lux | Rent og spa-lignende |
| Bad (servantskap/speil) | Stell, barbering, sminke | 300 – 500 lux | Lyst og skyggefritt |
| Hjemmekontor / Studie | Arbeid, lesing, fokus | 400 – 500+ Lux | Veldig lyst, energigivende og fokusert |
| Gang / Korridor | Overgang, velkommen, sikkerhet | 100 – 150 lux | Trygg, åpen og innbydende |
Faktor 4: Downlight-spesifikasjoner (lumenutgang & Strålevinkel)
Denne faktoren er enkel, men kritisk. Du må kjenne spesifikasjonene til den nøyaktige downlighten du planlegger å kjøpe før du fullfører planen din. En downlight som produserer 800 lumen er mye kraftigere enn en som produserer 400 lumen. Hvis du bruker det kraftigere lyset, trenger du færre armaturer. Sjekk alltid produktspesifikasjonene for lumenutgang og tilgjengelige strålevinkler.
Faktor 5: Vegg-, gulv- og takfarger (refleks)
Har du noen gang lagt merke til hvordan et rom umiddelbart føles lysere etter et nytt strøk med hvit maling? Det er på grunn av lysreflektansen. Fargene på rommets overflater spiller en rolle i hvor mye lys som trengs.
- Mørke vegger, gulv og møbler vil absorbere lys. I et rom med mørke marinevegger eller et dypt grått teppe, kan det hende du må øke det totale nødvendige lumenet med 10-20 % for å kompensere.
- Lyse vegger og overflater vil reflektere lyset rundt i rommet, slik at rommet føles lysere og mer åpent. I disse tilfellene fungerer standardberegninger vanligvis helt fint.
Faktor 6: Møbeloppsett og fokuspunkter
Du tenner ikke en tom boks; du lyser opp et møblert, bebodd rom. Møbeloppsettet ditt bør absolutt veilede belysningsplanen din.
Profesjonelle tips for belysning rundt møbler:
- Unngå "hoderefleks": Plasser aldri en downlight rett over der noens hode vil være når de sitter i sofaen eller ligger i sengen. Dette skaper ubehagelig gjenskinn. Plasser lyset litt foran sittegruppen i stedet.
- Se etter refleksjoner: Plassering av en downlight rett over et glasssalongbord eller et høyglansgulv kan skape en blendende refleksjon. Juster plasseringen for å unngå dette.
- Lys oppgaven, ikke personen: For oppgaveområder som kjøkkenbenker eller skrivebord, plasser lyset rett over arbeidsområdet for å lyse det perfekt.
- Identifiser dine fokuspunkter: Har rommet ditt en vakker peis, et fantastisk kunstverk eller en strukturert vegg? Bruk justerbare downlights for å fremheve disse fokuspunktene og legge til et lag med profesjonell design til rommet ditt.
Faktor 7: Brukerspesifikke behov
Vurder til slutt hvem som skal bruke rommet. Belysningsbehov kan endres basert på alder og følsomhet.
- For eldre brukere: Når vi blir eldre, svekkes synet vårt naturlig. Et rom som føles perfekt lyst for en 30-åring, kan virke svakt for en 80-åring. For et rom som primært brukes av en eldre person, bør du vurdere å øke det anbefalte lux-nivået med 50 % eller mer for å sikre sikkerhet og komfort.
- For barnerom: Et barns netthinnen utvikler seg fortsatt, og for sterkt eller sterkt lys kan være overstimulerende. For et barnerom eller barnehage er det best å velge mykere, varmere og alltid dimbar belysning for å skape et rolig miljø.
Slik beregner du antall downlights: 3 velprøvde metoder fra rask til presis
Greit, du har gjort leksene dine. Du kjenner rommets dimensjoner, du har satt lysstyrkemålene dine, og du har vurdert alle nøkkelfaktorene. Nå er det på tide å regne. Vi vil dekke tre forskjellige metoder, alt fra et raskt estimat til den profesjonelle standarden.
Metode 1: Arealdelingsregelen (et raskt anslag)
Dette er en rask og enkel metode som mange installatører har brukt i årevis. Den gir et grovt estimat og er best egnet for generell belysning i rom med standardhøyde der presisjon ikke er førsteprioritet.
- Formelen for generell belysning:
Number of Downlights = Total Room Area (in m²) ÷ 1.4 - Formelen for lysere rom (som kjøkken):
Number of Downlights = Total Room Area (in m²) ÷ 1.2
Eksempel på arbeid:
- Rom: En stue som måler 5 meter ganger 4 meter.
- Område: 5m × 4m = 20 m².
- Beregning:
20 ÷ 1.4 = 14.28 - Resultat: I følge denne regelen trenger du ca 14 eller 15 downlights.
Min ekspertuttalelse: Selv om denne metoden er rask, overvurderer den ofte antallet lys som trengs med dagens lyse, effektive LED-er. Å bruke denne regelen kan føre til det "overfylte taket"-utseendet. Jeg anbefaler å bruke dette kun som et veldig foreløpig utgangspunkt.
Metode 2: Avstandsformelen (en layout-første tilnærming)
Denne metoden prioriterer å lage et visuelt pent, symmetrisk rutenett. Det er en utmerket måte å sikre at layouten din ser balansert og profesjonell ut, snarere enn tilfeldig.
Den gylne regelen for avstand: Ideal Spacing Between Lights = Ceiling Height ÷ 2
Trinn-for-trinn guide:
- Bestem din ideelle avstand: For et standard 2,4 m tak vil den ideelle avstanden være
2.4 ÷ 2 = 1.2 metersfra hverandre. - Bestem din avstand fra veggene: Dette er et avgjørende skritt for å unngå "huleeffekten." Den første raden med lys skal være plassert ved halv av hovedavstanden din fra veggen. Så i vårt eksempel er det
1.2m ÷ 2 = 0.6 meters (or 60cm)fra hver vegg. - Beregn lys per rad (lengdevis): Del rommets lengde med avstanden din.
- Beregn lys per rad (breddevis): Del rommets bredde med avstanden din.
- Beregn det totale antallet lys: Multipliser antall lys for lengden med antall lys for bredden.
Eksempel på arbeid:
- Rom: En stue, 5m x 4m, med 2,4m tak.
- Mellomrom: 1,2 meter.
- Lys langs 5m lengde:
5m ÷ 1.2m = 4.16. Du kan ikke ha en del av et lys, så vi planlegger for 4 lys. - Lys langs 4m bredde:
4m ÷ 1.2m = 3.33. Vi planlegger for 3 lys. - Totalt antall lys:
4 lights × 3 lights = 12 downlights.
Denne metoden gir oss et rent 4×3 rutenett. Det er en mye bedre tilnærming enn metode 1, da den fokuserer på en jevn layout. Imidlertid tar det fortsatt ikke hensyn til *lysstyrken* til lysene du velger.
Metode 3: Lumenberegningsmetoden (den profesjonelle standarden)
Dette er det. Dette er den mest nøyaktige og pålitelige metoden, og den jeg anbefaler for hvert prosjekt, spesielt for funksjonelle rom som kjøkken, bad og kontorer. Den baserer beregningen på det faktiske lyset som kreves for rommets formål.
Mesterformelen: Number of Downlights = (Room Area × Target Lux Level) ÷ Lumens per Downlight
Trinn-for-trinn guide:
- Trinn 1: Beregn romarealet ditt.
Eksempel: Kjøkken som måler 5m x 4m = 20 m². - Trinn 2: Bestem ditt mål-luksnivå.
Se vår Lux-anbefalingstabell. For et lyst kjøkken, la oss sikte på 400 lux.
Eksempel: Target Lux = 400. - Trinn 3: Beregn det totale lumen som trengs for rommet.
Dette er ganske enkelt Area × Target Lux.
Eksempel:20 m² × 400 lux = 8,000 total lumens needed. - Trinn 4: Velg Downlight og finn lumenutgangen.
La oss si at du har valgt en stilig downlight som produserer 700 lumen.
Eksempel: Lumen per downlight = 700 lm. - Trinn 5: Beregn antallet downlights som kreves.
Bruk nå hovedformelen.
Eksempel:8,000 total lumens ÷ 700 lumens per light = 11.42. - Trinn 6: Rund opp og planlegg oppsettet.
Du kan ikke installere 0,42 av et lys, så du må runde opp til 12 downlights. Nå vet du at du trenger 12 armaturer, og du kan ordne dem i et pent 4×3 rutenett ved å bruke avstandsprinsippene fra metode 2.
Denne metoden kombinerer presisjon med layoutplanlegging, og sikrer at rommet ditt ikke bare er lyst nok, men også vakkert og jevnt opplyst. Det er gullstandarden av en grunn.
| Beregningsmetode | Best for | Fordeler | Ulemper |
|---|---|---|---|
| 1. Områdeinndelingsregel | Raske, grove estimater for ikke-kritiske områder. | Veldig raskt og enkelt. | Unøyaktig med moderne lysdioder; antyder ofte for mange lys. |
| 2. Avstandsformel | Opprette et visuelt rent, symmetrisk rutenettoppsett. | Sikrer et jevnt og profesjonelt utseende. | Tar ikke hensyn til lysstyrken (lumen) til lysene eller rommets funksjon. |
| 3. Lumenberegningsmetode | Alle situasjoner. Dette er den mest nøyaktige og anbefalte metoden. | Nøyaktig, tilpasset rommets formål, og står for lysstyrken. | Krever noen flere beregningstrinn. |
Din rom-for-rom downlighting Blueprint
Teori er flott, men la oss bli praktiske. Hvert rom har sin egen personlighet og formål, og belysningen din bør matche den. Her er en detaljert plan for de vanligste rommene i hjemmet ditt, som setter all vår kunnskap ut i livet.
Kjøkkenet: Hjemmets funksjonelle hjerte
- Lysmål: Kjøkkenet krever en lagdelt belysningstilnærming. Du trenger lys, fokusert Oppgavebelysning over countertops, the island, and the sink where you do most of your work. Dette bør balanseres med godt generell omgivelsesbelysning for resten av plassen.
- Anbefalte spesifikasjoner: Sikt etter 300-500 lux for oppgaveområder og 200-300 lux for generelle områder. EN 4000K Cool White fargetemperatur gjør at ting ser rent og lyst ut. Bruk en bredere strålevinkel (~60°) for generell belysning og en litt smalere (~40°) for fokuserte oppgaveområder.
- Oppsettstrategi: Dette er et viktig profftips. Plasser din oppgave downlights over forkant av benkeplatene dine, ikke midten av gangveien. Dette lyser opp arbeidsområdet ditt uten at kroppen din kaster en skygge over det du gjør. Plasser dem 1 til 1,5 meter fra hverandre. Vurder å legge til dekorative pendellys over en øy for et ekstra designlag.
- Minieksempel: For et 15m² kjøkken med sikte på lyse 300 lux, trenger du
15 × 300 = 4,500 lumens. Ved å bruke 600-lumen downlights, trenger du4500 ÷ 600 = 7.5, så du ville installere 8 downlights.
The Living Room: Skape et allsidig, koselig senter
- Lysmål: Fleksibilitet er navnet på spillet her. Stuen din er for å slappe av, underholde og noen ganger til og med jobbe. Du må kunne endre stemningen med et øyeblikks varsel. Lagdelt belysning er viktig.
- Anbefalte spesifikasjoner: En mykere 100-150 lux er perfekt for generell atmosfære. Velg en varm og koselig 2700K-3000K varmhvit fargetemperatur. En bred strålevinkel (60°-120°) vil skape en myk, jevn vask.
- Oppsettstrategi: Dimmere er ikke omsettelige i en stue! Bruk dem til å kontrollere lysstyrken og sette stemningen. I stedet for et stivt rutenett, bør du vurdere å plassere downlights rundt omkretsen av rommet for å få det til å føles større. Kombiner downlights med andre lyskilder som gulvlamper for lesekroker, bordlamper for varme og justerbare downlights for å fremheve en peis eller kunstverk.
- Minieksempel: En stue på 25 m² med sikte på et mykt behov på 100 lux
25 × 100 = 2,500 lumens. Ved å bruke 500-lumen downlights trenger du bare 5 downlights for det omgivende laget ditt, som du deretter vil supplere med lamper.
Soverommet: Ditt fristed for hvile og avslapning
- Lysmål: Soverommet er et privat fristed. Belysningen skal være myk, beroligende og behagelig, men fortsatt funksjonell nok til påkledning og rengjøring.
- Anbefalte spesifikasjoner: Som stua, sikte på 100-150 lux og a 2700K varmhvit temperatur. En bred strålevinkel vil gi en mild glød.
- Oppsettstrategi: En kritisk feil er å plassere downlights rett over sengen, som skinner et sterkt lys i øynene dine. Plasser dem i stedet rundt rommets omkrets eller fokuser dem nær funksjonelle soner som garderober og toalettbord. Dimmere er et must for å slappe av om natten. Kompletter downlights med myke nattbordslamper eller stilige pendellamper.
- Minieksempel: Et soverom på 20 m² med sikte på 100 lux behov
20 × 100 = 2,000 lumens. Med 500-lumen downlights ville du installere 4 downlights for generell belysning.
Badet: Balanserende funksjonalitet og spa-lignende atmosfære
- Lysmål: Bad trenger en forsiktig blanding av sterkt, funksjonelt lys for pleie og mykere omgivelseslys for å skape en avslappende, spa-aktig stemning. Sikkerhet er også viktig.
- Anbefalte spesifikasjoner: For sminkespeilet trenger du sterkt lys: 300-500 lux. For det generelle området, 150-200 lux er tilstrekkelig. EN 4000K Cool White temperatur gir utmerket fargegjengivelse for sminke og barbering.
- Oppsettstrategi: Du må bruke IP-klassifiserte downlights for sikkerhet i våtrom. En IP-klassifisering (Ingress Protection) på IP44 eller høyere er nødvendig for det meste av badet, og en IP65-klassifisering er nødvendig for lys plassert direkte inne i et dusjkabinett. For perfekt, skyggefri arbeidsbelysning, plasser to downlights på hver side av sminkespeilet, ikke rett over det. Legg til ett eller to sentrale lys for generell belysning.
- Minieksempel: Et bad på 8 m² med sikte på 200 lux behov
8 × 200 = 1,600 lumens. Ved å bruke 400-lumen IP-klassifiserte downlights, trenger du 4 downlights.
Gangen & Korridorer: Veiviser
- Lysmål: Ofte oversett, er gangbelysning avgjørende for å skape en trygg og innbydende overgang mellom rom. God belysning kan få en smal gang til å føles mer åpen.
- Anbefalte spesifikasjoner: Sikt etter 100-150 lux med en nøytral 3000K-4000K fargetemperatur.
- Oppsettstrategi: Space downlights jevnt, ca. 1,5 til 2 meter fra hverandre, midt i gangen. For et mer dramatisk, eksklusivt utseende, bruk justerbare downlights for å "veggvaske" – vinkle dem for å kaste en jevn vask av lys nedover den ene siden av hallen, som er perfekt for å fremheve et galleri med bilder.
- Minieksempel: En 10 meter lang gang ville trenge ca 4 eller 5 downlights med en avstand på ca. 2 meter.
Feilsøking og unngå vanlige downlighting-katastrofer
Selv med den beste planen kan ting gå galt. Her er noen av de vanligste feilene jeg ser og hvordan du kan unngå dem for å sikre at prosjektet ditt blir en suksess.
Feil 1: "Airport Runway"-taket
Problemet: Taket er rotete med for mange lys arrangert i et hardt, stivt rutenett. Dette gjør at rommet føles sterilt og institusjonelt, ikke som et hjem.
Løsningen: Stol på lumenberegningsmetoden (metode 3) for å finne riktig antall lys. Husk at med dagens teknologi er færre, kraftigere lys ofte bedre enn mange svake. Og alltid lag belysning – ikke stol på downlights alene.
Feil 2: "Huleeffekten"
Problemet: Alle downlights er samlet i midten av rommet. Dette etterlater vegger og hjørner i skygge, noe som kan få et rom til å føles mindre og mer innelukket.
Løsningen: Følg mellomromsregelen! Plasser alltid den første raden med lys på halvparten av avstanden fra veggene. Dette skyver lys til kantene av rommet og gjør at hele rommet føles lysere og mer åpent.
Feil 3: Lage uønskede skygger
Problemet: Du står ved kjøkkenbenken for å kutte grønnsaker, men kroppen blokkerer lyset og kaster en skygge akkurat der du trenger å se.
Løsningen: Dette skjer når oppgavelys plasseres bak brukeren. Plasser alltid arbeidsbelysningen litt foran deg, rett over arbeidsflaten. For kjøkkenbenker betyr dette å plassere downlights over kanten av benken, ikke midt i gangveien.
Feil 4: Ignorerer takhindringer
Problemet: Du har markert det perfekte rutenettet ditt, du begynner å bore, og ... dunker. Du har truffet en takbjelke, et vannrør eller en HVAC-kanal.
Løsningen: Planlegg fremover! Bruk en stendersøker for å kartlegge bjelkene og eventuelle andre potensielle hindringer i taket ditt før du borer et enkelt hull. Ha alltid en litt fleksibel layout i tankene, slik at du kan justere lysets posisjon med noen få tommer om nødvendig.
Feil 5: Strobe-effekten eller flimring
Problemet: De splitter nye lysene dine flimrer, surrer eller skaper en pulserende strobeeffekt, spesielt når de brukes med en takvifte.
Løsningen: Dette er nesten alltid et spørsmål om kvalitet eller kompatibilitet.
- Kjøp flimmerfrie LED-downlights av høy kvalitet. Det er verdt å bruke litt mer for et bedre produkt.
- Sørg for at dimmerbryteren din er kompatibel. Du trenger en dimmerbryter som er spesifikt vurdert for LED-belysning. Moderne "bakkant" dimmere er vanligvis det beste valget.
Konklusjon: Planlegg med selvtillit, lys med perfeksjon
Å få din downlight-plan riktig er en av de mest transformerende tingene du kan gjøre for hjemmet ditt. Det handler om mer enn bare synlighet; det handler om å skape en atmosfære, forbedre funksjonaliteten og gjøre rommet ditt til et sted du virkelig elsker å være. Nå forstår du viktigheten av planlegging, kraften i lumenberegningsmetoden og kunsten å skreddersy designet til hvert roms unike formål.
Du trenger ikke lenger gjette eller håpe på det beste. Med formlene, tegningene og eksperttipsene i denne veiledningen har du nå alle verktøyene og kunnskapen du trenger for å designe belysningen din med tilliten til en profesjonell. Kraften til å skape et vakkert opplyst hjem er i dine hender.
Begynn å planlegge ditt perfekte lysdesign i dag!
Ofte stilte spørsmål (FAQ)
- Q1: Hvor mange downlights trenger jeg per kvadratmeter?
- A: Den gamle tommelfingerregelen foreslo én downlight per 1,2 til 1,4 kvadratmeter. Dette er imidlertid ofte utdatert med moderne, lysere LED-teknologi og kan føre til overfylt tak. For de mest nøyaktige resultatene anbefaler vi på det sterkeste å bruke lumenberegningsmetoden i stedet.
- Q2: Hva er forskjellen mellom lumen og watt?
- Sv: Lumen måler lysstyrken til en pære (lyseffekten), mens watt måler energiforbruket. Når du velger LED-downlights, bør du alltid ta avgjørelsen din basert på lumenvurderingen for å sikre at du får den lysstyrken du trenger.
- Q3: Kan jeg installere LED-downlights i alle rom?
- A: Ja, de er allsidige nok for nesten alle rom. For bad, kjøkken og andre områder med fuktighet må du imidlertid bruke downlights med passende IP-klassifisering (Ingress Protection), for eksempel IP44 eller høyere, for å sikre sikkerheten.
- Q4: Trenger jeg en spesiell dimmer for LED-downlights?
- A: Ja, i de fleste tilfeller gjør du det. For å unngå flimring, summing eller dårlig ytelse, bør du bruke en dimmerbryter som er spesielt designet og vurdert for bruk med LED-belysning. Disse kalles ofte "bakkant"-dimmere.
- Q5: Hvor langt fra hverandre bør downlights være?
- A: En pålitelig tommelfingerregel er å dele takhøyden med to. For et standard 2,4 meter (8 fot) tak, betyr dette at du bør plassere downlights med ca. 1,2 meter (4 fot) fra hverandre. Husk å plassere den første raden bare halvparten av den avstanden fra veggene.
- Q6: Er LED-downlights kostnadseffektive i det lange løp?
- A: Absolutt. Selv om startkostnaden kan være litt høyere enn eldre teknologier, bruker LED betydelig mindre energi og har en mye lengre levetid (som ofte varer i år eller tiår). Dette sparer deg en betydelig sum penger på både strømregningen og kostnadene for utskifting av pærer over tid.