Saksene dine er skarpe, klipperne dine er oljet, og teknikken din er feilfri. Men hva med ditt mest undervurderte verktøy? Den som fungerer lydløst i bakgrunnen, og dikterer kvaliteten på hvert snitt, komforten til hver klient og det aller førsteinntrykket av butikken din? Vi snakker om belysningen din.
For mange barbershops behandler belysning som en ettertanke, en enkel sak om å gjøre rommet lyst nok til å se. Denne vanlige feilen kan føre til inkonsekvente kutt, et drenerende arbeidsmiljø og en klientopplevelse som faller flat. Sannheten er at stor belysning ikke er en luksus; Det er en grunnleggende nødvendighet for enhver seriøs pleieinstitusjon.
Denne guiden er den eneste ressursen du trenger for å mestre dette viktige elementet. Vi vil avmystifisere kunsten og vitenskapen om belysning, og lede deg gjennom alt fra de grunnleggende prinsippene til avanserte designstrategier som vil gjøre butikken din skille seg ut. Mot slutten av denne guiden vil du ha ekspertkunnskapen til å designe et lysskjema som forbedrer ferdighetene dine, løfter merkevaren din og holder kunder tilbake for mer.
Hvorfor er belysning det viktigste verktøyet i frisørbutikken din?
Før vi dykker ned i watt, lumen og inventar, la oss fastslå hvorfor belysning fortjener din fulle oppmerksomhet. Det er langt mer enn bare å "gjøre ting lyst." En gjennomtenkt lysplan er en stille partner i virksomheten din, og påvirker direkte arbeidet ditt, kundene og bunnlinjen.
Hvordan sikrer god belysning presisjon i hvert snitt?
I kjernen er barbering et håndverk av presisjon. Enten du utfører en feilfri hudfade, hugger ut en intrikat hårdesign eller oppnår en sylskarp lineup, må du se hver eneste detalj. Å prøve å jobbe under svake eller skyggefulle forhold er som å prøve å male et mesterverk i en hule. Det er en oppskrift på katastrofe.
Dårlig belysning kan lett føre til at du går glipp av et herrelt hår, feildømmer en retningslinje eller skaper en ujevn blanding. Disse små feilene, usynlige i dårlig lys, blir lysende åpenbare når klienten tråkker utenfor. Og la oss være ærlige, du kan ikke Photoshop en dårlig hårklipp. Eksepsjonell belysning eliminerer gjetninger, og gir deg mulighet til å jobbe med selvtillit og levere de konsistente resultatene av høy kvalitet som bygger et fantastisk rykte.
Kan belysning virkelig påvirke hvordan hårfarge og tekstur ser ut?
Absolutt. Hår er et komplekst lerret av farge, tekstur og tetthet. Den rette belysningen er som en HD-linse, og avslører alle disse kritiske nyansene. Det lar deg se nøyaktig:
- Ekte hårfarge: Viktig for fargeleggingstjenester, og sikrer at skyggen i stolen matcher skyggen i sollyset.
- Hårtekstur og avskjedslinjer: Å identifisere hvordan hår naturlig faller og hvor det er tykkere eller tynnere er nøkkelen til å lage en balansert, profesjonell stil som vokser ut godt.
- Subtile ufullkommenheter: Godt lys hjelper deg med å oppdage og rette problemer, og leverer et mer polert sluttprodukt.
Uten det flyr du blind og klarer ikke å skreddersy din tilnærming til de unike egenskapene til hver klients hår.
Hvordan påvirker belysning kundens humør og komfort?
Tenk på klientopplevelsen fra det øyeblikket de går i. Butikkens belysning er et kraftig verktøy for å forme humøret. Hard, lysstoffrør kan føle seg klinisk og uvelkomne. Dim, skyggefulle hjørner kan føle seg uoppfordrende eller til og med uren. Derimot skaper et gjennomtenkt designet lysskjema en atmosfære av profesjonalitet, avslapning og tillit.
Videre kan det rette lyset være utrolig smigrende. Varm, godt plassert belysning kan myke opp utseendet til mindre hudflekker og skape en behagelig glød, noe som får klienter til å føle seg bra med seg selv før tjenesten deres begynner. Studier har gjentatte ganger vist at estetisk, behagelig belysning har en direkte positiv innvirkning på folks stemninger. En lykkelig, avslappet klient er mer sannsynlig å glede seg over opplevelsen, bli en lojal kunde og henvise til vennene sine.
Beskytter du din egen velvære? Redusere barberøyet.
La oss ikke glemme den viktigste personen i butikken: deg. Å jobbe i timevis under dårlig belysning er som å be øynene dine løpe maraton hver eneste dag. Den konstante skvisende og anstrengelsen kan føre til kronisk hodepine, tretthet og langsiktige synsproblemer. Det tapper energien din og kan redusere lidenskapen din for håndverket.
Å investere i riktig belysning er en investering i din egen helse- og karriereens levetid. Det lar deg jobbe komfortabelt og bærekraftig, og sikre at du kan utføre på ditt beste i årene som kommer. Du er en dyktig profesjonell, ikke "Squinty McSnips." Arbeidsområdet ditt skal støtte deg, ikke kjempe mot deg.
Hvordan kommuniserer belysning merkevarens profesjonalitet?
Belysningen din er en form for ikke-verbal kommunikasjon. Det er en av de aller første tingene en ny klient vil legge merke til, og den setter umiddelbart tonen for merkevaren din. En lys, ren og med vilje tent rom kommuniserer kompetanse, kvalitet og nøye oppmerksomhet på detaljer. Den forteller klienter at dette er et sted der høye standarder er normen. Det bygger tillit før du selv henter saksene dine.
Fundamentals of Lighting: A Barber's Crash Course
Å dykke inn i belysningsverdenen kan føles som å lære et nytt språk. Men ikke bekymre deg - vi kommer til å dele opp de essensielle konseptene til enkle, praktiske termer. Å forstå disse grunnleggende er nøkkelen til å ta informerte beslutninger og designe et system som virkelig fungerer for butikken din.
Hva er de tre lyslagene? (Omgivende, oppgave og aksent)
Tenk på å designe belysningen din som å bygge et hus. Du kan ikke bare sette opp dekorative skodder uten et solid fundament og vegger. Tilsvarende er flott lysdesign bygget i tre forskjellige lag som fungerer sammen.
- Omgivelsesbelysning: Dette er din fundament. Det er det primære, generelle lyset som fyller hele plassen, eliminerer store mørke områder og setter den generelle stemningen og lysstyrken. Det sikrer sikker navigasjon og grunnleggende synlighet. Eksempler: Innfelte lys, LED -paneler eller sentrale takarmaturer.
- Oppgavebelysning: Dette er din arbeidshest. Oppgavebelysning er lys, fokusert belysning rettet mot bestemte områder der detaljert arbeid skjer. For en frisør er dette det mest avgjørende laget. Det er lyset som lar deg se hvert hår og utføre håndverket ditt med presisjon. Eksempler: Justerbare sporlys over arbeidsstasjoner, eller lys innebygd i speil.
- Aksentbelysning: Dette er din Kunstnerisk teft. Aksentbelysning brukes til å trekke øyet til spesifikke funksjoner, legge til dybde, drama og visuell interesse for rommet ditt. Det er det som gjør et funksjonelt rom til stilig. Eksempler: Spotlights på detaljhandelprodukter, bildelys over kunstverk eller veggskonces som fremhever en strukturert vegg.
Hvordan velger du riktig "farge" av hvitt lys? (Fargetemperatur forklart)
Ikke alt hvitt lys er det samme. "Fargen" på en hvit lyskilde kalles dens Fargetemperatur, og den er målt på en skala kalt Kelvin (K). Å forstå dette vil tillate deg å skape det perfekte humøret for hvert område i butikken din.
| Fargetemperaturområde | Utseende | Typisk stemning | Beste bruk i en frisør |
|---|---|---|---|
| Varm hvit (2700k - 3000k) | Myk, gulaktig, koselig glød | Avslappende, innbydende, tradisjonell | Venteområder, spa/massasjeom, aksentbelysning for et vintage tema. |
| Nøytral hvit (3500K - 4500K) | Balansert, ren, naturlig hvit | Vennlig, profesjonell, moderne | Mottakskranker, generell omgivelseslys. Et 4000K -lys er et populært "søtt sted." |
| Kult hvit / dagslys (5000K - 6500K) | Lys, skarp, blå tonet hvit | Energigivende, ren, høy-klarhet | Skjære- og fargeleggingsstasjoner. Maksimerer synligheten og reduserer øyestammen. |
Hvorfor er CRI (Color Rendering Index) en ikke-omsettelig beregning?
Dette høres kanskje teknisk ut, men det er utrolig viktig. De Color Rendering Index (CRI) er en poengsum fra 0 til 100 som måler hvor nøyaktig en lyskilde avslører de sanne fargene på objekter sammenlignet med naturlig sollys (som har en perfekt CRI på 100).
Hvorfor er dette en avtale-bryter i en barbershop? Se for deg at en klient får håret farget, elsker det i stolen din, men går deretter utenfor og finner ut at det ser ut som en helt annen nyanse. Denne "fargeoverraskelsen" er ofte forårsaket av lav-CRI-belysning. En høy CRI sikrer at hårfarger, hudtoner og til og med fargene på innredningen din ser nøyaktig ut som de skal.
Tommelfingerregelen for CRI: For et profesjonelt pleiemiljø, må du aldri nøye deg med mindre. Velg alltid lys med en CRI på 85 eller, ideelt sett, 90 og over. Denne informasjonen er nesten alltid oppført på produktets emballasje eller spesifikasjonsark.
Hvordan måler du lysstyrken riktig? (Lumen og lux)
La oss rydde opp i forvirringen mellom disse to begrepene. De forholder seg begge til lysstyrke, men de måler forskjellige ting.
- Lumen (LM): Dette måler Total mengde synlig lys En pære avgir i alle retninger. Tenk på det som den "rå kraften" eller den totale lysutgangen til selve pæren.
- Lux (lx): Dette måler Mengden lys som faktisk faller på en bestemt overflate. En lux er lik en lumen per kvadratmeter. Tenk på dette som den "effektive lysstyrken" du opplever på et bestemt sted.
Denne skillet er viktig. Du vil planlegge lysbehovene for hver sone i butikken din ved å bruke et mål lux nivå, og du vil kjøpe pærene dine basert på deres Lumen output for å oppnå det nivået.
Trinn for trinn: Hvordan planlegge barberbutikkbelysningen
En strålende lysordning skjer ikke ved et uhell; Det er resultatet av nøye planlegging. Ved å følge disse trinnene kan du lage en sammenhengende og effektiv belysningsstrategi som stemmer perfekt med butikkens behov og merkeidentitet.
Trinn 1: Definer butikkens tema og atmosfære
Før du selv tenker på en enkelt pære, kan du gå tilbake og definere sjelen til butikken din. Belysningen din er en viktig spiller for å fortelle merkevarens historie. Er butikken din et tilbakeslag til en klassisk epoke, et elegant moderne studio eller et robust industriområde? Belysningsvalgene dine skal forsterke dette temaet.
- For en industriell stil: Omfavne rå elementer som utsatte ledninger, metall-burede pærer og funksjonell sporbelysning.
- For en vintage/klassisk stemning: Tenk varmt, innbydende lys fra dekorative pendantlamper, elegante veggløp og kanskje til og med LED-pærer i Edison-stil.
- For et moderne/minimalistisk utseende: Velg rene linjer med elegante LED -paneler, lite påtrengende innfelte downlights og stilige lineære lysarmaturer.
Trinn 2: Vurder ditt fysiske rom
Hvert rom har sine egne rare og egenskaper. En grundig vurdering er avgjørende for en vellykket plan.
- Takhøyde: Dette dikterer dine inventarvalg. Høyt tak kan håndtere dramatiske hengende anheng og krever kraftigere lys for å belyse gulvet. Lavt tak er bedre egnet for innfelte, spor eller flushmonterte inventar for å opprettholde en følelse av åpenhet.
- Layout: Få ut et stykke papir og kartlegge de viktigste funksjonelle sonene: skjærestasjonene, sjampoområdet, resepsjonen, den ventende salongen og eventuelle detaljhandel skjermer. Hver av disse sonene har unike belysningskrav.
- Naturlig lys: Ikke kjempe med solen - jobb med den! Tilbring litt tid i butikken din til forskjellige tider av døgnet. Hvor faller det naturlige lyset? Skaper det gjenskinn på speilene dine på bestemte timer? Hvor er de evigvarende mørke hjørnene? Din kunstige belysningsplan skal utformes for å balansere og supplere dette naturlige lyset, noe som sikrer jevn belysning fra åpen til lukk.
Trinn 3: Beregn dine spesifikke lysbehov
Nå er det på tide å få inn tallene. Ved å bruke lysstyrkeanbefalingene fra forskningen vår, kan vi lage et klart mål for hver sone i butikken din. Dette tar gjetningene ut av å bestemme "hvor lyst er lyst nok."
| Butikkområde | Primærfunksjon | Anbefalt lysstyrke (lumen per kvadratmeter) | Anbefalt fargemperatur (k) |
|---|---|---|---|
| Kutting & Stylingstasjoner | Presisjonsoppgavearbeid | 100 - 200 lm/kvadratmeter. ft | 4000K - 6000K |
| Vask & Fargeleggingsområde | Avslapning & Fargeturnøyaktighet | 50 - 100 lm/kvadratmeter. ft | 3000K - 4000K (med høy CRI) |
| Venter & Resepsjonsområde | Innbydende & Komfort | 50 - 75 LM/SQ. ft | 3000K - 4000K |
| Detaljhandelsproduktvisning | Fremheving & Tiltrekning | Høyere, fokusert lysstyrke (aksentbelysning) | 4000k |
Å sette det ut i praksis: La oss si at kuttestasjonsområdet ditt er 10 fot med 10 fot, som er 100 kvadratmeter. Du vil ha et lyst, oppgaveorientert rom, slik at du sikter til 150 lumen per kvadratfot.
Beregning: 100 kvadratmeter x 150 lm/kvadratmeter. ft. = 15 000 totale lumen som kreves.
Hvis du velger LED -nedlys som hver produserer 1000 lumen, trenger du 15 av disse lysene for å belyse det spesifikke området riktig. Denne enkle matematikken sikrer at du kjøper riktig mengde lys for jobben.
En sone-for-sone guide til perfekt barberbutikkbelysning
Nå som vi har en plan, la oss bli spesifikke. En flott barberbutikkbelysningsdesign handler ikke om å oversvømme hele rommet med samme lys. Det handler om å skreddersy belysningen til den spesifikke oppgaven og stemningen i hver enkelt sone. Her er din praktiske guide til å belyse hvert hjørne av butikken din med formål.
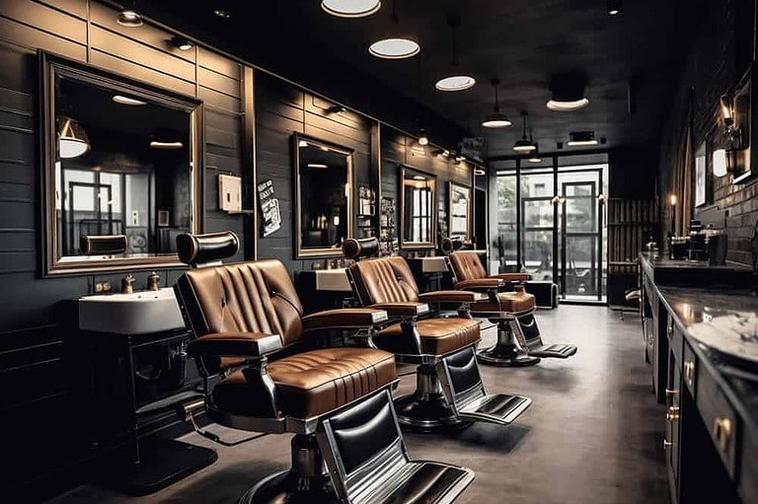
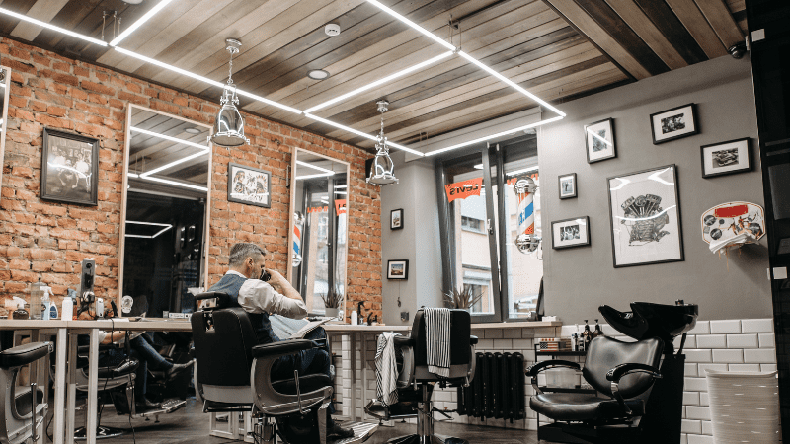
Kuttestasjonen: hjertet av operasjonen
Målet: Feilfri, skyggefri klarhet for presisjonsarbeid.
Dette er det kirurgiske teatret i butikken din, og det krever best mulig belysning. Ditt rykte er bygget her, en hårklipp om gangen. Belysningen må være lys, nøyaktig og strategisk plassert for å eliminere enhver sjanse for at skygger forstyrrer arbeidet ditt.
- Lyslag: Dette området krever en kraftig kombinasjon av lyst Oppgavebelysning som den primære kilden, støttet av god generelt Ambient belysning for å forhindre tøffe kontraster.
- Fasthetsanbefalinger:
- Overhead: Regulerbar LED sporlys er den ubestridte kongen her. Deres fleksibilitet lar deg sikte flere hoder nøyaktig der det er nødvendig, og oversvømme arbeidsområdet med lys. Innfelt av høy kvalitet Spotlights er et annet utmerket valg.
- Speilbelysning: Dette er det hemmelige våpenet mot skygger i ansiktet. Installer vertikal LED lineære lys eller stilig Veggskonces På begge sider av speilene dine. Dette gir direkte, frontal belysning som kansellerer ut alle skygger som er støpt fra luftlys. Bakbelyste speil som har denne funksjonen innebygd er et elegant, moderne alternativ.
- Plassering Pro tips: Plasser aldri hovedlyset ditt rett over klientens hode. Dette tvinger deg til å jobbe i din egen skygge. Plasser i stedet sporet eller søkelysene omtrent 2 meter foran frisørstolen, vinklet ned mot klienten. Dette lyser opp hodet og skuldrene perfekt uten hindring.
Vaskingen & Coloring Area: Hvor avslapning oppfyller nøyaktigheten
Målet: En rolig, spa-lignende atmosfære som fremdeles gir fargelys.
Denne sonen er et sted for transformasjon og avslapning. Belysningen skal føles mindre klinisk og mer beroligende, mens den fremdeles oppfyller det tekniske kravet om høy fargekraft for farging og toningstjenester.
- Lyslag: Fokus på mykt, diffusert Ambient belysning. Oppgavebelysning er mindre kritisk her, men kvaliteten på omgivelseslyset er avgjørende.
- Fasthetsanbefalinger:
- Bruk vanntett eller fuktig rangert innfelt Downlights For å sikre sikkerhet nær vann. Kritisk sett må disse ha en High CRI (90+) For å sikre fargedroskap.
- For et snev av luksus, bør du vurdere kreativ aksentbelysning. Tucking LED -stripelys Inn i en takskul kan skape en vakker, indirekte glød. Noen high-end salonger bruker til og med fiberoptisk belysning for å skape en "stjerneskudd" -effekt over vaskaene, og maksimerer følelsen av rolig flukt for klienten.
- Fargetemperatur: En varmere 3000k Fargetemperatur forbedrer den avslappende, spa-lignende følelsen av dette området. Bare sørg for at det ikke kommer på bekostning av en høy CRI.
Ventetiden & Resepsjonsområde: Førsteinntrykket
Målet: Å skape et varmt, innbydende og stilig førsteinntrykk som gjenspeiler merkevaren din.
Det er her du setter scenen. Belysningen her skal få klienter til å føle seg øyeblikkelig rolig og gi dem en klar følelse av butikkens personlighet og profesjonalitet.
- Lyslag: Dette området er først og fremst avhengig av godt designet Ambient belysning, forbedret av smakfull Aksentbelysning.
- Fasthetsanbefalinger: Dette er din sjanse til å komme med en stiluttalelse.
- En slående Pendelys Eller en liten lysekrone over resepsjonen kan fungere som et vakkert samlingspunkt.
- Elegant Veggskonces I venteområdet kan gi et mykt, behagelig lys som er mye mer behagelig enn tøffe overheads.
- For et rent, moderne utseende, LED -paneler eller innfelte lys kan gi en lys og luftig følelse.
- For tipset: Installer Dimmerbrytere I dette området. Dette lar deg justere lysstyrken gjennom dagen, og skape en lysere, mer energisk følelse om morgenen og en roligere, mer intim stemning om kvelden.
Produktvisning: Din stille selger
Målet: For å fremheve detaljhandelsproduktene dine, få dem til å se attraktive og oppmuntrende impulskjøpene.
Ikke la detaljhandelsproduktene sitte glemt på en mørk hylle. Godt opplyst varer ser mer premium ut og selger seg selv. Belysningen din kan gjøre en enkel produkthylle til en lønnsom detaljhandel.
- Lyslag: Denne sonen handler om kraften til Aksentbelysning.
- Fasthetsanbefalinger:
- Den mest effektive metoden er Integrert hyllebelysning. Installere tynn LED -stripelys På undersiden av hver hylle gjør hvert produkt pop og gir displayet et high-end, tilpasset utseende.
- Alternativt kan du dedikere et takbane med flere justerbare Spotlights Målet direkte til detaljhandelen. Dette lar deg nøyaktig fremheve helteprodukter eller nyankomne.
- Fargetemperatur: En nøytral 4000k er ofte best for detaljhandelsdisplay. Det får emballasjefarger til å se skarpe, rene og ekte til livet.
Velge de riktige inventar: din frisørsalderverktøysett
Med en solid plan på plass, er det på tide å velge maskinvare. Denne delen vil fungere som din produktguide, og hjelper deg med å forstå de forskjellige tilgjengelige typene og hvorfor en teknologi står hode og skuldre over resten.
Tradisjonell Halogen vs. Modern LED: Hvorfor det ikke er noen konkurranse
I det siste var halogenpærer et populært valg for deres sterke lys og utmerkede fargegjengivelse. Imidlertid har moderne LED -teknologi overgått dem på nesten alle målbare måte. For en ny eller renovert frisørsalong er valget klart.
| Trekk | Halogenlys | LED -lys |
|---|---|---|
| Energieffektivitet | Lav (en 50W pære er vanlig) | Ekstremt høy (En 7W-10W pære kan produsere den samme lysstyrken) |
| Levetid | Kort (1000 - 2000 timer) | Ekstremt lang (25 000 - 50 000+ timer) |
| Varmegenerering | Veldig høyt (blir ubehagelig varm) | Veldig lav (kult å ta på, tryggere) |
| På forhåndskostnad | Senke | Høyere |
| Langsiktige kostnader | Høy (på grunn av energi og hyppige erstatninger) | Veldig lav (betaler for seg selv i sparing) |
| Allsidighet | Begrensede farger og funksjoner | Store alternativer i farge, temperatur, dimming og smarte kontroller |
Dommen: Mens halogenlys har en litt lavere innledende kjøpesum, gjør de overveldende fordelene med LED -lys i energibesparelser, lang levetid, sikkerhet og allsidighet dem til det eneste logiske og økonomisk forsvarlige valget for en moderne barberbutikk. Investeringen i lysdioder vil betale for seg selv mange ganger.
Din essensielle handleliste
Her er arbeidshestarmaturene du sannsynligvis vil velge fra butikken din:
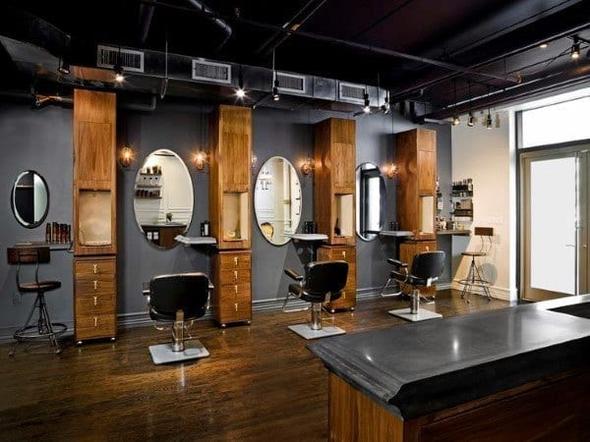
- LED -sporbelysning: Den mest verdifulle spilleren for oppgavebelysning. En enkelt strømkilde mater et spor som kan inneholde flere, uavhengig målbare lette hoder. Dette gir deg enestående fleksibilitet til å dirigere intenst lys nøyaktig der du trenger det, og du kan enkelt legge til eller flytte hoder når butikkoppsettet endres.
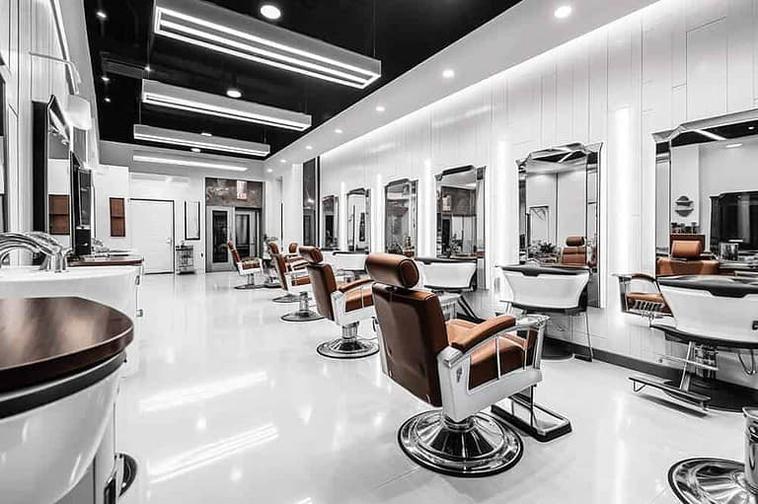
- Innfelte downlights: Gå til ren, lite påtrengende omgivelsesbelysning. Disse inventar er installert i taket, og gir et sømløst utseende som fungerer bra i enhver designstil, spesielt i butikker med lavere tak der du vil maksimere romfølelsen.
- Pendellys: Dette er hengende inventar som fungerer som både en lyskilde og et stort dekorativt element. De er perfekte for å komme med en stiluttalelse over en resepsjon, i et venteområde, eller som en sentral funksjon i et rom med høyt tak.
- Veggskonces: Inventar som monteres direkte på veggen. De er viktige for å gi det kritiske frontallyset på speilstasjoner og kan også legge til et lag med mykt, omgivelseslys til gangene eller ventearealene.
- LED -paneler & Lineære lys: Disse gir bred, jevn og ofte skyggefri belysning. De er et utmerket valg for en moderne, minimalistisk estetikk og fungerer bra for generell omgivelsesbelysning over store områder.
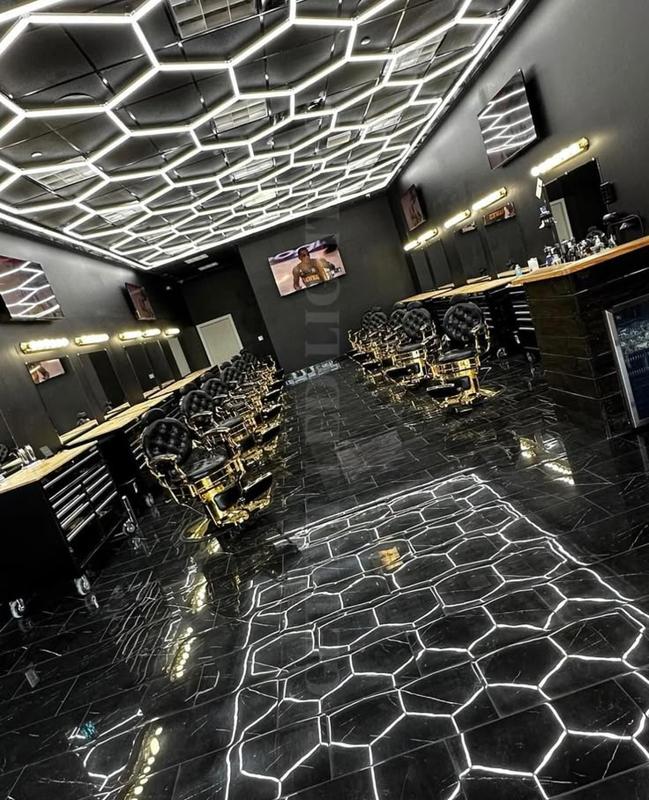
Kreative belysningsideer som skiller butikken din fra hverandre
Vil du gå utover det grunnleggende og skape et virkelig minneverdig rom? Her er noen ideer med høy påvirkning som utnytter de unike egenskapene til LED-teknologi.
- Bakbelyste speil: Dette er et sofistikert og svært funksjonelt designvalg. Ved å montere LED -strimler på den bakre omkretsen av speilene dine, lager du en vakker "glorie" -glød. Dette gir myk, til og med frontal belysning som er utrolig smigrende for kundene dine og bra for detaljarbeid.
- Opplyst hyller: Gjør detaljhandelproduktene umulige å ignorere. Følg tynne LED -stripelys på undersiden av hver detaljhandel. Dette gjør at produktene selv ser ut til å gløde, noe som gir skjermen din en profesjonell, high-end boutique-følelse.
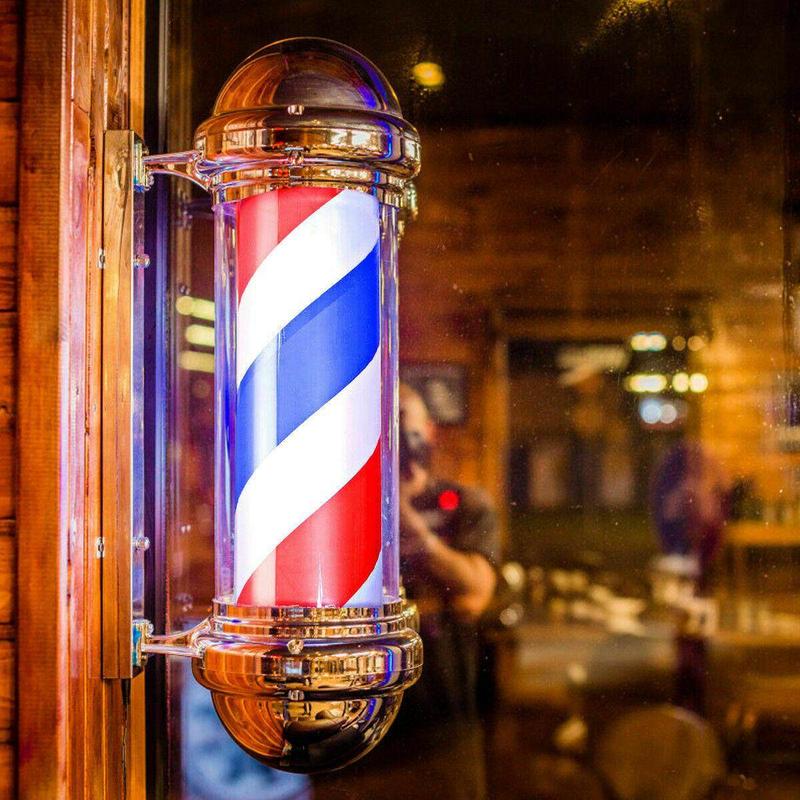
- Den moderne frisørstangen: Gi den tradisjonelle frisørstangen en vri fra det 21. århundre. Pakk en innendørs dekorativ pol med programmerbar RGB (rød, grønn, blå) LED -stripelys. Du kan stille dem til å sykle gjennom de klassiske røde, hvite og blå, eller endre fargene for å matche høytider eller spesielle arrangementer.
- Tilpasset neon flex -skilting: Tradisjonelle neonskilt er dyre og skjøre. Moderne LED Neon Flex tilbyr det samme livlige, iøynefallende utseendet, men er mer holdbart, energieffektivt og kan bøyes i hvilken som helst form. Bruk det til å lage et tilpasset skilt med butikkens logo, et kult sitat eller et grafisk design. Det er den perfekte måten å forsterke merkevaren din og skape et "instagrammabelt øyeblikk" som klienter vil elske å dele.
Installasjonshemmeligheter: plassering, skygger og blending
Du kan ha de beste inventarene i verden, men hvis de er installert dårlig, vil resultatet være skuffende. Riktig installasjon handler om strategisk plassering for å mestre samspillet mellom lys og skygge. Her er hemmelighetene til en profesjonell installasjon.
De gylne reglene for inventarplassering
Å overholde noen få viktige plasseringsprinsipper vil løse 90% av vanlige lysproblemer før de til og med starter.
- Unngå direkte plassering på stasjoner: Som nevnt før, må du aldri plassere ditt primære oppgavelys rett over frisørstolen. Dette tvinger deg til å jobbe i din egen skygge. Det ideelle stedet er 2 til 3 fot foran stolen, vinklet mot klienten.
- Bruk speilet som et verktøy: Ikke vær redd for å sikte lys mot speilet. Fiskebanelys mot den øvre delen av speilet skaper et mykt, diffust sprettlys som gir utmerket, blendingsfri belysning.
- Omfavne frontal belysning: Nøkkelen til å eliminere ansiktsskygger er å tenne klienten fra fronten. Den beste måten å gjøre dette på er med vertikale inventar montert på begge sider av speilet, med midten av lyskilden på omtrent ansiktsnivå (en vanlig anbefaling er ~ 1600mm eller 63 tommer fra det ferdige gulvet).
- Sørg for jevn avstand for omgivelseslys: Når du installerer innfelte downlights eller paneler for generell belysning, må du opprettholde en jevn avstand mellom dem. Dette forhindrer flekkete "hot spots" og mørke soner, og skaper en sømløs og til og med spredning av lys over hele butikken.
Hvordan vinne krigen mot skygger og blending
Dette er de to dødelige fiendene med god frisørsalongbelysning. Slik beseirer du dem.
- Å erobre skygger: Løsningen er å bruke Flere lyskilder fra forskjellige vinkler. En enkelt lyskilde, uansett hvor lys, vil alltid skape harde skygger. Kombinasjonen av vinklet luftlys og direkte frontal lys fra speilarmaturene er det en-to-stansen som sikrer et skyggefritt arbeidsområde.
- Å temme blending: Blending er ubehagelig for både deg og din klient. Det er forårsaket av at en altfor lys eller utsatt lyskilde treffer øyet direkte eller spretter av en reflekterende overflate som et speil eller kromklippere. For å administrere det:
- Bruk inventar med diffusorer eller frostede linser å myke opp lyset.
- Velg "Anti-Glare" eller "Deep-Cup" -lys der pæren er innfelt høyere opp i armaturen, og beskytter den mot direkte utsikt.
- Det viktigste er at du installerer Dimmerbrytere. Dimmere gir deg den ultimate kontrollen over lysintensiteten, slik at du kan ringe den inn for den perfekte balansen mellom lysstyrke og komfort.
DIY vs. Profesjonell installasjon: En avgjørende avgjørelse
Mens fristelsen til å spare penger med en DIY -installasjon er forståelig, for en kommersiell virksomhet som en frisørsalong, er dette et hjørne du aldri bør kutte.
En profesjonell, lisensiert elektriker bringer mer enn bare verktøy; De gir en forståelse av lokale byggekoder, riktige ledningsteknikker for kommersielle rom og kritiske sikkerhetsprotokoller. De vil sikre at hele systemet ditt er trygt, kompatibelt og bygget for å vare. For dine kunder, dine ansatte og din virksomhet selv, er profesjonell installasjon ikke bare en anbefaling - det er et essensielt krav.
Budsjettering for glans: kostnad, kvalitet og avkastning
La oss snakke penger. En full belysning totalt sett er en betydelig investering, men det er en av de viktigste du vil gjøre i butikken din. Å forstå kostnadene og tenke langsiktig vil hjelpe deg å ta en smart, lønnsom beslutning.
Hvordan estimere belysningskostnadene dine
Det totale budsjettet ditt vil være en kombinasjon av tre hovedkategorier:
- Inventar: Dette vil være den største delen av budsjettet. Prisene varierer dramatisk basert på merkevare, stil, kvalitet og funksjoner (f.eks. Fargeskiftende, smarte kontroller).
- Arbeidet: Kostnaden for å ansette en lisensiert elektriker for installasjon. Dette kan variere basert på kompleksiteten i jobben, din beliggenhet og om det er en ny bygning eller en komplisert ettermontering.
- Materialene: Ikke glem støttende rollebesetning. Dette inkluderer ledninger, ledninger, koblingsbokser, brytere, dimmere og potensielt nye transformatorer.
"Invester nå, redd senere" filosofi om LED -belysning
Det er lett å få klistremerke sjokk når du sammenligner en halogenpære på $ 5 med en LED -armatur på $ 30. Men det er her du trenger å tenke som en bedriftseier og vurdere Totale eierkostnader. Jo høyere forhåndskostnad for lysdioder er en investering som gir massiv Return on Investment (ROI).
Tenk på det: Et LED -system vil dramatisk redusere den månedlige strømregningen. Det vil også eliminere de tilbakevendende kostnadene ved å kjøpe erstatningspærer og betale noen for å installere dem det neste tiåret eller mer. Når du tar hensyn til disse langsiktige besparelsene, er LED-systemet ikke bare billigere over levetiden, men vil aktivt spare deg for penger år etter år etter at det betaler for seg selv.
Hvordan oppdage kvalitet og unngå billige knock-offs
I belysningsverdenen får du ofte det du betaler for. Slik sikrer du at du investerer i kvalitet, trygge inventar:
- Se etter sertifiseringer: Kjøp bare lys som har sikkerhetssertifiseringer fra anerkjente testlaboratorier. I Nord -Amerika, se etter Ul listet eller ETL oppført merker. For energieffektivitet, se etter Energy Star Rating.
- Sjekk garantien: Produsentens garanti er en tillitserklæring. En anerkjent LED-inventar i kommersiell kvalitet skal komme med en robust garanti, ofte i området for 3 til 5 år. Vær på vakt mot produkter med liten eller ingen garanti.
- Velg anerkjente merker: Selv om det er mange nye merker på markedet, er det ofte en større forsikring om kvalitet, pålitelighet og kundestøtte.
Klar til å belyse håndverket ditt?
Din ferdighet fortjener å bli sett i best mulig lys. En gjennomtenkt lysplan er ikke en utgift - det er en investering i kvaliteten på arbeidet ditt, merkevarens omdømme og kundenes lykke. Det er på tide å slutte å behandle belysning som en ettertanke og begynne å bruke det som det kraftige forretningsverktøyet det er.
Hvis du er klar til å forvandle barberbutikken din til et fyrtårn av stil og presisjon, ta neste trinn. Rådfør deg med en belysningsprofesjonell og skap et rom som virkelig skinner.