Your home’s first impression doesn’t end when the sun goes down. In fact, that’s when the real magic can begin. The right outdoor lighting can transform your property from a dark, indistinct silhouette into a warm, welcoming, and enchanting spectacle. Think of it as the artistic brushstroke that defines your home’s character after dark, turning a simple house into a landmark of sophistication and security that glows with personality.
But where do you even begin? With a dizzying array of options—spotlights, recessed lights, lanterns, path lights, floodlights—choosing the right fixtures and creating a cohesive design can feel overwhelming. It’s a common feeling. A poorly planned setup can look jarring or, even worse, like an airport runway. On the other hand, a thoughtful design can elevate your entire property, making it the envy of the neighborhood.
This is the only guide you will ever need. We’ve distilled insights from top lighting designers, landscape artists, and seasoned homeowners to create a comprehensive blueprint for success. Together, we will walk you through everything, from the fundamental principles of illumination to a massive collection of creative, actionable ideas for every corner of your property. You will learn not just what to do, but why and how to do it, empowering you to make decisions with confidence.
Get ready to explore the three pillars of outdoor lighting, master professional techniques like uplighting and grazing, discover over 50 brilliant ideas, and learn the critical do’s and don’ts to avoid common mistakes. By the end of this guide, you’ll have the knowledge and inspiration to design a lighting scheme that boosts your curb appeal, enhances your family’s security, and perfectly reflects your personal style.
Part 1: The Foundations of Brilliant Outdoor Lighting

Before we dive into the creative ideas, let’s build a solid foundation. Understanding the core concepts of outdoor lighting is the key to a successful project. It’s what separates a random collection of lights from a truly intentional and beautiful design. Think of this as learning the language of light, so you can express your vision perfectly.
Why Your Outdoor Lighting is More Than Just a Light Bulb
Great outdoor lighting does so much more than just help you find your keys in the dark. It’s a powerful tool that enhances your home in several meaningful ways. When planned correctly, it’s an investment that pays off every single night.
- Boosting Your Curb Appeal: This is the most visible benefit. Strategic lighting can accentuate your home’s best features. It can highlight the texture of your brickwork, the grandeur of your columns, or the charming details of your roofline. It also showcases your landscaping, turning your trees and garden beds into stunning nighttime features. Your home will look just as good, if not better, after sunset.
- Enhancing Safety & Security: A well-lit home is a secure home. Dark corners and shadowy entryways can unfortunately invite unwanted attention. A properly illuminated exterior, especially around doors, windows, and pathways, is a powerful deterrent to potential intruders. Beyond security, it’s about safety. Clear lighting on steps, walkways, and driveways prevents trips and falls, ensuring your family and guests can navigate your property safely and easily.
- Creating a Welcoming Atmosphere: There’s something incredibly inviting about a home that glows with a warm, friendly light. It acts as a beacon, guiding your guests to the front door and setting a positive, hospitable tone for their visit. It says, “Welcome, we’re glad you’re here.”
- Increasing Your Home’s Value: This is a key point that many homeowners overlook. A professionally designed and installed outdoor lighting system isn’t just a cosmetic upgrade; it’s a significant improvement that can increase your property’s perceived value. Some real estate experts suggest it can boost a home’s value by as much as 20%. It’s an investment that adds beauty, function, and financial worth.
The Three Pillars of Outdoor Lighting: Task, Accent, and Ambient
Every great lighting plan is built on three distinct layers. Understanding these three pillars—Task, Accent, and Ambient—will help you think like a designer and choose fixtures with a clear purpose. This approach ensures your lighting is both beautiful and functional.
| Type of Lighting | Primary Purpose & Function | Common Fixtures Used |
|---|---|---|
| Task Lighting | This is your functional, get-the-job-done lighting. Its main purpose is to illuminate specific areas to help you perform a “task” safely and easily. Think of any area where you need clear visibility. | Pathway lights to see where you’re walking, step lights to prevent tripping, bright overhead porch lights for unlocking the door, and lights by the garage to guide your car. |
| Accent Lighting | This is the “drama” and “wow factor” lighting. It’s used to draw the eye and create visual interest by highlighting specific features of your home or landscape. It adds depth, texture, and character to your property. | Spotlights to highlight a single tree, uplights to showcase architectural columns, well lights to illuminate a statue from below, and floodlights to graze a textured stone wall. |
| Ambient Lighting | Also known as general lighting, this is the soft, foundational glow that fills the space. Its job is to provide overall visibility and a sense of security without creating harsh glare. It sets the overall mood. | Wall lights (sconces) casting a gentle wash of light, post lights illuminating a garden area, “moonlighting” from trees, or festive string lights hung over a patio. |
A truly masterful design seamlessly blends all three layers. Your task lighting ensures safety, your accent lighting creates beauty, and your ambient lighting ties it all together into a cohesive, inviting scene.
Choosing Your Tools: A Comprehensive Guide to Outdoor Fixture Types
Now that you know the why and the what, let’s look at the how. Your lighting fixtures are the tools you’ll use to paint your home with light. Here’s a detailed guide to the most common types you’ll encounter.
- Outdoor Wall Lights (Sconces & Lanterns): These are the true workhorses of front-of-house lighting. Typically installed next to doors or on garage walls, they provide a perfect blend of ambient and task lighting. The style you choose can dramatically impact your home’s look. Classic, lantern-style fixtures offer a timeless, traditional feel, while sleek, minimalist sconces are perfect for a modern or contemporary home.
- Outdoor Pendants: Think of these as decorative jewelry for your porch. Hung from covered ceilings, they serve as a beautiful focal point while casting a warm, inviting light over a seating area or entryway. They are perfect for adding a touch of indoor elegance to an outdoor space.
- Post & Pier Lights: These are freestanding fixtures mounted on posts. They are commonly used to line driveways, illuminate garden beds, or mark the entrance to a property. They add a sense of structure and formality to a landscape while providing essential ambient and task lighting.
- Recessed & Ceiling Lights (Downlights): For those who love a clean, minimalist aesthetic, recessed lights are the perfect choice. Installed flush into soffits, eaves, or porch ceilings, they provide powerful downward illumination without any visible fixture, keeping the look uncluttered and modern.
- Spotlights & Floodlights: These are your primary tools for creating dramatic accent lighting. It’s important to know the difference:
- Spotlights produce a narrow, concentrated beam of light (usually under 45 degrees). They are perfect for pinpointing a specific feature, like a single architectural column, a flag, or a small tree.
- Floodlights cast a much wider beam, designed to “flood” a larger area with light. They are ideal for illuminating the entire facade of a house, a large stone wall, or a cluster of trees.
- Path & Bollard Lights: As the name suggests, these are designed to light your walkways. They come in many styles, from short, mushroom-shaped lights to taller, more modern bollards. The most important feature to look for is a downward-facing design that illuminates the ground without creating blinding glare for those walking the path.
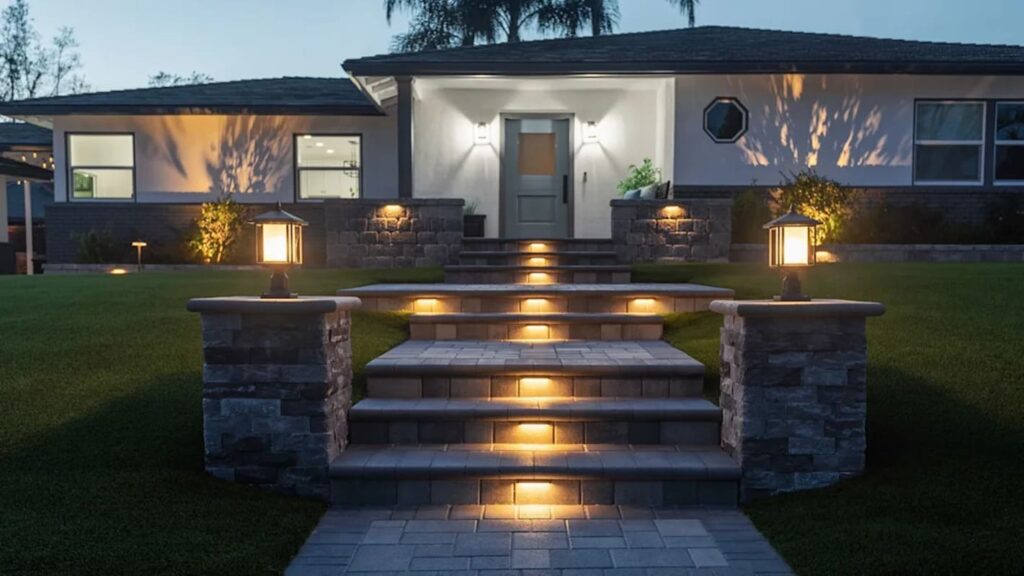
- Step & Deck Lights: These are small, low-profile fixtures designed to be built directly into stair risers, deck surfaces, or retaining walls. Their primary role is safety, clearly marking changes in elevation to prevent trips and falls, but they also add a sophisticated, high-end look.
- String & Fairy Lights: Nothing creates a festive and romantic atmosphere quite like string lights. Larger, bistro-style string lights with Edison bulbs are perfect for draping over a patio or deck. More delicate fairy lights are wonderful for wrapping around tree trunks, weaving through railings, or creating magical “light curtains” for a gazebo.
- In-Ground (Well) Lights: These powerful fixtures are buried directly in the ground, with only the light source visible. This makes them the perfect tool for dramatic uplighting of trees, columns, and walls, as you get all the beautiful light without seeing the fixture itself.
Part 2: The Art of Illumination: Professional Lighting Techniques to Master
Ready to move beyond just placing lights and start designing like a pro? This section will teach you the artistic techniques that lighting designers use to create schemes that are not just bright, but beautiful, balanced, and full of impact. Mastering these concepts is the key to a truly stunning result.
The Three Foundational Rules of Effective Lighting Design
Before you place a single fixture, keep these three core principles in mind. They are the bedrock of any successful lighting plan.
- Cohesion: Tell a Complete Story. Your outdoor lighting should feel like a single, unified experience that guides the eye smoothly from the curb to your front door. You want to avoid large, unlit “black holes” between illuminated areas. A lit pathway that leads to a dark porch feels jarring and incomplete. A cohesive design connects the dots, creating a seamless and logical flow.
- Depth: Create a 3D Experience. Your front yard isn’t flat, so your lighting shouldn’t be either. To create a sense of depth and avoid a “stage set” look, you must light objects in layers. This means illuminating features in the foreground (like a small shrub near the street), the mid-ground (like a prominent tree or garden bed), and the background (the facade of your house). This layering technique makes the space feel larger and more immersive.
- Focal Points: Give the Eye a Destination. A lighting design without a clear focal point can feel chaotic and aimless. You need to decide what the “star of the show” is. What architectural or landscape feature do you want to draw attention to? Common focal points include the front entryway, a majestic tree, a beautiful water feature, or a unique architectural detail. Once you identify your focal points, you can build the rest of your lighting plan around them.
Painting with Light: Uplighting vs. Moonlighting
These are two of the most powerful and fundamental techniques for illuminating tall landscape features, each creating a very different mood.
- Uplighting: The Dramatic Statement.
- How it’s done: You place a light source, typically a spotlight or an in-ground well light, at the base of an object and aim it directly upwards.
- The effect: This technique creates a bold, dramatic effect. It highlights the form, texture, and height of the object, casting long, interesting shadows. It’s a surefire way to make a feature pop.
- Best for: Showcasing the majestic structure of tall trees, emphasizing the grandeur of architectural columns, revealing the rugged texture of stone or brick walls, and making statues or sculptures stand out.
- Moonlighting: The Subtle, Natural Glow.
- How it’s done: You place a fixture high up in the branches of a mature tree (ideally 25 feet or higher) and angle it to shine down through the leaves and branches.
- The effect: This beautiful technique mimics the soft, ethereal glow of a full moon. It creates a gentle, dappled pattern of light and shadow on the ground below, providing a wide area of soft, natural-looking ambient light. It feels magical and serene.
- Best for: Illuminating large areas like lawns, patios, gardens, and pathways in a subtle and non-intrusive way. It’s perfect when you want illumination without seeing an obvious light source.
Creating Drama and Texture: The Magic of Silhouetting, Shadowing, and Grazing
Want to take your design to the next level? These advanced accent lighting techniques are what separate amateur efforts from professional, high-end designs. They add layers of sophistication and visual intrigue.
| Technique | How It’s Done | The Visual Effect | Best For |
|---|---|---|---|
| Silhouetting | Place a spotlight behind a feature object, aiming the light at the wall or surface behind it. The object itself remains dark, while the background is brightly lit. | This technique creates a stunning, high-contrast effect that highlights the object’s unique shape and outline, turning it into a dramatic silhouette. | Objects with interesting and recognizable shapes, like a sculpture, a gnarled tree branch, or a uniquely shaped topiary. It works best against a plain, light-colored wall. |
| Shadowing | Place a spotlight in front of an object, aiming the light through its branches or structure and onto a wall or surface behind it. This is the opposite of silhouetting. | This creative technique casts an enlarged, often beautifully distorted shadow of the object onto the wall. The gentle flicker of leaves in the wind can even create a sense of movement. | Plants with open, intricate structures like Japanese maples, ferns, or ornamental grasses. It’s a fantastic way to add visual texture to a large, plain wall, such as vinyl siding. |
| Grazing | Position a light source very close to a textured surface (typically about a foot away) and aim the beam at a very sharp, acute angle either up or across the surface. | This powerful technique drags deep, dramatic shadows across the surface, exaggerating every crevice, bump, and imperfection. It’s the ultimate way to reveal and celebrate texture. | Highly textured surfaces where you want to create a dramatic, high-end look. It works wonders on materials like river stone, stacked slate, old brick, or rough-hewn wood. |
Part 3: The Ultimate Idea Book: 50+ Lighting Ideas for Every Zone of Your Home’s Exterior
Now for the fun part! Here is a huge collection of creative and practical lighting ideas, broken down by the different zones of your property. Use this as a menu of options to build your perfect, customized lighting plan.
The Grand Entrance: Front Door, Porch & Step Lighting
This is the focal point of your home’s welcome. The lighting here should be both beautiful and highly functional.
- Classic Lanterns for Timeless Appeal: Flank your front door with a pair of traditional, elegant lanterns. This symmetrical look is always in style and provides a warm, balanced glow.
- Modern Wall Sconces for a Sleek Look: For a contemporary home, choose minimalist sconces that cast light both up and down, creating clean lines and a sophisticated effect.
- A Single Statement Pendant: If your porch has enough height, hang a single, large, decorative pendant light. It acts as a stunning focal point and provides excellent ambient light.
- Subtle Recessed Downlights: For a clean, modern look, install recessed lights in the porch ceiling. They provide bright, shadow-free illumination without any visible fixture.
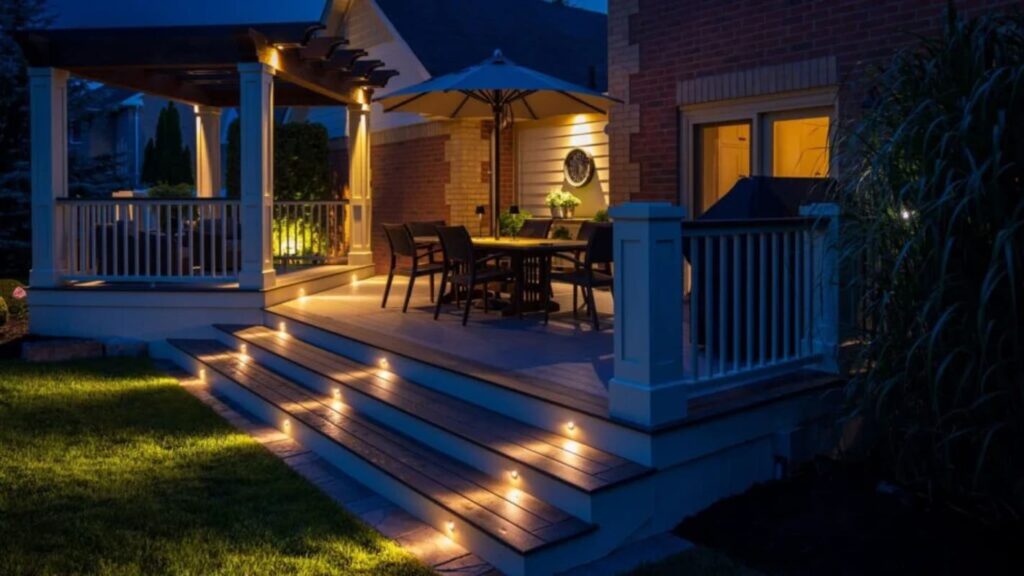
- Integrated Step Lights: For the ultimate in safety and high-end design, build small lights directly into the risers of your front steps. They cast light exactly where you need it.
- Newel Post Deck Lights: A great alternative for steps is to attach small, downward-facing lights to the newel posts at the top and bottom of your stairs.
- Illuminated House Numbers: A stylish and practical touch. Backlit or top-lit house numbers are easy for guests, delivery drivers, and emergency services to see at night.
The Approach: Pathway, Walkway & Driveway Lighting
Guide your guests safely and stylishly from the street to your front door.
- Solar Path Lights: The easiest DIY option. Modern solar lights are surprisingly bright and require no wiring. Just stake them into the ground along your path.
- Low-Voltage Bollard Lights: For a more permanent and professional look, use sturdy bollard lights. These short posts come in various styles to match your home’s aesthetic.
- Recessed In-Ground Driveway Lights: Install durable, drive-over rated lights along the edges of your driveway. This creates a sleek, industrial, and high-end look.
- LED Strip Lighting Along Edges: A very modern technique. Conceal waterproof LED strips under the lip of a concrete path or wooden boardwalk to create a futuristic “floating” effect.
- Patterned Projector Lights: Some path lights have decorative shades that cast beautiful, star-like or floral patterns of light onto the ground, adding a touch of magic.
- Staggered Path Lights: Instead of a rigid, soldier-like line, stagger your path lights on alternating sides of the walkway for a more natural, organic feel.
The Architecture: Highlighting the House Facade & Garage
Use light to show off your home’s best architectural features.
- Accent Spotlights on Key Features: Use narrow-beam spotlights to draw the eye to specific elements like columns, gables, peaks, or window dormers.
- Wall Grazing on Textured Surfaces: Unleash the beauty of your stone or brick facade by using the grazing technique. It will make the texture pop like never before.
- Wall Washing for a Soft Glow: Use wide-beam floodlights to cast a gentle, even layer of light across a large, plain wall. This can make the house itself appear to glow.
- Recessed Soffit & Eave Lighting: Installing downlights under the eaves of your roof is a fantastic way to provide perimeter lighting, highlight the home’s shape, and improve security.
- Garage Door Uplighting: Place in-ground well lights or small spotlights at the base of the pillars on either side of your garage door to frame it beautifully.
- Contemporary Garage Sconces: Don’t forget the garage! Adding stylish, modern sconces on either side of the garage door adds both function and style, tying it into the rest of your home’s design.
The Outdoor Living Spaces: Patio, Deck & Gazebo Lighting
Create an inviting and magical atmosphere for your outdoor entertaining areas.
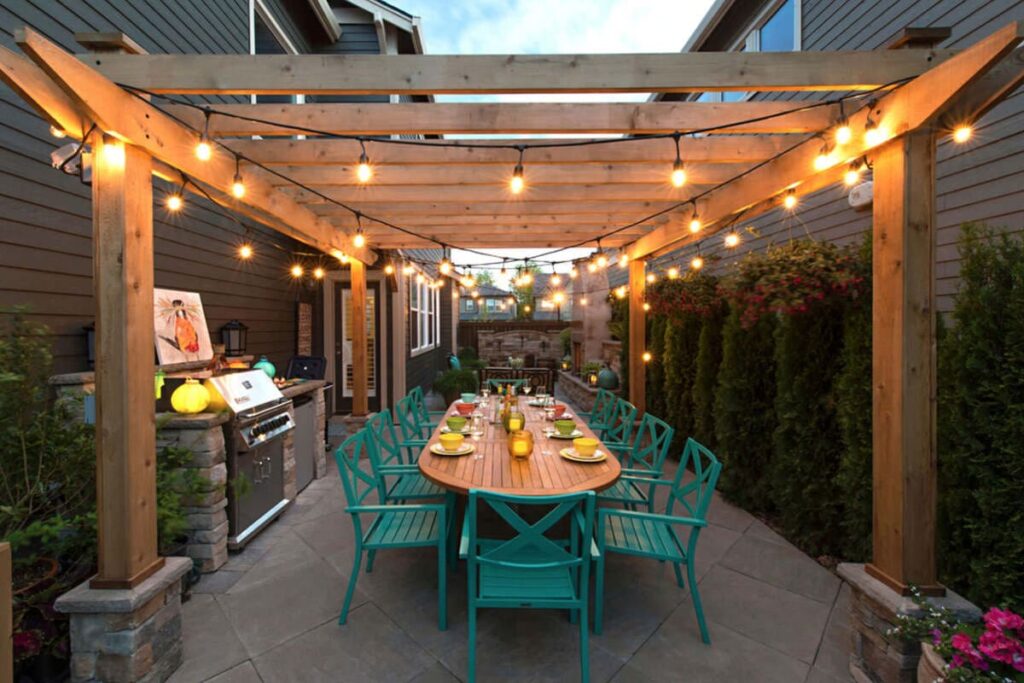
- Festive String Lights Overhead: The quintessential choice for a fun, relaxed vibe. Drape commercial-grade, bistro-style string lights over a patio or deck.
- Magical Fairy Light Curtains: Create a stunning backdrop by hanging multiple vertical strands of delicate fairy lights around a gazebo, pergola, or porch.
- Under-Rail Deck Lighting: For a subtle, sophisticated glow, install LED strips or small puck lights underneath your deck railings. It illuminates the deck surface without any visible glare.
- Hardwired Post Cap Lights: Integrate lighting directly into your deck by using post caps that have built-in, low-voltage lights.
- Outdoor Chandeliers: For the ultimate touch of elegance, hang a weather-rated chandelier in a covered seating area or gazebo.
- Tiki Torches (with LED Flames): Get a tropical, vacation vibe with modern, safe LED tiki torches that mimic the flicker of a real flame without the fire hazard.
The Natural Elements: Garden, Tree & Landscape Lighting
Bring your garden to life after dark and celebrate the beauty of your landscape.
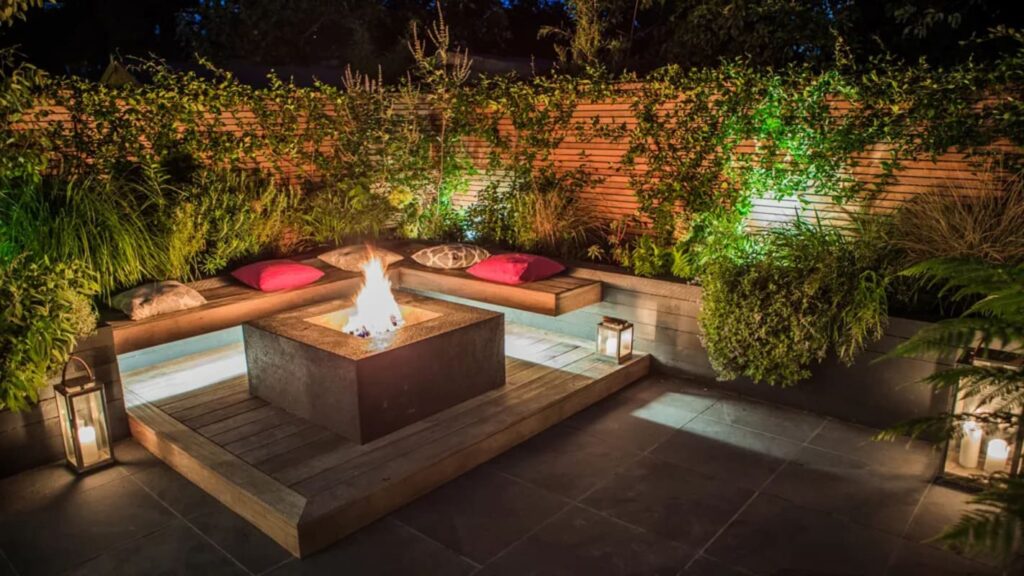
- Dramatic Tree Uplighting: This is a must-do. Use one or more spotlights or in-ground well lights to illuminate the trunk and canopy of a mature tree. It turns it into a living sculpture.
- Gentle Moonlighting from High Branches: Use the moonlighting technique to cast soft, dappled light onto the lawn or garden bed below a large tree.
- Illuminated Planters: A very cool and modern idea. Purchase planters that have built-in, often color-changing, LED lighting. They serve as both a plant container and a light fixture.
- Highlighting Flower Borders with Spike Lights: Use small, adjustable spotlights mounted on spikes to aim light precisely at your most beautiful flowers and plants.
- Shadowing with Shrubbery: Use a uniquely shaped bush or shrub to cast interesting shadows onto a nearby fence or wall.
- Wrapping Tree Trunks with Fairy Lights: A simple, classic, and always beautiful look, especially during the holidays or for a special event.
- Lighting a Living Wall: If you have climbing plants or a trellis, weave waterproof fairy lights through the foliage to create a magical, twinkling green wall.
The Water Features: Pool, Pond & Fountain Lighting
Water and light are a magical combination. Make your water features a stunning nighttime centerpiece.
- Addressable Underwater Pool Lights: Go beyond simple white lights. Install modern, color-changing RGB lights inside your pool that can be programmed to create different moods or even sync with music for a party.
- Illuminating Fountains from Within: Place waterproof lights directly in the fountain basin, aimed up at the flowing water. This makes the water itself appear to glow, creating a mesmerizing effect.
- Lily Pond Accent Lighting: Use small, subtle, submersible lights to highlight blooming water lilies or to create a soft glow around the edge of a koi pond.
- Neon Flex Around Pool Edges: For a trendy, resort-style vibe, outline the shape of your pool with vibrant, waterproof neon-style LED lighting.
- Floating Globe Lights: Place solar-powered or battery-operated floating globe lights in your pool or pond for a whimsical, scattered light effect.
The Perimeter: Boundary Wall & Fence Lighting
Define your property line with style and enhance your home’s overall sense of security.
- Down-Facing Wall Lights: Install fixtures that cast light downwards onto your boundary wall, creating elegant pools of light and shadow.
- Under-Cap Lighting: For a very clean, high-end, and integrated look, install LED strips under the capstones of a stone wall or beneath the top rail of a fence.
- Pillar and Column Lights: If your fence or wall has pillars, mount a light fixture on top of each one to create a grand, stately look.
- Cross-Lighting a Fence: Alternate lights on either side of a fence to create an interesting play of light and shadow, preventing a flat, uniform look.
Part 4: The Practicalities: Planning, Installation, and Cost-Saving
You’re armed with ideas and inspiration, but a great plan also needs to be practical. This section covers the crucial follow-up questions about how to implement your design, stay on budget, and avoid common problems.
Smart & Savvy: 7 Cost-Effective Outdoor Lighting Tips
A beautiful lighting scheme doesn’t have to break the bank. Here are some smart ways to save money without compromising on quality or style.
- Switch to LED. Period. This is the single most important money-saving tip. While LED fixtures might have a slightly higher upfront cost, their long-term savings are enormous. They use up to 80% less energy than old halogen bulbs and can last for 25,000 hours or more, meaning you’ll save a fortune on your electricity bill and won’t be buying replacement bulbs for years.
- Keep Your Fixtures Clean. It sounds simple, but a layer of dirt, dust, or pollen can significantly dim the output of your lights. A quick wipe-down a couple of times a year can restore their brightness, preventing you from thinking you need to buy more powerful (and more expensive) replacements.
- Use a Dimmer Switch. Not just for indoors! Installing a dimmer on your outdoor lighting system gives you incredible control. You can lower the brightness for a soft, ambient mood, which saves energy and further extends the life of your LED bulbs.
- Install Motion Sensors. For security floodlights and lights along less-traveled pathways, motion sensors are a brilliant solution. They ensure the lights are only on when someone is present, providing security on-demand while slashing energy consumption.
- Go Solar (Strategically). For decorative accents and path lighting, modern solar-powered fixtures are an excellent choice. They have zero running costs and are incredibly easy to install since there’s no wiring involved. They may not be powerful enough for primary task or security lighting, but they are perfect for layering in extra glow.
- Use the Correct Wattage and Lumens. Don’t over-light. Use a proper plan (like the ones we discussed earlier) to determine exactly how much light you truly need. Buying fixtures that are far too bright for the space is a waste of money and energy. Also, ensure your bulb’s wattage is appropriate for the fixture to prevent damage.
- Focus on Quality over Quantity. It’s better to have a few high-quality, well-placed fixtures than a dozen cheap, poorly made ones. Good quality fixtures will last longer, perform better, and look more elegant, saving you money on replacements and repairs in the long run.
The 6 Golden Rules of Outdoor Lighting Placement: A Do’s and Don’ts Guide
Placement is everything. Follow these simple rules to ensure your lighting is effective, safe, and considerate.
| Rule | Do This | Don’t Do This |
|---|---|---|
| 1. Direct Your Path Lights | Always ensure your path and step lights are aimed downward. The goal is to illuminate the ground you walk on, creating a safe, clear passage. | Don’t use fixtures that shine light sideways or upwards into the eyes of people using the path. This is known as “glare bomb” and is both uncomfortable and unsafe. |
| 2. Mind Your Neighbors | Be a considerate neighbor. Position and aim your lights so that the beams are contained within your own property. Your light should enhance your home, not annoy others. | Don’t point a bright floodlight or spotlight directly at your neighbor’s windows, doors, or their favorite patio seating area. This is a quick way to start a neighborhood dispute. |
| 3. Avoid Direct Glare at Home | Angle your lights to highlight the features of your home, not to shine directly into it. Use indirect lighting techniques to create a soft, pleasant glow. | Don’t aim powerful lights directly at your own doors or windows. This creates blinding glare from inside and makes it impossible to see what’s happening outside. |
| 4. Conceal the Source | Whenever possible, hide the light fixture itself. The magic of outdoor lighting comes from the beautiful effect of the light, not from staring at a bright, exposed bulb. | Don’t leave the light source visible unless it is an intentionally decorative fixture, like a beautiful lantern or a stylish pendant. For accent lights, the source should be invisible. |
| 5. Secure Your Wiring | For a safe and durable installation, bury all low-voltage wiring according to your local electrical codes (typically in a conduit buried 6 to 18 inches deep). | Never leave wiring exposed on the surface of the ground where it can be a trip hazard, get damaged by a lawnmower, or chewed by animals. |
| 6. Layer Your Lights | Remember the three pillars! Combine your task, accent, and ambient lighting to create a rich, multi-dimensional, and highly functional lighting design. | Don’t rely on a single type of light, like one or two harsh security floodlights, to illuminate your entire property. This creates a flat, uninviting, “prison yard” effect. |
A Critical Note on Safety: Wiring and Weather Ratings (IP Ratings)
This is not the place to cut corners. Outdoor environments are harsh, with rain, snow, heat, and cold. Your lighting fixtures must be specifically designed to handle these conditions.
IP Ratings Explained
Every outdoor light fixture should have an IP (Ingress Protection) rating. This two-digit number tells you how well it’s protected against solids (like dust) and liquids (like water).
- Damp-Rated (e.g., IP44): These fixtures are suitable for covered areas that are protected from direct rainfall but might still experience moisture and condensation. Think of a covered front porch or a gazebo.
- Wet-Rated (e.g., IP65, IP67): This is a must for any fixture that will be exposed to direct rain, snow, or water from sprinklers. This includes most path lights, spotlights, and in-ground well lights.
- Submersible (IP68): This is the highest level of protection and is the only option for lights that will be placed completely underwater, such as in a swimming pool or fountain.
Wiring Safety
While low-voltage lighting systems (typically 12V) are much safer and easier for a confident DIYer to install than line-voltage (120V) systems, safety is still paramount. All wiring should be rated for direct burial and, for best practice, should be run through a protective conduit (either non-metallic PVC or rigid metal) and buried at the depth required by your local electrical code. If you have any doubts, especially with line-voltage installations, always hire a licensed professional electrician.
Conclusion: Your Home’s Nightly Debut Awaits
A brilliant outdoor lighting scheme is a carefully considered blend of art and science. It’s about more than just flipping a switch; it’s about understanding the different types of light, mastering professional techniques, and tailoring a creative vision to your specific home and landscape. It’s a project that brings immense satisfaction every single time you pull into your driveway after dark.
You are now equipped with the knowledge, inspiration, and practical advice to move beyond simple, functional lighting and create a design that truly transforms your property. You have the tools to highlight your home’s best features, dramatically improve its safety and security, and craft that warm, welcoming ambiance you’ve always admired. The power to make your home shine is in your hands.
So, don’t let your beautiful home disappear after sunset. Grab a notepad, take a walk around your property tonight, and start sketching out your ideas. Your home’s stunning nightly debut is just a plan away.
Explore Our Collection of Outdoor Lighting & Start Your Project Today!
Frequently Asked Questions (FAQ)
- Q: How do I start illuminating my front yard?
- A: The best way to start is with a simple nighttime audit. Walk your property after dark and identify three things: 1) Safety-critical zones that are too dark (paths, steps, doorways). 2) The most beautiful features you want to show off (a mature tree, a stone wall). 3) Areas where you want to create a mood (a patio, a seating area). Start by addressing the safety zones first, then add layers of accent and ambient light. One of the easiest first steps is to install solar-powered path lights to instantly improve safety and add a warm glow.
- Q: Does good outdoor lighting really increase home value?
- A: Yes, it absolutely can. Multiple sources in the real estate industry confirm that a well-designed, professionally installed outdoor lighting system significantly increases a property’s curb appeal and perceived value. Some experts estimate it can add up to 20% to the value. It makes a home look more luxurious, secure, and welcoming—all highly desirable features for potential buyers.
- Q: Where should outdoor lights be placed on the front of a house?
- A: Placement is all about purpose. For task lighting, place fixtures right by the front door, on either side of the garage, and along pathways. For accent lighting, place fixtures at the base of architectural columns or trees you want to highlight. For ambient light, install wall sconces or use downlights in the eaves. The most important rules are to avoid pointing lights directly at windows (yours or your neighbor’s) and to ensure light is cast downward on paths and steps to prevent glare.
- Q: What is the best type of light for outdoor use?
- A: LED (Light Emitting Diode) technology is, without a doubt, the best choice for all outdoor lighting applications today. LEDs are incredibly energy-efficient, saving you money on your electricity bill. They have an extremely long lifespan, which drastically reduces maintenance. They are also very durable and resistant to shock and weather, and they come in a vast array of colors, brightness levels, and styles.
- Q: Should I leave my front porch lights on all night?
- A: While leaving lights on all night can certainly enhance security, it’s not always the most efficient or necessary option. A better approach is to use modern controls. You can install a simple timer to have the lights turn on at dusk and off at a set time (like midnight or 1 a.m.). Even better, use a “dusk-to-dawn” photocell sensor, which automatically turns the lights on at sunset and off at sunrise, ensuring light is only used when it’s actually dark outside. For maximum efficiency, a motion sensor will only activate the light when someone approaches.