Imaginez-vous debout devant un chef-d’œuvre. Dans une galerie, les couleurs jaillissent de la toile, chaque coup de pinceau racontant son histoire sous une lueur douce et ciblée. L’air bourdonne de respect. Dans une autre, le même tableau se trouve sous une lumière crue et plate, ses teintes vibrantes atténuées, sa texture perdue. La magie est partie. C'est le pouvoir de l'éclairage des musées. C'est plus qu'une simple illumination ; c'est une forme d'art délicate et scientifique. C’est l’équilibre critique entre la création d’une expérience touristique inoubliable et l’accomplissement du devoir profond de préserver notre patrimoine culturel commun pour les générations à venir.
Ce rôle essentiel repose cependant sur un conflit fondamental. La lumière est le médium même qui nous permet de voir et d’apprécier ces trésors, mais elle est aussi un destructeur silencieux, première cause de dommages irréversibles. Comment surmonter ce paradoxe ? Ce guide est votre carte. Nous explorerons la science derrière la lumière, vous aiderons à choisir la bonne technologie, à concevoir un plan d’éclairage magistral et à maîtriser les principes de conservation. Éclairons le chemin vers une collection parfaitement éclairée et parfaitement conservée.
Partie 1 : Les fondations – Pourquoi l’éclairage des musées est-il si important ?
Un éclairage adéquat du musée atteint deux objectifs monumentaux à la fois : il captive le public tout en préservant les artefacts inestimables exposés. C’est un conservateur invisible qui façonne la perception, l’émotion et même l’intégrité physique de notre histoire. Comprendre son double rôle est la première étape vers une conception d’éclairage réussie.
1.1 Comment l’éclairage façonne-t-il l’expérience du visiteur ?
Dès qu’un visiteur entre dans une galerie, son expérience est sculptée par la lumière. C’est un outil puissant qui transforme une simple visualisation en un voyage mémorable.
- Améliorer la perception visuelle : Un bon éclairage est ce qui donne vie à l’art. Il permet à l’œil humain de percevoir tout le spectre de couleurs souhaité par l’artiste, révélant les subtils changements de ton et les textures complexes du médium. Pensez au tissage délicat d’un textile ancien ou aux coups de pinceau audacieux et empâtés sur une peinture à l’huile. Sans la bonne lumière, ces détails cruciaux sont perdus et l’œuvre d’art n’est pas vraiment visible.
- Créer une atmosphère et une ambiance : L’éclairage est l’architecte de l’atmosphère. Voulez-vous un espace dramatique et ciblé où une seule sculpture retient toute l’attention ? Ou une galerie chaleureuse et accueillante qui encourage les visiteurs à s’attarder et à explorer ? La chaleur, la direction et l’intensité de la lumière créent une ambiance qui peut évoquer des sentiments de crainte, d’intimité ou de curiosité intellectuelle, approfondissant ainsi le lien émotionnel du visiteur avec l’exposition.
- Guider le récit : Chaque exposition raconte une histoire et la lumière en est le narrateur. En utilisant l'interaction de la lumière et de l'ombre, une technique que les artistes appellent clair-obscur-un concepteur d'éclairage peut créer une hiérarchie visuelle. Une lumière vive et focalisée attire le regard sur les pièces clés, établissant des points focaux et guidant les visiteurs à travers le parcours narratif prévu de l'exposition. Il vous indique où chercher et ce qui compte le plus.
- Assurer la sécurité et la navigation : Au-delà de l’art, l’éclairage répond à un objectif pratique fondamental. Un éclairage adéquat dans les entrées, les couloirs et les escaliers garantit la sécurité des visiteurs et une navigation facile. Une entrée bien éclairée n’évite pas seulement les accidents ; cela crée un sentiment d'accueil et d'enthousiasme, donnant un ton positif à l'ensemble de la visite.
1.2 Pourquoi l'éclairage est-il un facteur essentiel dans la conservation des artefacts ?
La même lumière qui nous permet de voir l’art est aussi sa menace la plus persistante. C’est le dilemme du conservateur, et comprendre la science qui le sous-tend n’est pas négociable.
Les dégâts légers sont une voie à sens unique. C’est cumulatif, irréversible et implacable. Notre travail consiste à ralentir ce voyage à un rythme effréné.
- La science des dommages causés par la lumière (dégradation photochimique) : La lumière est énergie. Lorsque cette énergie, en particulier celle du rayonnement ultraviolet (UV) invisible, frappe un artefact, elle peut déclencher des réactions chimiques au sein des molécules du matériau. Ce processus, connu sous le nom de dégradation photochimique, n’est qu’une façon scientifique de dire que la lumière détruit littéralement l’objet au fil du temps.
- Types de dommages : Cette dégradation se manifeste de plusieurs manières. Vous pourriez voir les couleurs vibrantes d’un manuscrit se fondre dans de pâles fantômes d’elles-mêmes. Le papier lui-même peut devenir jaunâtre et cassant, ou les fils d’une robe historique peuvent s’affaiblir et se briser. Ces dégâts ne sont pas seulement cosmétiques ; c’est une perte fondamentale de l’intégrité physique de l’objet.
- Caractère cumulatif et irréversible : Le concept le plus crucial à comprendre est que ces dommages sont à la fois cumulatif et irréversible. Chaque instant d’exposition à la lumière s’ajoute à la « dose » totale de dommages qu’un objet subit au cours de sa durée de vie. C’est comme un budget léger ; une fois dépensé, il disparaît pour toujours. Vous ne pourrez jamais restaurer la couleur qui s’est estompée. L’objectif du restaurateur est donc de gérer ce budget avec le plus grand soin, afin de garantir que l’artefact puisse être vu en toute sécurité pendant des siècles, et non seulement des décennies.
Partie 2 : La science de la lumière – Quelles sont les mesures clés pour l'éclairage des musées ?
Pour contrôler la lumière, il faut d’abord la mesurer. Choisir la bonne source de lumière n’est pas une question de conjecture ; c'est une science basée sur des mesures spécifiques et quantifiables. Comprendre ces termes clés vous permettra de sélectionner un éclairage à la fois beau et sûr pour votre collection.
2.1 Qu'est-ce que l'indice de rendu des couleurs (IRC) et pourquoi est-il crucial ?
L'indice de rendu des couleurs, ou CRI, est un score de 0 à 100 qui vous indique avec quelle précision une source de lumière révèle les vraies couleurs d'un objet. La référence est la lumière naturelle du jour, qui présente un IRC parfait de 100.
Pour un musée, le CRI est tout. Un artiste choisit sa palette avec un soin incroyable, et une source de lumière à faible IRC peut complètement déformer sa vision, rendant un rouge vif terne ou un bleu subtil gris. C’est la différence entre voir un chef-d’œuvre tel que l’artiste l’a prévu et voir une imitation délavée.
L'importance de R9 : le test rouge
Dans la mesure plus large de l'IRC, il existe une valeur spécifique appelée R9, qui mesure dans quelle mesure une lumière restitue une couleur rouge saturée. C’est devenu un « test critique » essentiel pour les lampes LED modernes, car de nombreuses LED standards ont du mal à afficher les rouges avec précision. Étant donné que les tons rouges sont essentiels au rendu de tout, de la peau humaine aux riches grains de bois en passant par d'innombrables pigments historiques, une valeur R9 élevée est essentielle pour un éclairage haute fidélité.
Norme du musée pour la qualité de la lumière : Pour toute application sérieuse dans un musée ou une galerie, l'éclairage doit répondre aux minimums suivants :
- Bonne qualité: IRC ≥ 90 et R9 ≥ 50
- Excellente qualité : IRC ≥ 90 et R9 ≥ 90
Demandez toujours les données CRI et R9 auprès d'un fabricant. S’ils ne peuvent pas le fournir, la lumière n’est probablement pas adaptée à votre collection.
2.2 Qu'est-ce que la température de couleur (CCT) et comment choisir la bonne ?
La température de couleur corrélée (CCT) décrit la « chaleur » ou la « fraîcheur » d'une source de lumière blanche et est mesurée en unités de Kelvin (K). C'est un peu contre-intuitif : un inférieur La valeur Kelvin signifie un plus chaud, une lumière plus jaunâtre, tandis qu'un plus haut la valeur signifie un glacière, lumière plus bleutée.
Le débat chaleureux contre cool
- Lumière chaude (2700K – 3500K) : Cette gamme évoque la sensation des bougies ou des ampoules à incandescence traditionnelles. Il crée une atmosphère chaleureuse, intime et souvent traditionnelle, ce qui en fait un choix populaire pour les objets historiques, les arts décoratifs et les collections d'art classique.
- Lumière neutre à froide (3 500 K – 5 000 K+) : Cette lumière plus claire et plus blanche est souvent utilisée pour les galeries d’art contemporain et les musées scientifiques. Il peut améliorer la clarté visuelle, faire ressortir des détails nets et créer une sensation analytique plus moderne.
Alors que d'anciennes théories suggéraient qu'une lumière chaude était toujours la meilleure solution pour les faibles niveaux de lumière dans les musées, des recherches récentes montrent que les préférences des visiteurs sont plus flexibles. La règle la plus importante est cohérence. Mélanger différentes températures de couleur dans le même espace peut être visuellement choquant, car nos yeux ont besoin de temps pour s'adapter. Un CCT d’environ 3 000 K reste un choix polyvalent sûr et agréable pour de nombreux musées.
2.3 Comment la luminosité est-elle mesurée (lumens & Lux) et quels sont les niveaux recommandés ?
Il est facile de confondre Lumens et Lux, mais la distinction est vitale pour la conservation.
- Lumens (LM): Cela mesure la quantité totale de lumière visible produite par une ampoule ou un luminaire à la source. Considérez-le comme la « puissance » brute de la lumière.
- Lux (LX): Celui-ci mesure la quantité de lumière qui tombe réellement sur une surface. C’est le nombre qui compte pour la conservation car il vous indique la quantité de lumière qu’un artefact reçoit. (Un pied-bougie, une unité impériale plus ancienne, équivaut à environ 11 lux).
La norme de conservation : niveaux de lumière maximaux
Sur la base de décennies de recherche, la communauté de la conservation a établi des directives strictes concernant la quantité maximale de lumière que différents matériaux peuvent tolérer en toute sécurité. Le respect de ces niveaux est l’étape la plus importante pour prévenir les dommages légers.
| Catégorie de sensibilité | Exemples de matériaux | Niveau de Lux maximum recommandé |
|---|---|---|
| Catégorie 1 : Très sensible | Aquarelles, textiles, manuscrits, teintures fugitives, photographies historiques, soie, parchemin | 50 Lux |
| Catégorie 2 : Modérément sensible | Peintures à l'huile et à la détrempe, bois, meubles, cuir non teint, os, ivoire | 150 Lux |
| Catégorie 3 : Les moins sensibles | Métal, pierre, céramique, verre, émail | 300 Lux |
Pour les zones générales telles que les couloirs et les halls d'entrée où aucun objet sensible n'est exposé, les niveaux d'éclairage peuvent être plus élevés, généralement entre 100 et 200 lux pour une navigation confortable.
2.4 Pourquoi les rayonnements UV et IR sont-ils si dangereux ?
- Rayonnement ultraviolet (UV) : Il s’agit de la partie invisible et à haute énergie du spectre lumineux qui constitue le composant le plus dommageable pour les artefacts. C'est le principal moteur de la dégradation photochimique. La norme professionnelle est de maintenir les niveaux d'UV en dessous de 75 microwatts par lumen (μW/lm), mais avec la technologie moderne comme les LED, un niveau de un objectif proche de zéro est à la fois réalisable et constitue le nouvel idéal.
- Rayonnement infrarouge (IR) : C'est simplement de la chaleur rayonnante. Les ampoules traditionnelles comme les halogènes produisent une quantité importante d’IR, qui peuvent littéralement cuire la surface d’un artefact. Cet échauffement localisé provoque le dessèchement, la fragilité et la fissuration des matériaux organiques comme le bois, le papier et la toile avec le temps.
2.5 Qu'est-ce qu'un angle de faisceau et comment contrôle-t-il la mise au point ?
L'angle du faisceau vous indique la largeur ou l'étroitesse du cône de lumière d'un luminaire. La maîtrise des angles de faisceau vous permet de peindre avec la lumière, créant ainsi une concentration et un effet dramatique.
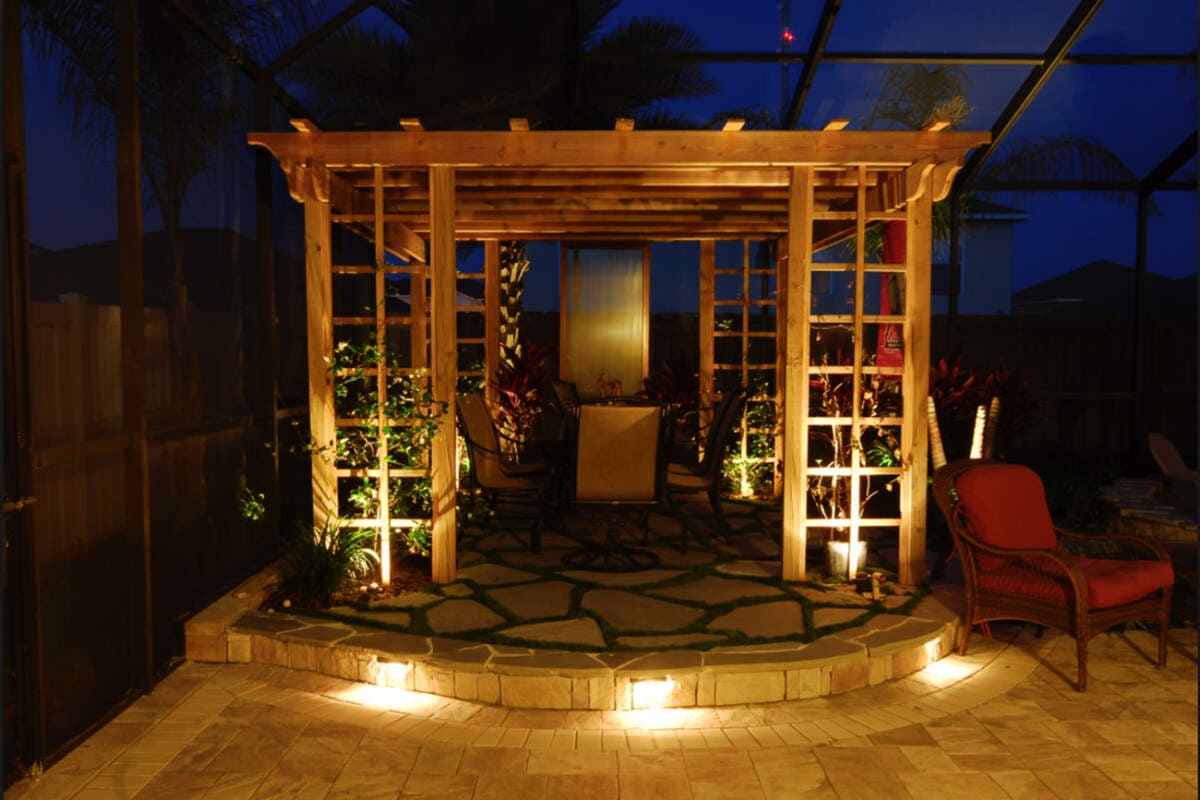
- Faisceaux étroits (projecteurs : 10°-25°) : Ceux-ci créent un cercle de lumière serré et concentré. Ils sont parfaits pour un éclairage d’accentuation : faire ressortir une seule sculpture, mettre en valeur un détail spécifique sur une pièce plus grande ou créer des bassins de lumière spectaculaires dans une pièce sombre.
- Faisceaux larges (projecteurs : >30°) : Ceux-ci fournissent un éclairage large et uniforme. Ils sont utilisés pour l’éclairage d’ambiance général ou pour le « wall washing », où vous souhaitez éclairer uniformément un mur entier de peintures sans créer de points chauds gênants sur chacun d’entre eux.
Partie 3 : Choisir vos outils – Quels sont les meilleurs luminaires et luminaires pour un musée ?
Une fois la science comprise, il est temps de choisir vos outils. La technologie de l’éclairage a considérablement évolué et les musées d’aujourd’hui ont accès à des options plus sûres, plus efficaces et plus polyvalentes que jamais. Le grand gagnant de cette évolution est la LED.
3.1 Quel est le meilleur type d’éclairage pour un musée ? Une comparaison détaillée
Pendant des décennies, les musées ont dû faire des compromis. Ils pourraient avoir un excellent rendu des couleurs avec des ampoules halogènes chaudes et inefficaces, ou ils pourraient avoir une efficacité énergétique avec des lampes fluorescentes de mauvaise qualité. Cette époque de compromis est révolue.
| Technologie | Avantages | Les inconvénients | Risque de conservation |
|---|---|---|---|
| LED (diode électroluminescente) | Haute efficacité, très longue durée de vie, excellent & CRI/CCT réglable, intensité variable, conceptions polyvalentes. | Coût initial plus élevé, la qualité varie considérablement d’un produit à l’autre. | Très faible : UV proche de zéro et IR (chaleur) négligeable. L'option la plus sûre. |
| Halogène / Incandescent | Excellent CRI (~100), lumière chaude et agréable. | Extrêmement inefficace, durée de vie très courte, chauffe très fort. | Très élevé : Émet des niveaux importants de chaleur UV et IR nocive. |
| Fluorescent | Économe en énergie, longue durée de vie. | Mauvais CRI à moins que spécialisé (et coûteux), peut scintiller, contient du mercure. | Haut: Émet des UV importants, nécessitant des filtres. Moins de chaleur que les halogènes mais toujours un risque. |
| HID (décharge à haute intensité) | Très lumineux pour sa taille. | Mauvais rendu des couleurs, durée de vie courte, rendement UV important. | Très élevé : Non recommandé pour toute application muséale à proximité d’artefacts. |
Le verdict est sans appel : pour toute nouvelle installation ou mise à niveau, Les LED sont la référence incontestée en matière d’éclairage de musée, surpassant les technologies plus anciennes sur tous les paramètres importants, de la sécurité de la conservation aux coûts opérationnels.
3.2 Pourquoi les lumières LED sont-elles désormais la référence pour les musées ?
La transition vers l’éclairage LED n’est pas seulement une tendance ; c’est une révolution qui a résolu bon nombre des défis historiques de l’éclairage des musées.
- Profil de conservation supérieur : C’est l’avantage le plus important. Les LED de haute qualité émettent virtuellement pas de rayonnement UV et chaleur infrarouge négligeable. Cela signifie que vous pouvez éclairer des objets en toute sécurité sans les cuire ni les bombarder avec les longueurs d’onde de lumière les plus dommageables. Cela élimine le besoin de filtres UV coûteux et nécessitant beaucoup d’entretien.
- Efficacité énergétique & Économies de coûts à long terme : Les LED sont des merveilles d'efficacité, consommant jusqu'à 75 à 80 % d'énergie en moins qu'une ampoule halogène pour produire la même quantité de lumière. Même si l’investissement initial est plus élevé, les économies sur les factures d’électricité sont substantielles. Combiné à leur longue durée de vie, le retour sur investissement (ROI) en fait le choix le plus solide financièrement à long terme.
- Longévité et entretien réduit : Une LED typique de qualité musée peut durer 50 000 heures ou plus, soit plus d’une décennie d’utilisation dans une galerie typique. Comparez cela à une ampoule halogène qui pourrait durer seulement six mois. Cela réduit considérablement les coûts de main-d'œuvre associés aux remplacements fréquents et, surtout, minimise le nombre de fois où le personnel doit amener les échelles et les équipements à proximité de collections inestimables, réduisant ainsi le risque de dommages accidentels.
- Polyvalence et contrôle inégalés : Les possibilités de conception avec les LED sont presque infinies. Ils sont disponibles dans une vaste gamme de températures de couleur, d’angles de faisceau et de types de luminaires. Leur taille compacte leur permet de s'intégrer dans des vitrines et des espaces restreints. De plus, ils sont intrinsèquement compatibles avec les systèmes de contrôle modernes, permettant une gradation précise et une intégration dans des systèmes d'éclairage intelligents et réactifs.
3.3 Quels sont les appareils d'éclairage couramment utilisés dans les musées et leur fonction ?
Choisir la bonne ampoule ne représente que la moitié de la bataille. Le luminaire, le boîtier qui dirige la lumière, est ce qui transforme une source de lumière en un outil de conception.
- Éclairage sur rail : C’est le cheval de bataille de la galerie moderne pour une bonne raison. Il se compose d'un rail (le rail) qui alimente plusieurs luminaires réglables. Son principal avantage est flexibilité. À mesure que les expositions changent, vous pouvez facilement faire glisser, repositionner et réorienter les lumières sans aucun recâblage. Cela le rend parfait pour les spectacles temporaires et les espaces dynamiques.
- Pleins feux : Ces luminaires produisent un faisceau de lumière étroit et contrôlé conçu dans un seul but : créer un point focal. Les projecteurs sont utilisés comme éclairage d’accentuation pour donner à une sculpture un aspect héroïque, pour attirer l’œil d’un visiteur sur un artefact clé ou pour créer un drame à contraste élevé.
- Lèche-mur : Un lèche-mur est un luminaire spécialisé qui projette une lumière large et uniforme sur une surface verticale. Au lieu de créer des « flaques » de lumière sur chaque tableau, il éclaire uniformément l’ensemble du mur. C'est idéal pour les galeries présentant une série d'œuvres d'art de taille similaire, créant un aspect épuré et cohérent.
- Éclairage encastré : Également connus sous le nom de downlights ou « lampes canettes », ils sont installés à fleur de plafond. Ils offrent une esthétique élégante et minimaliste et sont le plus souvent utilisés pour fournir un éclairage ambiant général dans tout un espace de galerie. Certains modèles, appelés cardans, sont réglables et peuvent fournir un certain degré d’éclairage d’accentuation.
- Lumières d’image : Il s’agit de petits luminaires dédiés qui se montent directement sur le cadre d’une œuvre d’art ou sur le mur juste au-dessus. Ils fournissent un éclairage intime et ciblé pour une seule pièce et sont souvent utilisés dans des galeries de style plus traditionnel ou résidentiel pour ajouter une touche d'élégance.
- Bandes lumineuses LED : Ces bandes flexibles de minuscules LED ont ouvert un monde de possibilités créatives. Ils sont parfaits pour les effets d'éclairage indirects comme l'éclairage en corniche (où ils sont cachés dans un renfoncement pour projeter une douce lueur sur le plafond), pour éclairer uniformément l'intérieur des vitrines sans points chauds, ou pour ajouter des points forts architecturaux à des éléments tels que des escaliers.
- Caissons lumineux : Pour les œuvres d’art transparentes ou translucides, comme les diapositives photographiques ou les vitraux, une lightbox est la solution idéale. Il s’agit d’un luminaire peu profond et fermé qui fournit un rétroéclairage uniforme, faisant briller les couleurs et les détails de l’œuvre d’art de l’intérieur.
Partie 4 : Le plan directeur – Comment concevoir un système d'éclairage de musée ?
Une conception d’éclairage réussie naît d’un plan réfléchi et non d’une sélection aléatoire de luminaires. Le processus commence par la recherche et la collaboration et se construit couche par couche pour créer un environnement cohérent, efficace et magnifique.
4.1 Quelle est la première étape de la création d'un plan d'éclairage ?
Avant même de penser à une ampoule spécifique, la première étape, et la plus critique, consiste à évaluation et collaboration. Un projet d'éclairage qui commence par une liste de courses est voué à l'échec. Le travail de base implique :
- Comprendre la collection et l'espace : Analysez en profondeur les artefacts qui seront affichés. De quoi sont-ils faits ? Dans quelle mesure sont-ils sensibles à la lumière ? Quelles sont les caractéristiques architecturales de la galerie ? Y a-t-il des éléments historiques à considérer ?
- Collaborer avec une équipe : La conception d’éclairage n’est pas un acte solitaire. Cela nécessite une discussion ouverte avec conservateurs (pour comprendre les objectifs narratifs), restaurateurs (pour établir des limites de sécurité strictes), et concepteurs d'expositions (pour intégrer l'éclairage à l'aménagement général). Ma propre expérience, y compris les enseignements tirés de projets menés dans des institutions comme le Fitzwilliam Museum, a montré que cette fondation collaborative est le facteur de succès le plus important.
- Normes et lignes directrices en matière de consultation : Familiarisez-vous avec les normes professionnelles établies, telles que celles de l’Illuminating Engineering Society (IES), et avec la politique d’entretien des collections de votre propre institution. Ces documents fournissent le cadre scientifique et éthique de votre conception.
4.2 Comment créer une disposition d'éclairage en couches ?
Une bonne conception d’éclairage provient rarement d’un seul type de lumière. Au lieu de cela, il est construit en couches, chaque couche remplissant un objectif distinct. Cette stratégie crée une profondeur visuelle, un intérêt et une fonctionnalité.
- Couche 1 : Éclairage ambiant (La Fondation) : C’est la lumière générale et globale qui remplit l’espace. Son objectif est de fournir un niveau de luminosité confortable pour une navigation sûre et de réduire les ombres dures. Il définit l’ambiance de base de la pièce. Ceci est souvent réalisé avec des lumières encastrées, des éclairages sur rail à faisceau large ou un éclairage indirect en corniche.
- Couche 2 : Éclairage d’accentuation (L’étoile) : Il s’agit de la lumière focalisée et directionnelle qui fait le travail le plus important : mettre en valeur l’œuvre d’art. Les lumières d’accentuation créent les points focaux qui guident le regard du visiteur. Le contraste entre la lumière d’accentuation plus brillante d’un objet et la lumière ambiante plus faible qui l’entoure est ce qui crée une excitation visuelle et un drame. C’est le monde des projecteurs et des éclairages sur rail à faisceau étroit.
- Couche 3 : Éclairage décoratif (les bijoux) : Parfois, le luminaire lui-même est une œuvre d’art. L'éclairage décoratif comprend des éléments tels que des lustres, des appliques ou des installations lumineuses conçues sur mesure. Leur objectif principal est esthétique, ajoutant une dernière couche d’intérêt visuel et de caractère à l’espace.
4.3 Devriez-vous utiliser la lumière naturelle ou artificielle ?
Il s’agit d’un débat classique dans la conception de musées. Chaque source présente de puissants avantages et de sérieux inconvénients.
- Lumière naturelle (lumière du jour) :
- Avantages: Il offre un CRI parfait de 100, restituant les couleurs avec une fidélité absolue. Cela crée également une connexion dynamique et agréable avec le monde extérieur.
- Les inconvénients: C’est incroyablement difficile à contrôler ; son intensité et sa couleur changent au fil de la journée et selon la météo. Plus important encore, il est saturé de rayons UV très nocifs.
- Le verdict: La lumière naturelle doit être traitée avec une extrême prudence. Il peut être utilisé pour un éclairage ambiant général, mais doit être fortement contrôlé avec des films filtrant les UV sur toutes les fenêtres, ainsi que sur les stores, les stores ou les volets. La lumière directe du soleil ne doit en aucun cas toucher un artefact sensible à la lumière.
- Lumière artificielle :
- Avantages: Il est contrôlable à 100%. Vous pouvez choisir l’intensité exacte, la température de couleur et la direction dont vous avez besoin pour atteindre les objectifs esthétiques et de conservation. C’est stable et prévisible.
- Les inconvénients: Il peut être de mauvaise qualité s’il n’est pas sélectionné avec soin, entraînant un mauvais rendu des couleurs ou des reflets indésirables.
- Le verdict: La lumière artificielle est l’outil principal et le plus essentiel pour un éclairage d’exposition responsable. Un système bien conçu vous donne tout le contrôle dont vous avez besoin pour créer un environnement magnifique et sûr.
4.4 Pourquoi une conception d'éclairage flexible est-elle essentielle pour un musée moderne ?
Un musée n'est pas un espace statique. Les expositions changent, les collections changent et de nouvelles histoires sont racontées. Un système d’éclairage rigide et fixe constitue un handicap dans cet environnement dynamique.
Un système d’éclairage flexible assure la pérennité de votre galerie. Il permet de s’adapter à n’importe quelle vision curatoriale sans repartir de zéro.
Voici les outils clés pour atteindre la flexibilité :
- Éclairage sur rail : Comme mentionné précédemment, il s'agit de la solution ultime en matière de flexibilité, permettant aux luminaires d'être déplacés et réorientés facilement.
- Zones d'éclairage : Divisez les galeries plus grandes en « zones » plus petites, chacune avec son propre jeu de lumières sur des commandes indépendantes. Cela vous permet de créer simultanément différentes scènes d’éclairage dans différentes parties de la pièce.
- Contrôles intelligents : Les systèmes de contrôle avancés (comme DALI ou les systèmes intelligents sans fil) changent la donne. Ils permettent au personnel de régler la luminosité, la température de couleur et la mise au point à distance via une tablette ou un panneau de commande, éliminant ainsi le besoin d'échelles et de réglages manuels pour chaque petit changement. Cela permet de gagner du temps, de réduire les risques et d'offrir un contrôle créatif inégalé.
Partie 5 : Le dilemme du conservateur – Comment concilier préservation et accès public ?
Chaque décision en matière d’éclairage de musée renvoie à ce conflit central : la nécessité pour les gens de voir la collection versus la nécessité de la protéger de la lumière même qui la rend visible. C’est là que convergent la politique, la science et la stratégie pratique.
5.1 Comment les dégâts légers s’accumulent-ils ? Le budget horaire Lux
Pour gérer les dégâts légers, nous devons d’abord comprendre comment ils sont mesurés. L’exposition totale à la lumière qu’un objet reçoit est un produit à la fois de l’intensité et du temps. Ceci est calculé avec une formule simple mais puissante :
Exposition (en Lux-heures) = Niveau de lumière (en Lux) × Temps (en heures)
Pensez-y comme à un « coup de soleil » pour un artefact. Une courte exposition à une lumière très intense peut causer les mêmes dommages qu’une très longue exposition à une lumière faible. Par exemple:
- 1 heure en plein soleil (100 000 Lux) = 100 000 Lux-heures d'exposition.
- 2 000 heures dans une galerie parfaitement éclairée (50 Lux) = 100 000 Lux-heures d'exposition.
Ce concept donne naissance à l’idée d’un « budget lumière à vie » pour chaque artefact. Le travail d’un restaurateur consiste à dépenser ce budget aussi lentement et judicieusement que possible, afin de garantir que l’objet dure des siècles. Chaque décision d'éclairage, du niveau de lux aux heures d'ouverture de la galerie, constitue un retrait de ce budget limité.
5.2 Quelles sont les normes officielles concernant l'éclairage des musées et la durée des expositions ?
Pour normaliser ce processus, les principales institutions et sociétés d'ingénierie ont publié des lignes directrices formelles. Ce ne sont pas seulement des suggestions ; ils représentent le consensus professionnel sur le soin responsable des collections.
- Normes IESNA : L'Illuminating Engineering Society of North America (IESNA) publie des documents clés tels que IESRP-30 (« Éclairage pour les musées et les galeries d’art »), qui fournit des conseils techniques complets.
- Bulletin technique CCI 36 : Le bulletin de l’Institut canadien de conservation sur les LED est une ressource historique, fournissant des recommandations fondées sur des données probantes sur le choix des LED et les dommages potentiels. C'est l'autorité en matière de transition vers un éclairage moderne.
- Politiques institutionnelles : De nombreux grands musées publient leurs propres directives internes. Les normes du Galerie d'art plus libre du Smithsonian & Galerie Arthur M. Sackler sont une référence pour l'ensemble du domaine.
| Catégorie de matériau (exemples) | Niveau de lumière maximum | Durée maximale de l'exposition (ligne directrice du Smithsonian) |
|---|---|---|
| A : Extrêmement fugitif (Pigments fugitifs & colorants, papier/soie dégradés, premières gravures sur bois) | 50 Lux | 3 mois sur une période de 5 ans |
| B : sensible (Aquarelles, textiles, pastels, laques) | 50 Lux | 6 mois sur une période de 5 ans |
| C : Modérément stable (Peintures à l'encre stable, dessins au crayon, cuir teint) | 50-100 Lux | 12 mois sur une période de 5 ans |
| E : Stable à la lumière (Peintures à l'huile, pierre, métaux, verre, céramique) | Jusqu'à 300 Lux | Illimité (dans les limites des lux) |
5.3 Quelles stratégies pratiques peuvent minimiser les dommages causés par la lumière ?
Armé de ces normes, vous pouvez mettre en œuvre une stratégie à multiples facettes pour protéger votre collection.
- Limiter le temps d'exposition : C’est la stratégie la plus simple et la plus efficace. Éteignez toujours les lumières dans les galeries lorsque le musée est fermé au public. Chaque heure d'obscurité prolonge la vie d'un artefact.
- Utilisez les commandes intelligentes : Implémentez des gradateurs et des capteurs de mouvement. Cela garantit qu'un objet n'est entièrement éclairé que lorsqu'un visiteur se tient devant lui, réduisant ainsi considérablement son exposition totale en lux-heures au cours d'une journée.
- Rotation des collections : Pour tout objet sensible à la lumière, un planning de rotation strict est obligatoire. Après le temps d'exposition imparti (par exemple 3 mois), l'objet doit être remis dans l'obscurité totale pour se « reposer » et arrêter l'accumulation de dommages.
- Utilisez des fac-similés pour les éléments « non exposables » : Certains éléments, comme les copies originales des documents nationaux fondateurs ou des manuscrits extrêmement fragiles, sont trop sensibles pour être exposés à la lumière. Dans ces cas-là, un fac-similé de haute qualité (une réplique précise) est affiché, tandis que l'original reste dans une chambre forte sombre et climatisée.
- Établir une routine de surveillance : Vous ne pouvez pas gérer ce que vous ne mesurez pas. Un programme de surveillance solide est essentiel. Cela comprend :
- Effectuer régulièrement des lectures ponctuelles avec un luxmètre pour garantir que les niveaux de lumière sont corrects.
- En utilisant enregistreurs de données pour suivre la lumière, la température et l’humidité au fil du temps.
- Placement cartes standard en laine bleue (qui s'estompent à un rythme connu) à l'intérieur des vitrines pour vérifier visuellement la dose totale de lumière.
- Tenir un enregistrement permanent de l'exposition à la lumière pour chaque objet dans votre logiciel de gestion de collections.
Partie 6 : De la théorie à la pratique – Un guide étape par étape pour sélectionner les LED des musées
Vous avez fait des recherches et élaboré un plan. Il est maintenant temps de choisir le matériel proprement dit. La sélection de la bonne lampe LED nécessite une approche méthodique pour garantir que vous obtenez la qualité que vous avez spécifiée. Cette liste de contrôle, basée sur les meilleures pratiques des principaux organismes scientifiques de conservation, vous guidera tout au long du processus.
Phase 1 : Recherche et spécifications préalables à l'achat
- Définissez vos besoins : Avant de magasiner, sachez ce que vous recherchez. Pour chaque application, spécifiez le CCT requis (par exemple, 3 000 K), l'angle du faisceau (par exemple, 25°) et le flux lumineux approximatif nécessaire pour atteindre votre niveau de lux cible.
- Fixez des critères de qualité stricts : Ceci est votre liste de contrôle non négociable. Votre cahier des charges envoyé aux fournisseurs doit préciser : IRC ≥ 90 et R9 ≥ 50 (ou R9 ≥ 90 pour les applications critiques). Ne faites aucun compromis sur ces chiffres.
- Recherchez des fournisseurs réputés : Recherchez des fabricants ayant fait leurs preuves dans la fourniture de musées, de galeries et de commerces de détail haut de gamme. Ces entreprises comprennent le besoin de qualité et peuvent fournir les données techniques nécessaires, telles que les rapports IES LM-79, qui certifient les performances d'une lampe.
- Exigez une garantie écrite : Une bonne garantie est le signe d’un fabricant confiant. Demandez une garantie d'au moins 3 à 5 ans qui couvre non seulement les pannes catastrophiques, mais également les mesures de performance telles que la dépréciation significative du flux lumineux (gradation) et le changement de couleur au fil du temps.
Phase 2 : Évaluation in situ des lampes d'essai
N’achetez jamais des centaines de lampes sur la seule base d’une fiche technique. Les tests dans le monde réel sont essentiels.
- Achetez quelques échantillons : Commandez un petit nombre de lampes d’essai auprès de vos deux ou trois principaux fournisseurs potentiels.
- Test dans l'espace réel : Installez les lampes dans une maquette de galerie ou dans une petite partie de l'espace d'exposition réel. Vivez avec eux pendant au moins une semaine pour vérifier tout problème de surchauffe ou de performances.
- Effectuer une évaluation visuelle approfondie : Il s'agit d'un travail d'équipe impliquant des conservateurs, des designers et des restaurateurs.
- Regardez l'œuvre : Les couleurs sont-elles vives et précises ? La lumière révèle-t-elle efficacement la texture ?
- Regardez le faisceau lumineux : Projetez la lumière sur un mur blanc et vierge. Le bord de la poutre est-il mou ou dur ? La couleur est-elle uniforme sur tout le faisceau ou y a-t-il des franges jaunes ou bleues ?
- Regardez le luminaire : Lorsque vous traversez l’espace, la lampe elle-même crée-t-elle un éblouissement inconfortable sous différents angles de vue ?
- Testez les contrôles : Si vous prévoyez d'utiliser des gradateurs, testez-les sur toute la gamme. Vérifiez tout scintillement ou bourdonnement perceptible.
Phase 3 : L'achat final et l'installation
- Analyser le retour sur investissement (ROI) : À l’aide des données de consommation d’énergie de la fiche technique, calculez vos économies à long terme en électricité et en maintenance. Cela permet de justifier l’investissement initial auprès des parties prenantes.
- Passez votre commande : En toute confiance grâce à vos tests in situ, passez la commande groupée auprès du fournisseur dont le produit a le mieux fonctionné.
- Documentez tout : Une fois installé, créez un enregistrement complet. Notez la marque, le modèle, les spécifications et la date d’installation des nouvelles lampes. Ces informations sont inestimables pour les futurs audits d’éclairage, les calendriers de maintenance et la mise à jour de la politique d’éclairage de votre institution.
Conclusion
L’éclairage des musées a connu une profonde transformation. Les LED modernes et de haute qualité ont résolu de nombreux conflits séculaires entre l'affichage et la préservation. Il est désormais tout à fait possible de créer des expositions visuellement époustouflantes et à résonance émotionnelle tout en respectant les normes les plus élevées en matière de sécurité de conservation. Nous pouvons baigner nos collections dans une belle lumière, à la fois douce et protectrice.
Le chemin vers un éclairage parfait n’est pas celui du hasard, mais celui du choix. Il s'agit d'une fusion d'art et de science, nécessitant une collaboration, une planification méticuleuse et un engagement inébranlable envers la qualité. En adoptant une approche méthodique et fondée sur des preuves, vous pouvez honorer l’intention originale de l’artiste, captiver chaque visiteur qui franchit vos portes et remplir votre devoir le plus sacré : garantir la survie de nos trésors culturels communs pour inspirer et éduquer pour les siècles à venir.
Foire aux questions (FAQ)
1. Quelle est la meilleure température de couleur pour une galerie d’art ?
Une température de couleur (CCT) comprise entre 3000K et 3500K est généralement recommandé car il offre un rendu des couleurs précis avec une atmosphère agréable et légèrement chaleureuse. Cependant, le choix final dépend de l’art spécifique exposé et de l’ambiance souhaitée ; l'art contemporain peut bénéficier d'un CCT plus froid (jusqu'à 4 000K ou 5 000K).
2. Quel IRC est nécessaire pour l'éclairage des musées ?
Un minimum Indice de rendu des couleurs (IRC) de 90 est la norme professionnelle pour l’éclairage des musées. Pour les applications les plus critiques, vous devez également rechercher un Valeur R9 (pour le rendu rouge) de 90 ou plus pour garantir que toutes les couleurs, en particulier les tons chair et les tons terre, semblent naturelles et éclatantes.
3. Les lumières LED sont-elles mauvaises pour les œuvres d’art ?
Non, bien au contraire. Les LED de haute qualité de qualité musée sont la forme d'éclairage la plus sûre disponible pour les œuvres d'art. En effet, ils n’émettent pratiquement aucun rayonnement ultraviolet (UV) nocif et une chaleur infrarouge (IR) négligeable. Le mythe selon lequel les LED sont nocives vient de produits précoces ou de mauvaise qualité. Une sélection appropriée basée sur les spécifications techniques est essentielle.
4. Comment éviter l’éblouissement sur les peintures ?
Pour éviter les éblouissements et les reflets gênants, positionnez vos lumières de manière à ce qu'elles frappent l'œuvre d'art à un endroit précis. Angle de 30 à 45 degrés. Utilisez des luminaires dotés d’un bon blindage, tels que des déflecteurs profonds, des snoots ou des persiennes en nid d’abeille. De plus, l’utilisation d’une lampe avec une lentille dépolie ou diffuse peut aider à adoucir la lumière et à réduire les reflets spéculaires.
5. Quel est le niveau de lux maximum pour les artefacts sensibles ?
Pour les matériaux très sensibles à la lumière tels que les aquarelles, les textiles historiques, les manuscrits et les teintures fugitives, le niveau de lumière maximum recommandé est de 50 lux. Le respect de cette limite stricte est l’une des mesures les plus importantes pour une conservation à long terme.